Como transferir e sincronizar fotos do iPhone para o iPad
![]() Clara Prescott publicado em 19 de dezembro de 2025Transferir dadosLeitura de 3 minutos
Clara Prescott publicado em 19 de dezembro de 2025Transferir dadosLeitura de 3 minutos
Existem alguns motivos pelos quais você precisa Transferir fotos do iPhone para o iPadSe você possui um iPhone e um iPad, pode querer visualizar suas fotos nos dois dispositivos. Às vezes, você precisa compartilhar fotos com familiares ou amigos que usam dispositivos iOS. A boa notícia é que existem vários métodos para fazer isso. Além disso, você pode aprender métodos comprovados neste guia completo.

Neste artigo:
- Parte 1: Como sincronizar fotos do iPhone para o iPad usando o iPhone Transfer
- Parte 2: Como transferir fotos do iPhone para o iPad via AirDrop
- Parte 3: Como transferir fotos do iPhone para o iPad por meio de álbuns compartilhados
- Parte 4: Como transferir fotos do iPhone para o iPad automaticamente via iCloud
- Parte 5: Como transferir fotos do iPhone para o iPad usando o iTunes
Parte 1: Como sincronizar fotos do iPhone para o iPad usando o iPhone Transfer
Se você quiser transferir fotos específicas do iPhone para o iPad, Transferência do iPhone imyPass É a melhor opção. Permite sincronizar diversos tipos de dados entre dispositivos iOS diretamente. Além disso, permite visualizar as fotos antes da sincronização.

Mais de 4.000.000 de downloads
Envie fotos diretamente entre o iPhone e o iPad.
Pré-visualização de fotos para transferência seletiva.
Oferecer múltiplos modos de visualização.
Compatível com fotos do rolo da câmera e fotos de aplicativos.
Compatível com os modelos mais recentes de iPhone e iPad.
Como transferir fotos diretamente do iPhone para o iPad
Conecte seu iPhone ao iPad
Inicie o melhor software de transferência de fotos assim que o instalar no seu computador. Ele está disponível para Windows 11/10/8/7 e macOS 10.12 ou superior. Conecte seu iPhone e iPad ao computador com cabos Lightning. O software os detectará imediatamente.
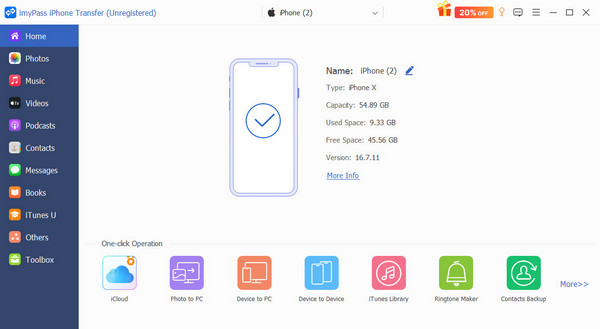
Fotos de pré-visualização
Selecione o dispositivo de origem na opção superior. Acesse o Fotos guia na barra lateral e pré-visualização de fotos em Biblioteca ou álbuns específicos.
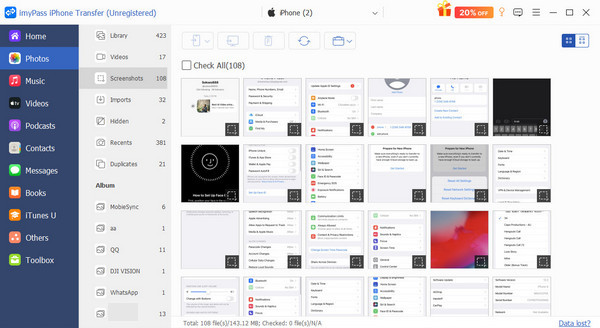
Sincronize fotos entre iPhone e iPad.
Selecione as fotos que deseja sincronizar. Clique em Telefone Clique no botão na faixa superior e selecione o dispositivo de destino. Quando terminar, as novas fotos serão mescladas com as fotos existentes. Por fim, desconecte o iPhone e o iPad.
Parte 2: Como transferir fotos do iPhone para o iPad via AirDrop
O AirDrop é uma maneira simples de enviar fotos de um iPhone para um iPad sem fio. É a conexão sem fio integrada entre dispositivos Apple, o que significa que você também pode Use o AirDrop no MacEle permite sincronizar algumas fotos entre um iPhone e um iPad em tempo real.
Entre no Centro de Controle em um dispositivo iOS.
Ative o Wi-Fi e o Bluetooth. Você não precisa se conectar a uma rede Wi-Fi física.
Pressione e segure o botão de configurações de rede e toque em AirDrop.
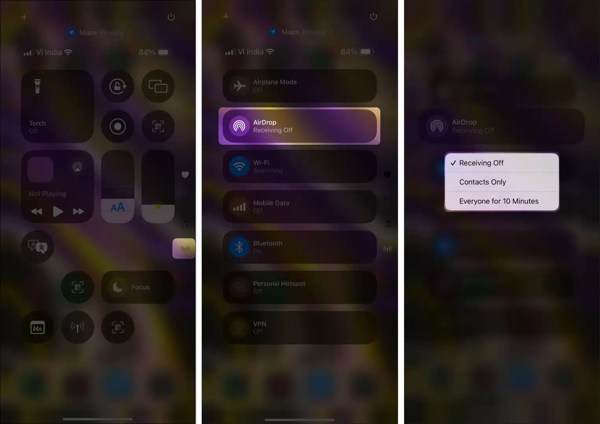
A seguir, escolha Todos por 10 minutos.
Repita os passos acima para configurar o AirDrop no outro dispositivo.
Execute o aplicativo Fotos no dispositivo de origem.
Selecione uma ou mais fotos que deseja compartilhar e toque em Compartilhar botão.
Escolher AirDrop e selecione o dispositivo de destino.
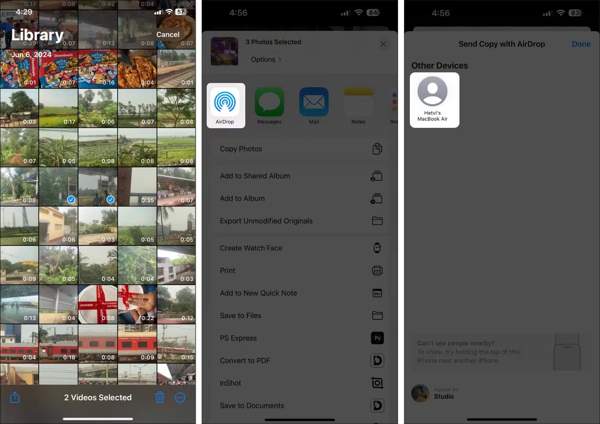
Assim que receber a notificação no dispositivo de destino, toque em Aceitar para começar a transferir fotos do iPhone para o iPad.
Parte 3: Como transferir fotos do iPhone para o iPad por meio de álbuns compartilhados
Os Álbuns Compartilhados são um recurso integrado em iPhones e iPads. Como o nome indica, eles permitem compartilhar fotos do seu iPhone para o seu iPad. Esse método permite compartilhar até 50.000 fotos e vídeos, com um tamanho máximo de 1 GB.
Abra o aplicativo Ajustes no seu iPhone.
Toque no seu perfil e escolha iCloud.
Imprensa Fotos e ligue Álbuns Compartilhados.
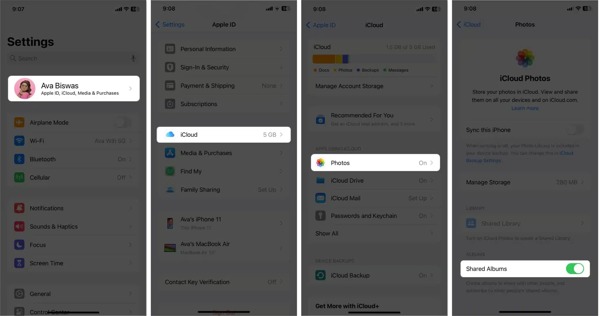
Em seguida, execute o Fotos aplicativo e acesse Álbuns.
Toque em Adicionar botão, escolha Novo álbum compartilhadoDigite um nome e pressione Próximo.
Digite o número de contato do destinatário e pressione Criar.
Em seguida, entre no Biblioteca álbum e mova as fotos desejadas para o novo álbum compartilhado.
Quando o dispositivo do destinatário receber o convite, execute o aplicativo Fotos.
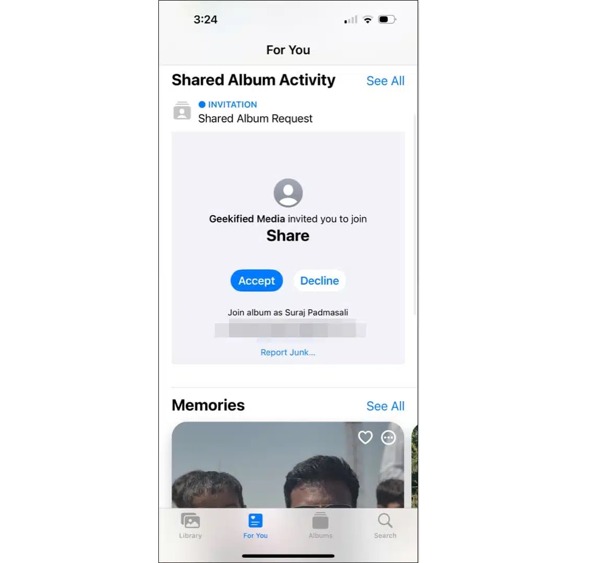
Vamos para Para você, escolher Atividade de álbum compartilhadoe toque em Aceitar.
Parte 4: Como transferir fotos do iPhone para o iPad automaticamente via iCloud
Se você deseja transferir fotos do iPhone para o iPad automaticamente, o iCloud é uma opção simples. Você pode iniciar sessão com a mesma conta do iCloud nos dois dispositivos. Depois que as fotos forem sincronizadas com o iCloud, você poderá acessá-las tanto no iPhone quanto no iPad.
Certifique-se de iniciar sessão com o mesmo ID Apple tanto no iPhone quanto no iPad.
Execute o Definições Instale o aplicativo no seu iPhone e conecte-se a uma rede Wi-Fi.
Toque no seu perfil e selecione iCloud.
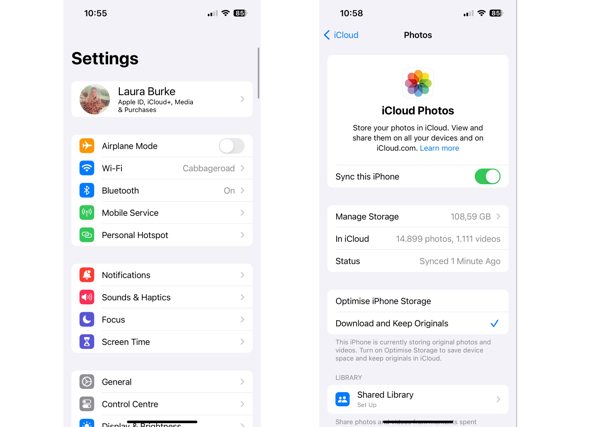
Toque Fotose ative Sincronizar este iPhone na tela do iCloud Fotos.
Em seguida, ligue seu iPad e acesse Definiçõese toque no perfil.
Navegar para iCloud e Fotos.
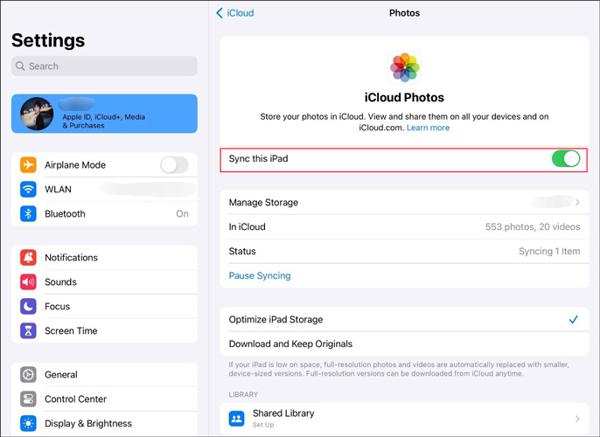
Selecionar Baixe e mantenha os originaise habilitar Sincronizar este iPadEntão, seu iPad irá baixar fotos do iCloud automaticamente.
Parte 5: Como transferir fotos do iPhone para o iPad usando o iTunes
Se você não conseguir sincronizar fotos de um iPhone para um iPad sem fio, o iTunes pode ser útil. Você pode transferir fotos do iPhone para o iPad usando um computador e um cabo USB. Este método requer a versão mais recente do iTunes ou do Finder.
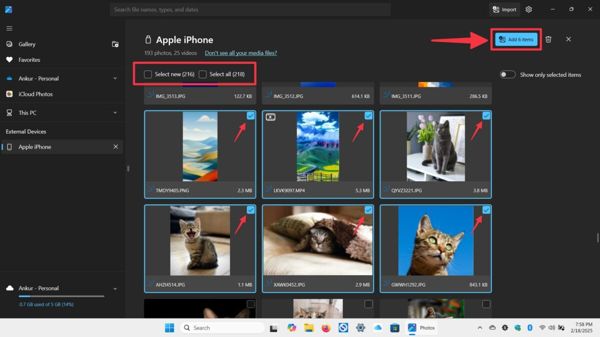
Conecte seu iPhone ao seu PC com um cabo USB.
Abra o aplicativo MS Fotos no seu computador.
Clique no Importar botão e selecione Apple iPhone em Dispositivos conectados.
Selecione as fotos desejadas e clique. Adicionar N itens.
Em seguida, escolha uma pasta de destino.
Desconecte seu iPhone e conecte seu iPad ao computador.
Abra o iTunes e clique em Dispositivo botão.
Vou ao Fotos aba abaixo Definições.
Verificar Sincronizar fotose selecione a pasta de localização em Copiar fotos de opção.
Clique no Aplicar botão na parte inferior.
Conclusão
Agora, você deve aprender vários métodos para Sincronizar fotos do iPhone para o iPadVocê pode migrar fotos entre dispositivos iOS sem fio usando Álbuns Compartilhados, AirDrop e iCloud. Além disso, o iTunes permite transferir fotos entre um iPhone e um iPad. Transferência do iPhone imyPass É a melhor opção para sincronizar arquivos diretamente entre dispositivos iOS. Além disso, a interface intuitiva é fácil de usar até para usuários comuns.

Clara é editora do imyPass. Ela é especialista em recuperação de dados. Você pode encontrar tutoriais e soluções profissionais para recuperar dados perdidos de qualquer dispositivo. Muitos usuários relataram que este tutorial é fácil e útil.
Soluções quentes
-
Transferir dados
-
Recuperar dados
-
Desbloquear iOS
-
Dicas para iOS
