What You Should Do If Your iPhone Won't Send Pictures
![]() Clara Prescott Published on December 29, 2025Transfer Data3-min reading
Clara Prescott Published on December 29, 2025Transfer Data3-min reading
"I have an iPhone 13 mini, and recently have not been sending pictures on my iPhone. How can I fix this problem?" That is a common problem and can occur when you back up photos from an iPhone to a computer or set up a new iPhone from an old device. If you encounter the same problem, don't panic since you can resolve it quickly. This article shares multiple solutions to help you send iPhone photos normally.

In this article:
Part 1: Why Can't I Send Pictures on My iPhone
There are many factors why my iPhone won't send photos or receive pictures with friends and family. Before moving on to the potential solutions, you'd better learn the common reasons behind this issue:
- 1. Poor or unstable internet connection.
- 2. Insufficient storage space in iCloud or the target device.
- 3. Improper or conflict settings.
- 4. Software glitches.
Part 2: How to Fix iPhone Won't Send Pictures
Solution 1: Enable iMessage
If photos won't send in iMessage on your iPhone, you should check the iMessage settings. Disabling iMessage accidentally can lead to the problem. Therefore, make sure to turn on iMessage on your device.

Go to the Settings app.
Choose the Apps tab, and pick Messages.
Find iMessage and toggle on the switch.
Note:
If iMessage is already enabled, toggle it off, and then turn it back on.
Solution 2: Enable MMS for Messages
If photos won't send in messages on your iPhone, you should turn on MMS Messaging. You cannot add photos in a standard text message. Alternatively, you have to send and receive photos in MMS.
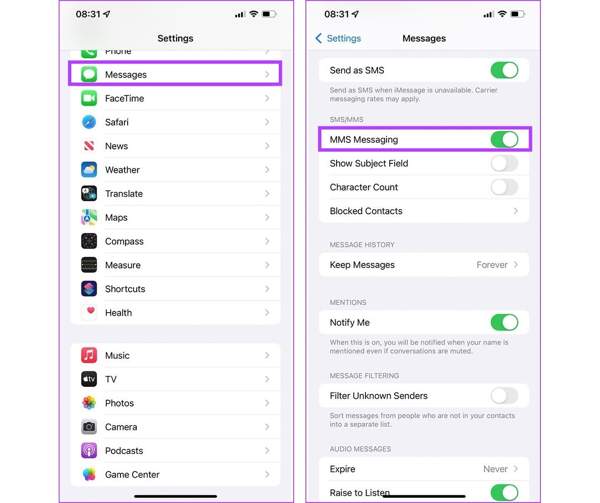
Run your Settings app.
Go to the Messages tab.
Scroll down and toggle on MMS Messaging.
Note:
If you can't see the MMS Messaging option, your carrier may not support it.
Solution 3: Check Network Connection
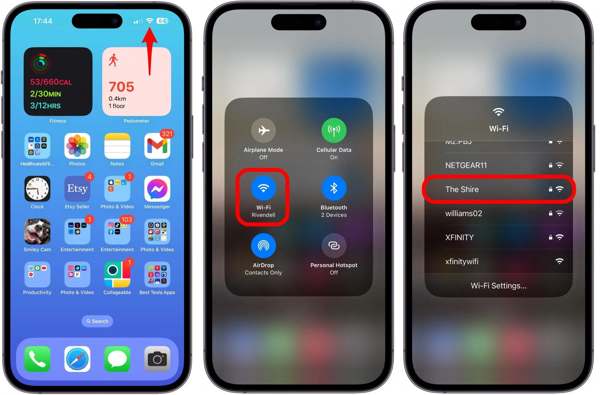
In most cases, pictures won't send on iPhone due to the poor internet connection, especially when photos don't send through iMessage, WhatsApp, iCloud, and more. Check your network signal at the top of your screen. If the current network is poor, go to your Control Center and turn on Cellular Data or vice versa.
Solution 4: Check File Size
By default, photos taken on an iPhone will be saved as HEIC. If you change your photo format to JPG or Most Compatible, the photo file size is larger. That may lead to pictures not being sent on an iPhone.
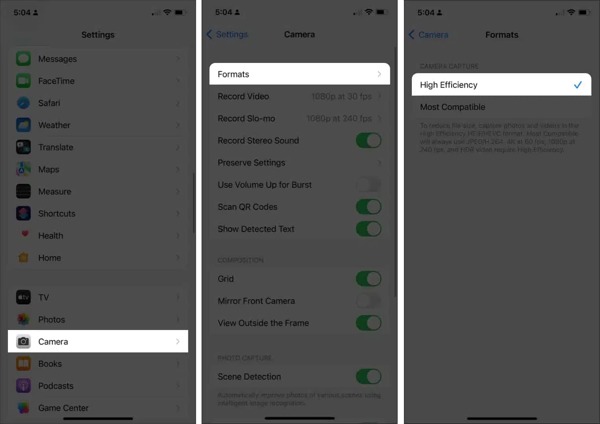
Go to your Settings app.
Choose the Camera option and pick Formats.
Switch to High Efficiency.
Now, take photos and send them.
Note:
After the operation, your camera photos will have smaller size. When you download iCloud photos, it will also in JPG format.
Solution 5: Restart iPhone
Why didn't all my photos transfer to my new iPhone? The reasons may be complicated. However, the solution may be simple: restarting your iPhone. While it is simple, restarting the iPhone can fix basic software glitches.
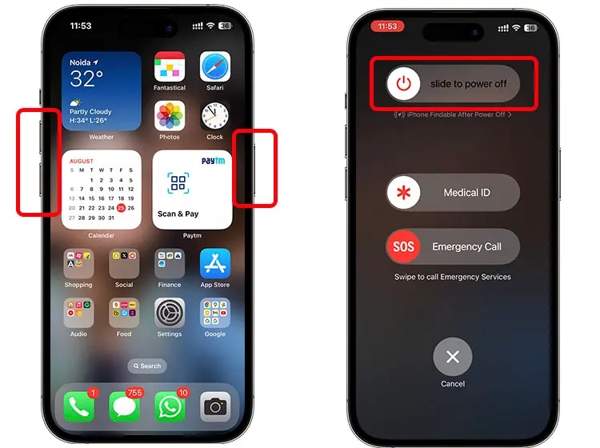
For iPhone X and above
Hold either Volume button and the Side button together.
When the power-off screen appears, release the buttons.
Move the slider to the right side to shut down your device.
Then, hold the Side button until you see the Apple logo.
For iPhone 8 and earlier
Long-press the Side, Top, or Sleep/Wake button to trigger the power-off screen.
Move the slider to power off your device.
30 seconds later, hold the Side, Top, or Sleep/Wake button until the Apple logo appears.
Solution 6: Reset Network Settings
If you have tried both Wi-Fi and cellular data but your iPhone still won't send photos, you'd better reset the network settings on your device. This problem may be due to the conflict network settings.

Run your Settings app.
Go to General, Transfer or Reset iPhone, and Reset.
Choose Reset Network Settings.
If prompted, enter your iPhone passcode.
Then, pick Reset Network Settings on the pop-up.
Note:
Generally, you just need to reset network settings. You don't need to erase all content and settings, or your iPhone will be factory reset.
Solution 7: Update Software
Another solution is keeping your iOS up to date. Outdated software can lead to a variety of problems, including pictures not sending on an iPhone. After connecting to the internet, update your iPhone:
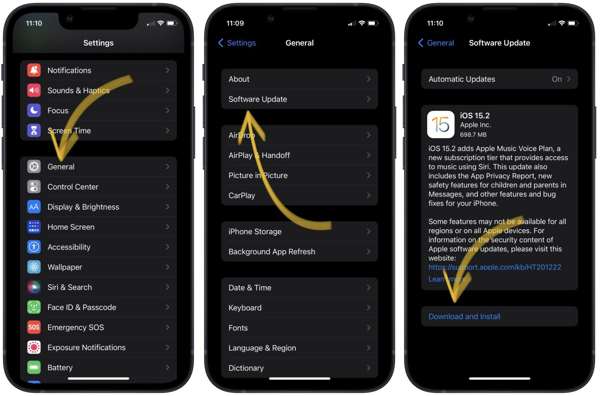
Go to General in your Settings app.
Tap Software Update to search for updates.
If an update is available, tap Download and Install.
Follow the onscreen instructions to update your iPhone.
Then, send photos again.
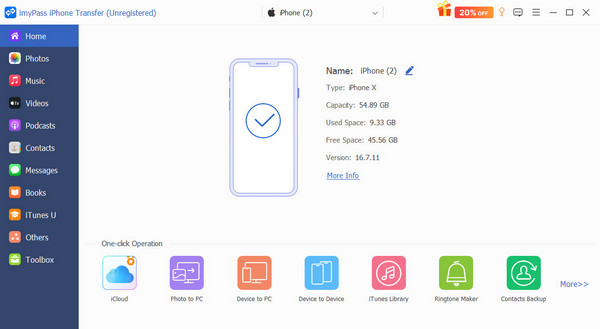
Part 3: One-stop Solution to Send iPhone Pictures
If the common solutions above are unavailable, imyPass iPhone Transfer is worth trying. It allows you to send iPhone pictures to another iOS device, PC, a Mac, or an Android phone quickly. Moreover, it protects photo quality during the process.

4,000,000+ Downloads
Send photos from iPhone to any other device.
Work through a physical connection quickly.
Preview iPhone photos before sending.
Support the latest versions of iOS and iPadOS.
How to Send Pictures on iPhone Quickly
Link your iPhone and computer
Launch the best photo transfer software for iPhone after installing it on your computer. Link your iPhone to a computer with a Lightning cable. Follow the onscreen prompts to authorize the connection.
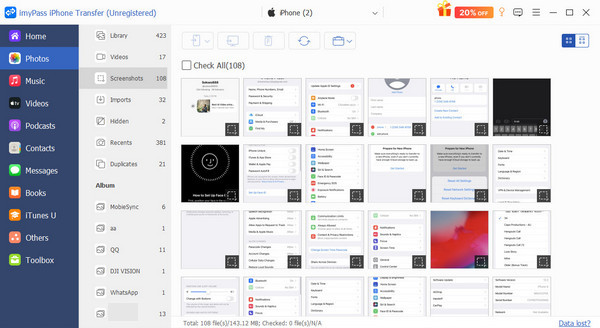
Preview iPhone photos
After scanning, go to the Photos tab and view photos on your iPhone by album. You can view the thumbnails or open a photo to view details.
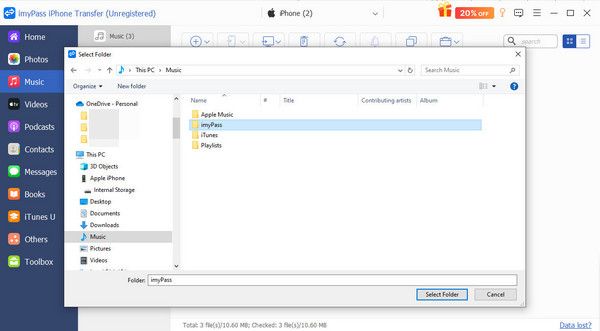
Send iPhone photos
Check the photos you want to send, click the PC button, and choose Export to PC.
If you want to send photos on iPhone to another iPhone, connect another device to your computer with a compatible cable. Click the Phone button, and choose the target device.
Conclusion
This article explained why I can't send pictures on my iPhone. More importantly, you can learn multiple effective solutions to fix this problem quickly. Perform common solutions one by one to send your photos. If the problem persists, imyPass iPhone Transfer can help you send photos from your iPhone to another device, including a PC, Mac, another iOS device, or an Android phone. Plus, the built-in advanced technology can protect your photo quality.

Clara is an editor from imyPass. She specializes in data recovery. You can find professional tutorials and solutions for recovering lost data from any device. Many users reported that his tutorial is easy and useful.
Hot Solutions
-
Transfer Data
-
Recover Data
-
Unlock iOS
-
iOS Tips
