How to Transfer Photos from Your iPhone to Flash Drive
![]() Clara Prescott Published on December 29, 2025Transfer Data3-min reading
Clara Prescott Published on December 29, 2025Transfer Data3-min reading
While Apple continues to expand iPhone storage, it fills up fast with high-quality photos, videos, and other app data. It is a good idea to transfer photos from your iPhone to a flash drive before freeing up space on your device. Flash drives offer an excellent solution: portable, private, and easy to use. Another good news is that multiple methods are available with a USB cable or an internet connection. We demonstrate the concrete tutorial below.

In this article:
Part 1: The Easiest Way to Transfer Photos from iPhone to Flash Drive
The fastest way to export photos from an iPhone to a flash drive is imyPass iPhone Transfer. It allows you to move all your photos to a flash drive directly. Moreover, the intuitive interface simplifies the workflow. That makes it a good option for ordinary people.

4,000,000+ Downloads
Import photos from iPhone to a flash drive quickly.
Work through a physical connection.
Preview iPhone photos for selective transferring.
Support all photo formats, like HEIF, JPG, PNG, GIF, etc.
Compatible with the latest models of iPhone and iPad.
How to Move Pictures from iPhone to Flash Drive
Connect to your iPhone
Launch the best photo transfer software for iPhone once you install it on your computer. It is available on Windows 11/10/8/7 and Mac OS X 10.12 or above. Connect your iPhone into your computer with a Lightning cable. Insert a flash drive with enough space into your machine, too.
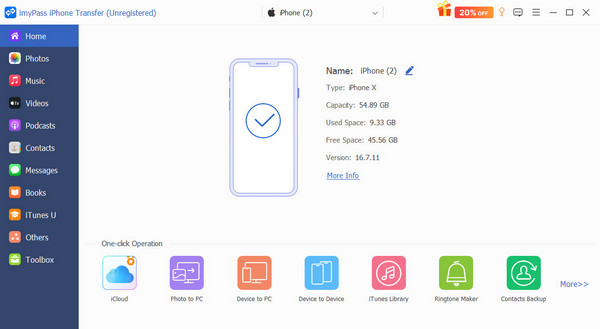
Preview iPhone photos
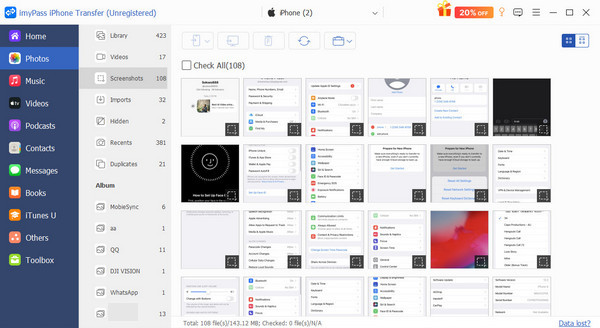
After data scanning, go to the Photos tab on the sidebar. Then, you can view all photos on your iPhone by album.
Move pictures from iPhone to flash drive
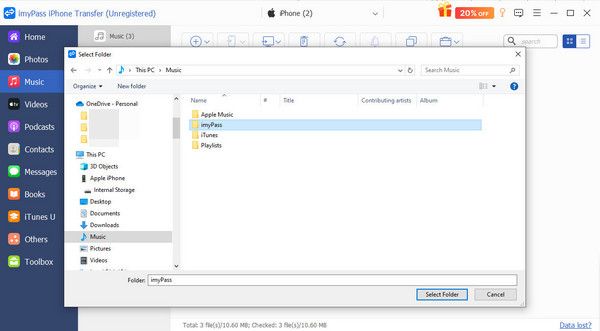
Select the photos you want to back up, click the PC button on the top ribbon, and choose Export to PC. Navigate to the flash drive in the File Explorer, and confirm photo migration.
Note:
To import photos to a flash drive from an iPhone, click the Add button on the top ribbon, find and select the photos on the drive, and import them. You can also transfer photos from iPhone to iPhone when you connect another iPhone to your computer.
Part 2: How to Export Photos from iPhone to Flash Drive Directly
While you can sync photos from an iPhone to another Apple device, an external drive connected to your iPhone won’t show up in the Photos app. Alternatively, the Files app can detect your flash drive. It allows you to copy iPhone photos to a flash drive quickly.
Run your Photos app, and go to the Library album.
Tap Select and press each photo you want to move.
Tap the Share button and choose Save to Files.
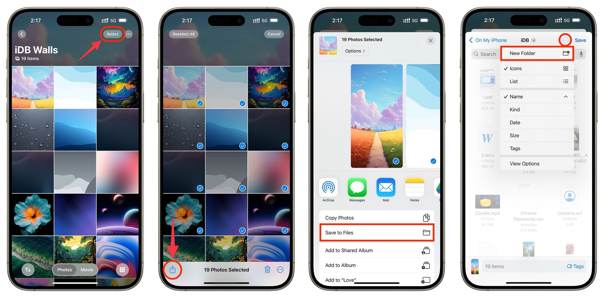
Press the More button in the On My iPhone or On My iPad section.
Choose New Folder, and tap Save to move selected photos to the new folder.
Connect your flash drive or memory stick to your iOS device.
Open the Files app on your device.
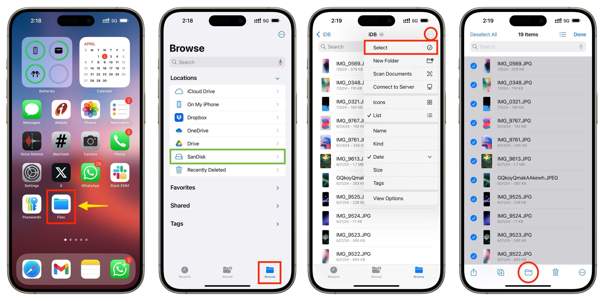
Go to the Browse tab and find the flash drive under the Locations area.
Next, navigate to the new folder, tap the More button with a three-dot icon, and choose Select.
Tap Select All, and hit the Folder button at the bottom.
Then, select the flash drive under the Locations area.
Finally, tap the Copy button to save iPhone photos to a flash drive.
Part 3: How to Copy Photos from iPhone to Flash Drive from iCloud
iCloud allows you to sync photos on iPhone or iPad across all your Apple devices. It enables you to transfer pictures from your iPhone to a memory stick through a stable Wi-Fi network. This method requires a PC or Mac.
How to Sync Photos on iPhone to iCloud
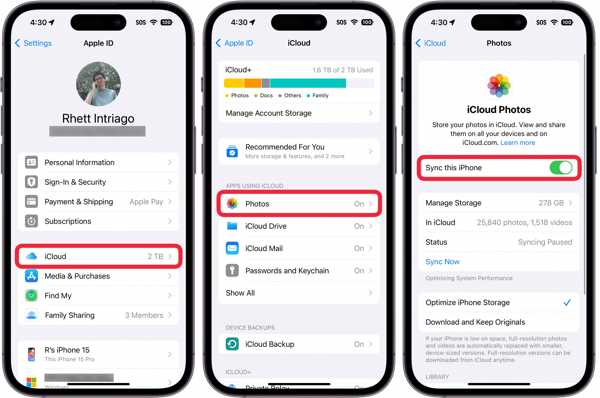
Run the Settings app on your iPhone.
Connect to a Wi-Fi network.
Tap on your profile and choose iCloud.
Tap Photos, and toggle on Sync this iPhone.
When prompted, choose Remove from iPhone or Download Photos & Videos, depending on your needs.
How to Move iPhone Photos to Flash Drive on Mac
Make sure that your Mac connects to a Wi-Fi.
Connect your flash drive to your Mac computer.
Open the Photos app from the Applications folder.
Go to the Photos menu, choose Settings, and switch the iCloud tab.
Check Download Originals to this Mac and wait for iCloud Photos to download.
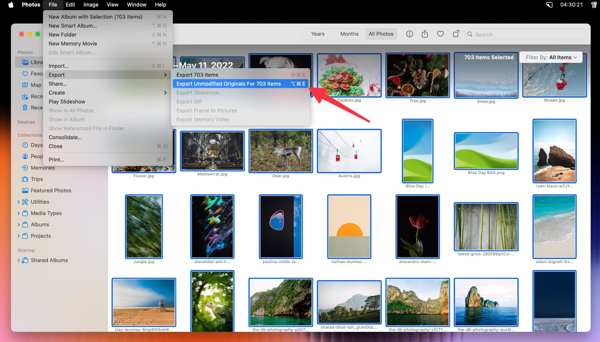
Next, go to the Library section in the Mac Photos app.
While pressing the Command key on your keyboard, select the desired photos.
Go to the File menu, choose Export, and click Export Unmodified Originals for N Items.
Click the Export button and choose the flash drive.
Finally, hit Export Originals to put iPhone photos on a flash drive.
How to Transfer iPhone Photos to a Flash Drive on PC
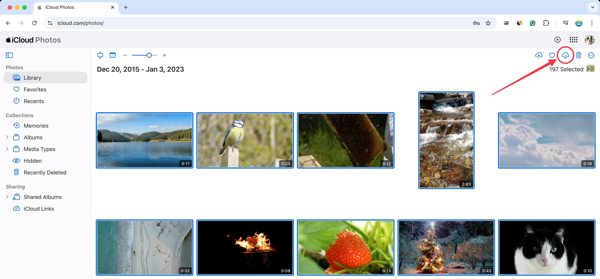
Go to www.icloud.com/photos in a browser and sign in with your Apple ID credentials.
Or visit www.icloud.com, log in to your account, and choose Photos. If 2FA is enabled, enter the verification code that appears on your screen.
Insert the flash drive into your PC or connect it to your PC with a USB cable.
Press the Ctrl key on your keyboard and click all the photos you want to transfer.
Click the Download button at the top right corner.
When prompted, insert the flash drive in the File Explorer and confirm downloading. This method can help you recover photos from iCloud to your iPhone if you enter the webpage on your iPhone.
Note:
If your iCloud doesn’t have enough storage, you can import iPhone photos to your PC with a USB cable and move them to a flash drive.
Conclusion
This guide explains how to export photos from an iPhone to a flash drive in various situations. If you don’t have a computer, move your photos to an external drive from your iPhone directly using the Files app. Moreover, you can sync photos to iCloud and download them to a flash drive using a computer. imyPass iPhone Transfer is the easiest way to back up your iPhone photos.

Clara is an editor from imyPass. She specializes in data recovery. You can find professional tutorials and solutions for recovering lost data from any device. Many users reported that his tutorial is easy and useful.
Hot Solutions
-
Transfer Data
-
Recover Data
-
Unlock iOS
-
iOS Tips
