How to Transfer Photos from iPhone to a PC or Mac Computer
![]() Clara Prescott Published on December 25, 2025Transfer Data3-min reading
Clara Prescott Published on December 25, 2025Transfer Data3-min reading
Before you delete your photos and free up space on your iOS device, you’d better create a backup. It cannot be denied that iPhone users are more likely to take photos using their handsets due to the advanced lenses. However, the high-quality photos are large and take up space. If your device becomes slow or lack of space, you have to manage your large photo files. This tutorial shares five ways to transfer photos from an iPhone to a computer.

In this article:
- Part 1: Ultimate Way to Transfer Photos from iPhone to PC
- Part 2: How to Send Photos from iPhone to Computer via a Cable
- Part 3: How to Copy Photos from iPhone to PC with iCloud Photos
- Part 4: How to Import Photos from iPhone to Mac Using AirDrop
- Part 5: How to Export Photos from iPhone to PC by Google Photos
- Part 6: Comparison: Methods of iPhone Photo Transferring
Part 1: Ultimate Way to Transfer Photos from iPhone to PC
The best way to send photos from your iPhone to a computer is imyPass iPhone Transfer. It allows you to transfer an entire photo gallery or specific photos from an iPhone to a computer. Plus, it works through a physical connection to accelerate the process. More importantly, it protects your photo quality with advanced technology.

4,000,000+ Downloads
Copy photos from iPhone to PC and Mac quickly.
Keep iPhone photo quality during the process.
Offer bonus features, like a HEIC converter.
Preview iPhone photos for selective transferring.
Support the latest models of iPhone and iPad.
How to Move Photos from iPhone to Computer
Detect your iPhone
Start the best photo transferring software for iPhone once you install it on your PC. There is another version for Mac users. Connect your iPhone to your PC with a Lightning cable. If prompted, tap Trust on your screen to trust this PC. Then, the software will detect your device automatically.
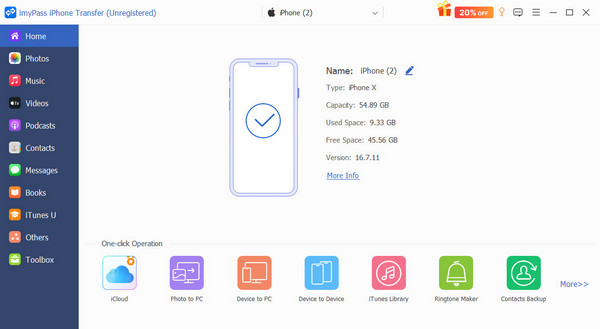
Then, you have two options:
Option 1: Move Selected Photos from iPhone to Computer
Preview photos
After scanning, go to the Photos tab on the sidebar. Now, you can view all photos on your iPhone by album. Plus, the software provides multiple view modes.
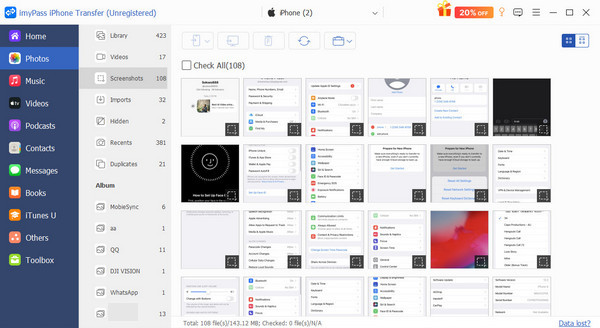
Move iPhone photos to the computer
Check the photo files you want to move, and click the PC button on the top ribbon. Choose Export to PC, set an output folder, and confirm the action.
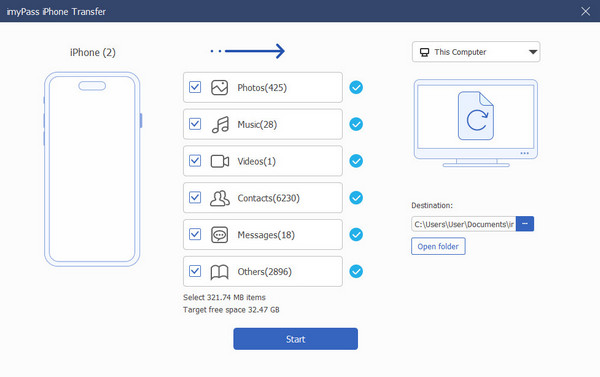
Option 2: Get All Photos from iPhone to PC
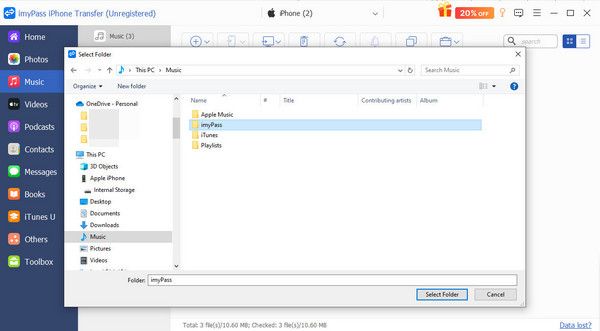
Go to the Toolbox tab on the sidebar and choose Device to PC. Make sure to select your PC as the target device. Click the Open folder button and set an output folder. Check the box next to Photos and uncheck other options. Click the Start button to begin getting all photos from the iPhone to the PC.
Part 2: How to Send Photos from iPhone to Computer via a Cable
While iOS is a closed system, it allows you to access Camera Roll on a computer with a USB cable. It means that you can import photos from an iPhone to a Mac or PC with a cable. We explain the workflows below:
How to Export Photos from iPhone to PC in Photos
Unlock your iPhone and plug it into your PC with a compatible cable.
When prompted, tap Trust, authorize the connection, and hit Allow.
Open the built-in MS Photos app from the Start menu.
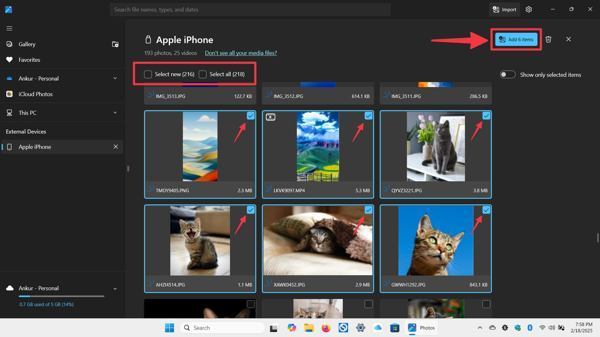
Click the Import menu at the top right corner, and select your Apple iPhone under the Connected devices section.
Then, PC will load all photos and videos in your Camera Roll.
You can either select the desired photos, check Select new, or check Select all.
Next, click the Add N items button.

On the Import N items dialog, set a location to save the photos.
Finally, click the Import button to export photos from iPhone to PC.
Note:
This method is available on Windows 11/10.
How to Pass Photos from iPhone to PC in File Explorer
If you are using an old version of Windows, hook up your iPhone to your PC with a USB cable.
Open File Explorer, go to the This PC section, and double-click your iPhone.
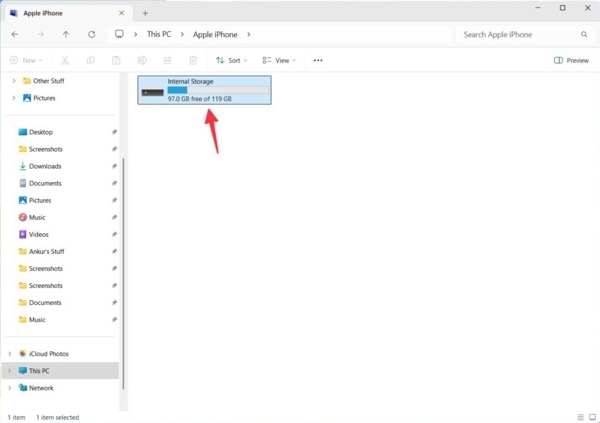
Access your device’s Internal Storage and enter the right folder.
Press the Ctrl key on your keyboard and select the desired photos.
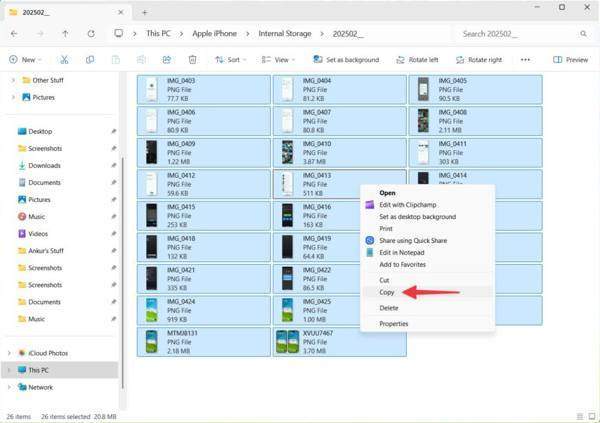
Then, you can copy them to a local folder, drag them to your desktop, or save them to an external drive.
How to Load Photos from iPhone to Computer Using Apple Devices
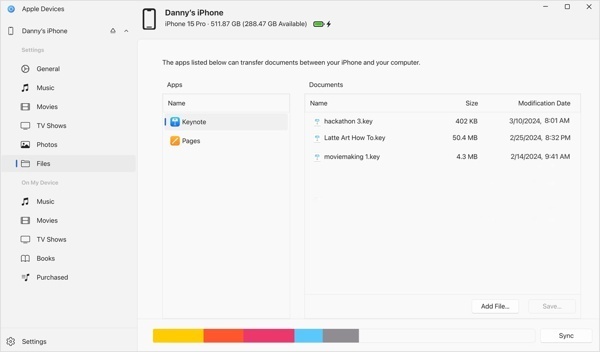
Install Apple Devices from the Microsoft Store.
Hook up your iPhone into your PC with a USB cable.
Run Apple Devices, click your iPhone, and enter the Photos tab on the sidebar.
Select the items you want to transfer, and load photos from iPhone to PC.
Note:
Your PC must be updated to the latest versions of Windows for seamless Apple integration.
How to Pull Photos from iPhone to Mac Photos App

Link your iPhone and your MacBook with a USB cable.
Click Allow to grant access permission.
Run the built-in Photos app on your Mac.
Click your iPhone name on the sidebar and view all iPhone photos.
Select all photos to pull from iPhone to Mac, click Import N selected or Import All New Items to extract photos from iPhone to Mac.
Note:
You cannot set the output folder.
How to Extract Photos from iPhone to Mac Using Image Capture
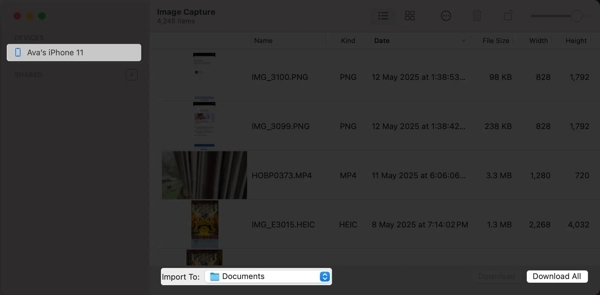
Connect your iPhone into your Mac with a USB cable.
Run the Image Capture app on your Mac.
Select your iPhone name on the device list.
Set an output folder in the Import To option.
Next, highlight each photo you wish to transfer, and click the Download or Download All button.
Note:
The main benefit of this method is customizing the output folder.
Part 3: How to Copy Photos from iPhone to PC with iCloud Photos
iCloud Photos is a cloud-based photo service developed by Apple for iPhone and iPad users. It allows users to sync photos across Apple devices. Moreover, users can access their photos on iCloud.com on any device and download iCloud photos.
How to Sync Photos on iPhone to iCloud

Connect your iPhone to an internet connection.
Run the Settings app on your device.
Tap on your profile and choose iCloud.
Tap Photos, and toggle on Sync this iPhone.
A few minutes later, your photos will be synced to iCloud. You can also transfer photos from iPhone to iPhone via iCloud.
How to Save Photos from iPhone to Computer on iCloud.com

Access www.icloud.com in a browser, and sign in with your Apple account.
Choose Photos to enter iCloud Photos.
Go to the Library album or the desired album.
Select the iPhone photos to save to the computer, and click the Download button.
How to Export Photos from iPhone to PC by iCloud Photos
Install the iCloud app from the Microsoft Store.
Open the app, sign in with your Apple ID credentials.
Check the Photos option.
Then, click the Options button next to Photos.
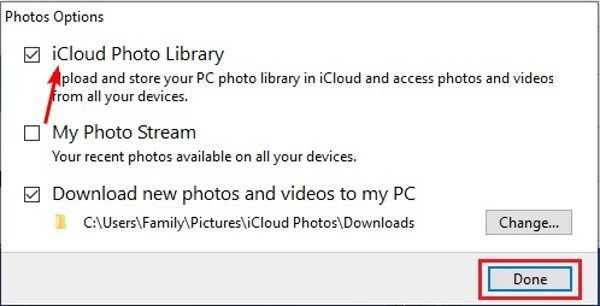
Check the iCloud Photo Library option and remember the path under Download new photos and videos to my PC.
Click Done to confirm it, and hit Apply.

Run File Explorer and navigate to the path to check the photos exported from the iPhone to the PC.
How to Sync Photos from iPhone to Mac via iCloud Photos

Run the Photos app on your Mac.
Click the Photos menu and choose System Settings or System Preferences.
Click Apple ID and choose iCloud.
Tap Photos, and toggle on Sync this Mac.
Once your Mac connects to a Wi-Fi network, iPhone photos will be synced to the Mac.
Part 4: How to Import Photos from iPhone to Mac Using AirDrop
The easiest way to transfer photos from an iPhone to a Mac laptop wirelessly is AirDrop. This way is used for transferring several photos among users who have multiple Apple devices. Here are the steps below:
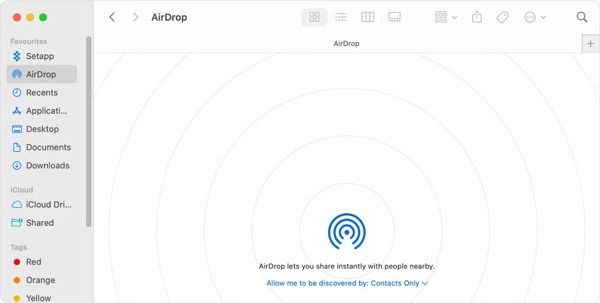
Open the Finder app on your Dock.
Click AirDrop on the sidebar.
Make sure to turn on Bluetooth and Wi-Fi.
You just need to enable Wi-Fi, but not connect to a network.
Click Allow me, and choose Everyone.
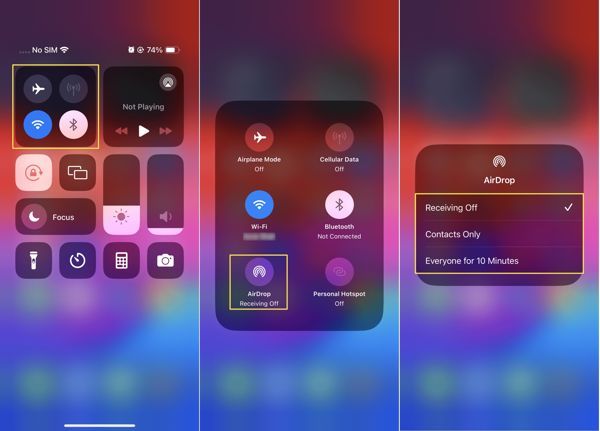
Turn on your iPhone and enter the Control Center.
Enable Wi-Fi and Bluetooth.
Turn on AirDrop and choose Everyone for 10 Minutes.
Open the Photos app, and select the photos you want to transfer.
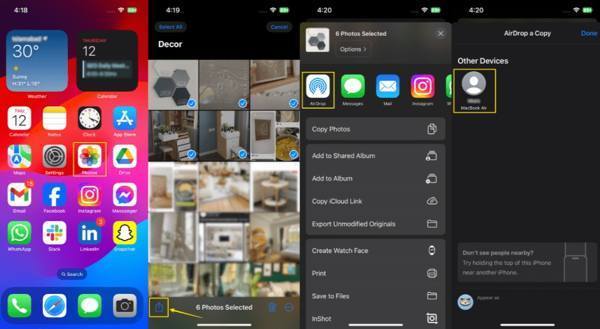
Tap the Share button, choose AirDrop, and press your Mac.
Then, accept the photos on your Mac.
Part 5: How to Export Photos from iPhone to PC by Google Photos
In addition to iCloud, you can also take photos from your iPhone to your computer with another cloud service, like Google Photos. Google gives each account 15GB of free storage. Once you back up your photos to Google Photos, you can access them on any other device.
Install Google Photos from the App Store on your iPhone.
Log in with your Google account.
Tap on your profile at the top right side.

Choose Google Photos settings, and pick Backup.
Toggle on Backup.
Make sure to connect your iPhone to a stable internet connection.
After your photos go to Google Photos, switch to your computer.
Now, you have three options:
Export all iPhone photos to PC
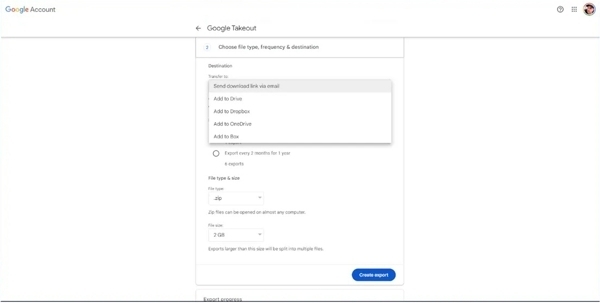
Go to https://takeout.google.com/ in a browser, and log in to your Google account.
Click Google Photos and deselect other data types.
Then choose an exporting method and export iPhone photos to PC.
Back up specific photos from iPhone to PC

Go to www.photos.google.com in your browser, and log in to your account.
Select the iPhone photos to back up to the PC.
Click the Download button.
Pull the entire iPhone album to the PC
Find an album to download on Google Photos in your browser.
Click the button with a three-dot icon to begin downloading the album.
Note:
Google Photos will download the album as a ZIP file.
Part 6: Comparison: Methods of iPhone Photo Transferring
| Transfer method | Support Platforms | Best for | |
| imyPass iPhone Transfer | Physical connection | Windows 11/10/8/7, and Mac OS X 10.12 | Back up iPhone photos to computer |
| With USB Cable | USB cable | Windows, and macOS | Transfer all photos |
| iCloud Photos | Wirelessly | Windows, macOS, online | Download entire iPhone photos |
| AirDrop | Wirelessly | macOS | Sync specific photos |
| Google Photos | Wirelessly | Online | Back up iPhone photos |
Conclusion
This guide shared multiple ways to send photos from iPhone to computer, including PC and Mac. The USB cable allows you to transfer Camera Roll from iOS to Windows and macOS quickly. iCloud Photos lets users sync iPhone photos wirelessly. For Mac users, AirDrop is a simple option. Google Photos is another way to back up and transfer iPhone photos. imyPass iPhone Transfer is the best option for ordinary people.

Clara is an editor from imyPass. She specializes in data recovery. You can find professional tutorials and solutions for recovering lost data from any device. Many users reported that his tutorial is easy and useful.
Hot Solutions
-
Transfer Data
-
Recover Data
-
Unlock iOS
-
iOS Tips
