How to Transfer iPhone Photos to an External Hard Drive [Easy]
![]() Clara Prescott Published on November 14, 2025Transfer Data3-min reading
Clara Prescott Published on November 14, 2025Transfer Data3-min reading
As the number of photos increases, the storage space on your iPhone always seems to run out. Whether it's the landscapes captured during travels or the little moments of daily life, you are reluctant to delete them. But when the 'Storage Full' warning keeps appearing, transferring photos to an external hard drive becomes the most reliable choice. Compared to cloud backup, this method is faster, safer, and not limited by the internet. This article will provide a detailed guide on how to transfer photos from iPhone to external hard drive. Whatever computer you use, or by connecting the hard drive directly, you can find the solution that suits you best.

In this article:
- Part 1. Before You Transfer Photos from iPhone to an External Hard Drive
- Part 2. Best Tool to Transfer iPhone Photos to an External Hard Drive Easily
- Part 3. Easily Move iPhone Photos to an External Hard Drive Using a Mac
- Part 4. Easily Move iPhone Photos to an External Hard Drive Using a Windows PC
- Part 5. How to Move Photos from iPhone to an External Hard Drive Without a Computer
Part 1. Before You Transfer Photos from iPhone to an External Hard Drive
Before starting to export iPhone photos to an external hard drive, doing some preparatory work can make the whole process smoother and safer. Understanding these key steps can not only prevent interruptions during the transfer but also ensure that the photos are not lost or corrupted.
• Check the external hard drive capacity
To avoid running out of storage during the transfer, make sure the external hard drive has enough space to store all the photos and videos from your iPhone. Choosing an external hard drive for iPhone photos with fast read/write speeds and high compatibility can make the process smoother.
• Ensure your iPhone has enough battery
During the transfer process, it is best to keep your iPhone well-charged or connected to a power source to prevent the device from shutting down and affecting data safety.
• Prepare your computer or device
If you plan to transfer photos via a Mac or Windows PC, make sure the computer's system and drivers are updated so your iPhone can be recognized smoothly.
• Backup important photos
Before starting, you can back up important photos to the cloud or other storage devices. This is also a way to protect your valuable data.
After understanding these preparations, you can move on to a simpler and faster method to transfer iPhone photos directly to an external hard drive.
Part 2. Best Tool to Transfer iPhone Photos to an External Hard Drive Easily
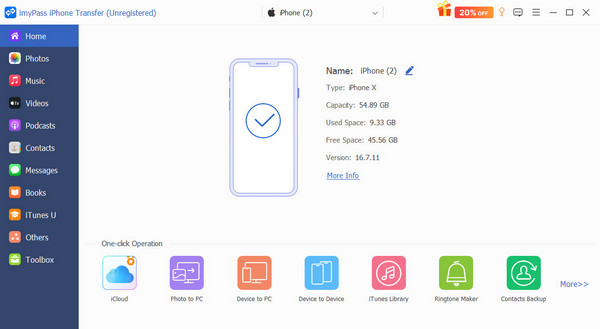
Using professional tools is the most hassle-free way, especially when you want to quickly and safely export a large number of photos from your iPhone. imyPass iPhone Transfer is an easy-to-use and comprehensive transfer tool, perfect for this kind of need.

4,000,000+ Downloads
Supports fast transfer of large numbers of photos without worrying about device lag.
Allows direct import of photos to external hard drives or computers, with flexible storage location options.
Preserves original photo quality with no compression loss, ensuring clear images.
Supports export of all photo formats, including HEIC, JPEG, and PNG.
After opening the software on your computer, establish a connection between your iPhone and the external hard drive by linking them to the computer and wait for the devices to be recognized.
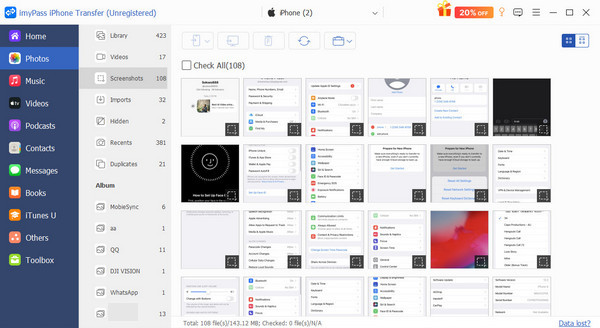
In the software interface, select the Photos category, browse your iPhone's photo albums, and check the photos you want to transfer.
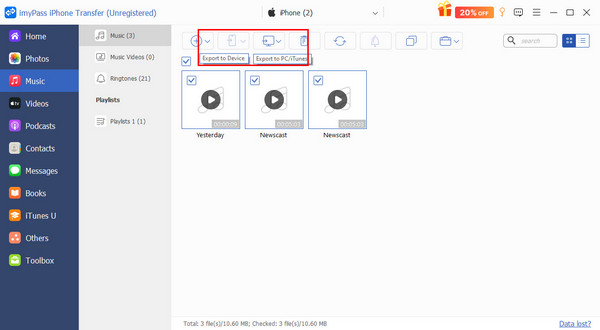
Click Export to PC and choose your external hard drive as the destination. Make sure the hard drive is properly connected and recognized.
And the software will automatically copy the selected photos from your iPhone to the external hard drive. You can see the progress bar and remaining time during the transfer.
After the transfer is complete, open the external hard drive to confirm that the photos have been fully exported, ensuring that each photo can be viewed properly.
Part 3. Easily Move iPhone Photos to an External Hard Drive Using a Mac
If you don't want to download extra software, that's fine. Different computer systems also have built-in tools that can basically meet your needs.
Photos App
Link your iPhone and your Mac together with a data cable and open the Photos app.
Select your iPhone device from the sidebar, and the app will automatically display the photos on your iPhone.
Choose the photos you wish to move, hit Import To, and set your external hard drive as the destination.
Choose Import Selected or Import All to complete the photo transfer.

Using the Photos App allows you to manage your albums directly while ensuring that the exported photos retain their original quality and preserve the original iPhone photos' location. This is the preferred method for many Mac users on how to transfer photos from an iPhone to an external hard drive.
Image Capture
Plug your iPhone into your Mac with a data cable and open the Image Capture app.
Find your iPhone in the device list and tap on it.
Set the Import To location to the external hard drive.
After selecting the photos, click the Import button to copy the photos to the hard drive quickly.

The advantage of Image Capture is that it is more lightweight and suitable for users who only want to export certain photos quickly or have specific requirements for folder structure.
Part 4. Easily Move iPhone Photos to an External Hard Drive Using a Windows PC
Exporting iPhone photos to an external hard drive on a Windows computer is also very simple. You can complete the operation using the built-in File Explorer or the Photos app that comes with Windows, without needing any additional software.
File Explorer
Insert your iPhone into a Windows computer using a data cable, and tap Trust This Computer on your iPhone.
Open File Explorer and find your iPhone device under This PC.
Open the iPhone's internal storage and locate the DCIM folder, which is the default storage location for iPhone photos.

Select the photos or folders you need, right-click and choose Copy, then paste them onto the connected external hard drive.

Using File Explorer is an efficient method on how to transfer photos from an iPhone to a hard drive because you can manage the folder structure directly. It is especially suitable for users who need to categorize and back up photos into different hard drive directories.
Photos App
Open the Windows Photos App, click Import, and select From a USB device to import photos.
When you choose your iPhone as the source, the Photos app will scan and list all available photos.
Select the external hard drive as the import destination, and choose the photos you want to import.
Click Import Selected, and the Photos app will copy the photos to the hard drive.

The Photos app allows you to preview photos and automatically avoid duplicate imports, making it suitable for users who want to organize and back up their photos quickly.
Part 5. How to Move Photos from iPhone to an External Hard Drive Without a Computer
If you don't want to rely on a computer, you can also transfer photos directly from your iPhone to an external hard drive. Currently, there are some portable hard drives on the market with Lightning or USB-C interfaces that can connect directly to an iPhone, making file copying easy.
Insert the adapter into the iPhone, then connect the external hard drive.
Open the Files app and find the hard drive's name under Browse.
Select the photos you want to move, tap Save, and choose the external hard drive as the destination.

This method is suitable for users who often forget their iPhone backup password and want to back up photos anytime, as well as for those who don't carry a computer while traveling.
Conclusion
Whether you want to free up storage space on your iPhone or create a secure backup for your precious photos, this article presents the most reliable methods for how to transfer iPhone photos to an external hard drive. If you want to complete the process in the shortest time while preserving the original quality of your photos, imyPass iPhone Transfer is undoubtedly the most trustworthy tool. Start organizing your album now so that every photo can be safely stored and easily accessed.

Clara is an editor from imyPass. She specializes in data recovery. You can find professional tutorials and solutions for recovering lost data from any device. Many users reported that his tutorial is easy and useful.
Hot Solutions
-
Transfer Data
-
Recover Data
-
Unlock iOS
-
iOS Tips
