Learn How to Save Photos on iPad in Different Ways Easily
![]() Clara Prescott Published on November 14, 2025Transfer Data3-min reading
Clara Prescott Published on November 14, 2025Transfer Data3-min reading
Your iPad stores countless precious memories, from travel shots to family moments. But when storage runs low or you want to back up, edit, or print them on your computer, how to transfer photos from iPad to computer becomes a real question. The right method may vary depending on whether you're moving a few images or an entire album. This guide will show you several efficient and practical ways to do it.

In this article:
Part 1. Preparations Before Transferring Photos on iPad
Before transferring photos, being well-prepared can greatly increase the success rate and prevent interruptions or loss of photos during the transfer. Whether you plan to learn how to transfer photos from an iPad to a computer or intend to save pictures to a USB drive or laptop, the following steps are very important:
Check the connected device
Ensure the data cable is intact, the ports are clean, and the connection is stable. If you want to transfer photos from an iPad to a desktop, it is recommended to use the original Lightning or USB-C cable to minimize connection errors.
Confirm sufficient storage space
If you want to transfer photos from iPad to flash drive or transfer photos from iPad to USB drive, check the available space on the target device in advance. If using a USB stick, make sure the file system format (such as exFAT or FAT32) supports photo transfer; otherwise, it may prompt that the file is too large or the format is incompatible.
Turn off auto-lock
During the transfer process, if the iPad automatically locks the screen or enters low power mode, it may cause interruptions. It is recommended to turn off Screen Time in Settings and keep the battery above 50%.
Organize album content
Delete duplicate or blurry photos and create new albums to mark the images you want to transfer. This makes it easier to select files to copy and allows you to quickly locate the target album when you need to transfer photos from a computer to an iPad later.
After completing the above preparations, the iPad will be in an optimal state, ensuring faster and safer transfers in the subsequent process.
Part 2. Best Way to Transfer and Manage iPad Photos
If you want to avoid issues like formatting errors, slow speed, or file loss during the transfer process, a professional tool can make everything simple. imyPass iPhone Transfer is designed for this purpose; it can help users easily complete the task of how to transfer photos from iPad to computer, while also managing albums, syncing files, and backing up data.

4,000,000+ Downloads
Utilizing advanced data acceleration technology, it can migrate thousands of photos within minutes.
Supports all iPad models and the latest iOS versions, so there's no need to worry about device incompatibility.
Flexible two-way transfer allows easy switching between devices for mutual transfers.
Maintains image quality without compression or distortion.
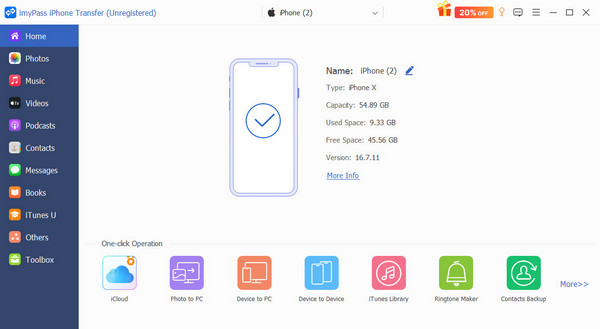
After opening the software, connect your iPad to the computer using the original data cable. The software will automatically recognize the device model and storage information.
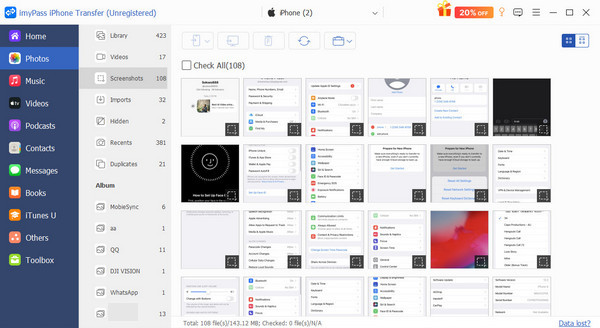
Click on Photos in the function bar on the left side of the main interface, and the system will automatically scan all albums on the iPad. You can browse the albums and manually select the photos you want to export, or you can select all photos.
After selecting the destination path, click the Export to PC button to save the photos to your computer safely.
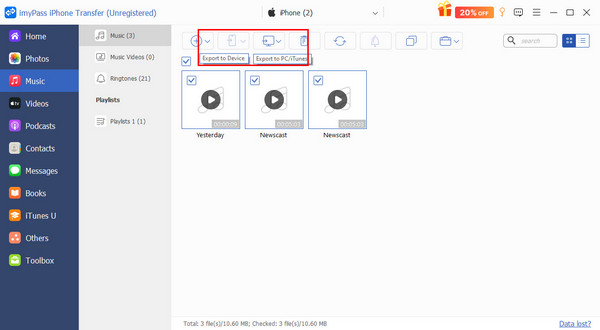
If you want to transfer files from your computer to your device, you can also click Import to Device to easily complete the process of how to transfer photos from a computer to an iPad. imyPass iPhone Transfer is not just a transfer tool; it also helps you organize your photo albums, keeping your photos safe, tidy, and well-organized.
Part 3. Common Methods to Transfer Photos on iPad
Besides using professional tools, many users also prefer to transfer photos between devices using built-in or traditional methods. Depending on different usage scenarios, you can choose to transfer via USB, iTunes, or AirDrop. Below, we will introduce these three common methods to help you choose the most suitable one based on your needs.
Use USB
Some users are more inclined to want to know how do I transfer photos from iPad to USB stick because this wired connection is the most direct and stable.
Use a data cable to connect the iPad to the computer.
Once the computer recognizes the device, open File Explorer or the Photos app.
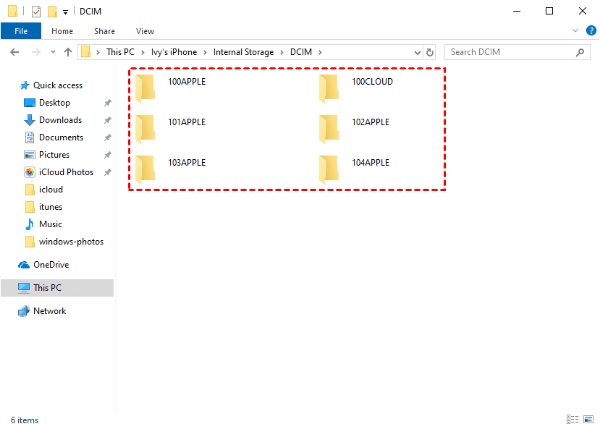
Locate the iPad in the device list and enter the DCIM folder.
Manually select the images you want to transfer, then copy and paste them to the computer or a USB drive.
This method has the advantage of not requiring a network connection, but it can be cumbersome when dealing with a large number of files. You can also use a USB drive with a Lightning connector and plug it directly into the iPad to complete the copying.
Use iTunes
For users who want to back up photos more systematically, iTunes is a traditional but stable choice.
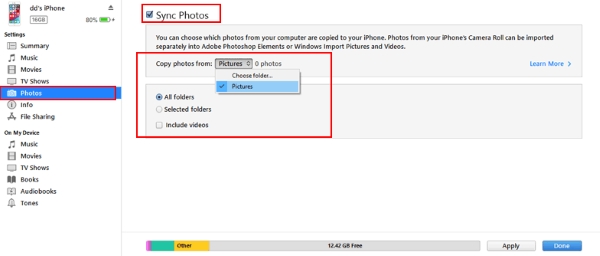
Open iTunes on your computer and connect your iPad to the computer. Sometimes, the iPad is disabled connect to iTunes, which could be due to system issues.
Click the Device button and go to the Photos tab.
Check Sync Photos, then select the albums or folders you want to export.
After clicking Apply, the system will automatically import the photos to your computer.
The advantage of using iTunes is that it allows you to manage music, videos, and photos simultaneously, but its operations are relatively fixed, and you cannot freely select individual photos to export. Therefore, it is more suitable for full backup needs.
Use AirDrop
If you have a Mac computer or another Apple device, AirDrop is an ideal wireless option. It can quickly meet the need to transfer images from iPad to PC (Mac only).
Ensure both devices have Wi-Fi and Bluetooth turned on, and enable AirDrop.
Open the Photos app on your iPad and select the images you want to transfer.
Tap the Share button and choose the name of the receiving device from the options.
On your computer, confirm the reception, and the photos will be automatically saved to the Downloads folder.

AirDrop is suitable for transferring a small number of high-quality images, providing fast and lossless transfer, but it only works between devices within the Apple ecosystem.
Each of the above methods has its own focus: USB is more stable, iTunes is more comprehensive, and AirDrop is more convenient. You can choose the most suitable method flexibly based on your device type and transfer needs.
Conclusion
The value of photos lies not only in capturing moments but also in preserving and sharing them. When you want to bring memories from your iPad to other devices, knowing how to save photos on iPad and choosing the right transfer method can make the process much easier. With the help of imyPass iPhone Transfer, moving photos is no longer limited by format, speed, or compatibility, allowing you always to keep your image data in your own hands.

Clara is an editor from imyPass. She specializes in data recovery. You can find professional tutorials and solutions for recovering lost data from any device. Many users reported that his tutorial is easy and useful.
Hot Solutions
-
Transfer Data
-
Recover Data
-
Unlock iOS
-
iOS Tips
