Guide to Sharing Photos Through iCloud Across Devices
![]() Clara Prescott Published on January 08, 2026Transfer Data3-min reading
Clara Prescott Published on January 08, 2026Transfer Data3-min reading
In a world where taking photos has become routine, our photo albums are often filled with photos scattered across different devices. Effortlessly aggregating photos from your phone, iPad, or computer is plagued by transfer hassle and storage limitations. In fact, iCloud Photo Sharing was born for that purpose. Next, we'll show you step by step how to use iCloud to share photos efficiently, making organizing and sharing easier.

In this article:
Part 1. What Is iCloud Photo Sharing
Many people have heard of iCloud, but don't realize that it can do more than just back up photos. iCloud Photo Sharing is an extremely useful service in the Apple ecosystem. It allows you to seamlessly sync your photos across multiple devices and share the same album with others, making it easy to manage and interact across devices.
Unlike normal cloud storage, sharing photos through iCloud is more like a "collaborative album." You can create a shared album on your iPhone, iPad, or Mac and invite friends or family to join, add photos, leave comments, and like them together.
For home users, Apple also offers iCloud Photos Family Sharing. Simply turn on Family sharing, and family members can automatically see the latest photo and video updates without having to send them manually.
In short, iCloud photo sharing offers three core advantages:
- Smart sync: Keep photos consistent across all devices and view them anytime, anywhere.
- Multi-person collaboration: You can invite others to co-manage your album, making communication easier.
- Security: iCloud encrypted storage ensures privacy.
Part 2. How to Set Up iCloud Shared Photo Library
The first step to getting the most out of iCloud Photo sharing is to learn how to set up iCloud Shared Photo Library properly. This feature allows you to share a shared gallery with others, and all participants can view, add, or edit content, making it ideal for families, couples, or teams.
Before you start sharing, make sure your device is updated to iOS 16 or later and that iCloud Photos is enabled. You can follow the following steps:
Open Settings and tap your profile picture to enter iCloud.
Select Photos and open the Shared Library option.
Click Get Started and follow the prompts to create a new shared gallery.
Enter the name or Apple ID of the member you want to invite. The system supports up to six people to use the same shared gallery.
Choose what to share. You can choose all photos and videos or Photos from a certain date.
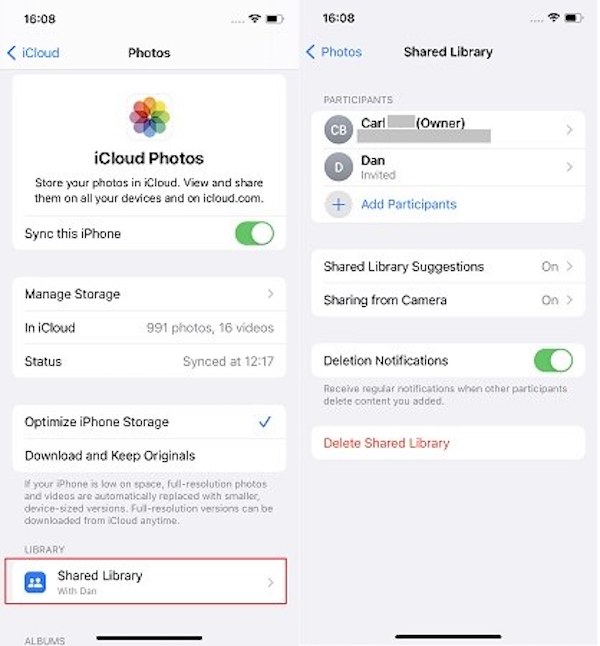
Once the setup is complete, the gallery will be automatically updated synchronously on all participant devices. Your iCloud Shared Photo Library will run smoothly and sync with multiple people.
Part 3. How to Join Other People's iCloud Shared Photo Library
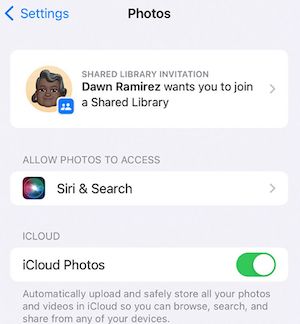
Instead of creating your own shared Photo Library, you can also join the iCloud Shared Photo Library invited by others. When someone invites you to join a shared gallery, you'll get a request in the Photos App or via email. Just follow these steps:
Open the Photos app.
Click the " Join Shared Library " prompt that appears at the top.
Check the gallery owner and share scope, confirm, and select Join.
The system will automatically download the content of the shared gallery, so you can view, comment on, or add new photos to the album.
Once you complete these steps, you are officially a member of the shared gallery, able to manage and interact with others. Even if a member accidentally deletes a picture, it does not matter; it is easy to recover the deleted photos.
You can also use the Share iCloud photo album to share a single album instead of an entire library. This method is suitable for sharing photos of temporary events or festivals, and it allows for privacy and efficient collaboration.
Part 4. How to Use iCloud Shared Photo Library
After you have successfully created or joined a shared gallery, the next key is to learn how to use it efficiently. iCloud Shared Photo Library isn't just a shared photo album; it's an intelligent collaboration tool.
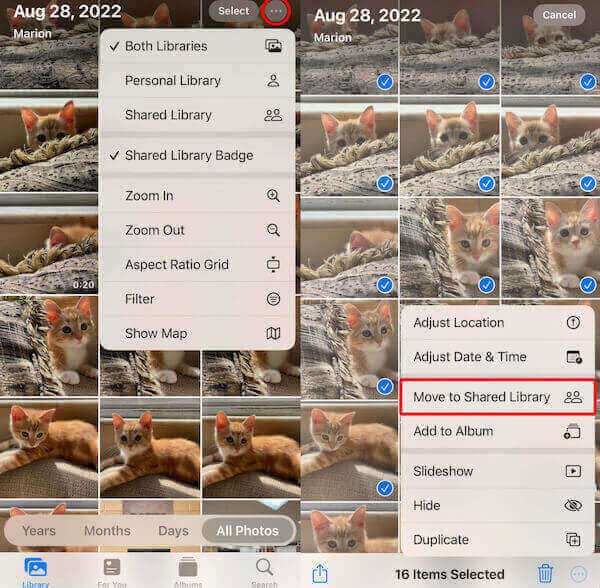
Manage and categorize your shared content
Once in the Photos App, you can toggle between your personal and shared photos on the Photos page. Everything added to a shared gallery is synchronized in real time, and every member can see the latest changes.
- If you want to add an existing photo to it, open it and click Move to Shared Library.
- to restore private photos, simply select Move to Personal Library.
- You can also use smart categories like people and places to filter photos you want to share quickly. Adding to the iCloud shared photo library will also retain the original iPhone photo location.
Control the sharing scope and authority
As you go along, you may want to set different sharing permissions for different photos. Apple provides flexible management options to help you control:
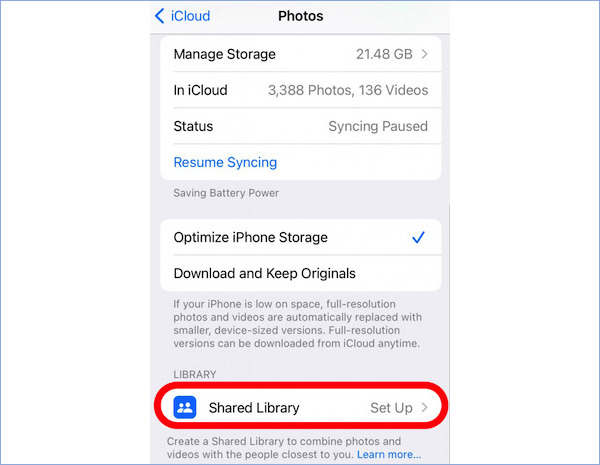
- Go to Settings > Photos and select Shared Library settings.
- You can adjust members’ access rights, such as browsing only or allowing uploads.
- For more details on how to share photos on iCloud, you can also choose to share only for a specific album, activity, or time period.
Interact with members and update automatically
- In a shared gallery, you can not only see photos others have added, but you can also comment on them or "like" them.
- When you take a photo, if the Share from Camera option is enabled, the photos you take with other members will be automatically shared without additional Settings.
With these features in mind, you can truly leverage iCloud Shared Photo Library to make photo sharing smarter, interaction more natural, and organizing more efficient.
Part 5. Limitations of iCloud Photo Sharing and Best Alternative
Although iCloud Photo Sharing brings great convenience to photo management, there are still some limitations in actual use, which bother many users:
Limited storage: Free iCloud accounts only provide 5GB of space. If you share too many photos, you need to pay for additional storage.
Limited device compatibility: It is only available on Apple devices and cannot be flexibly accessed directly on Android or Windows.
Strong network dependence: both upload and synchronization must stabilize the network; otherwise, delay or failure is prone to occur.
Limited sharing control: Individual access rights cannot be set for a single photo, and privacy flexibility is not high.
System limits operation: Some old systems cannot use iCloud Shared Photo Library and need to update to a newer version.
Because of these limitations, many users hope to find a freer and more efficient alternative. In this case, imyPass iPhone Transfer is the ideal choice.

4,000,000+ Downloads
Support multiple device types to transfer photos freely between iPhone, iPad, Windows, and Mac.
Plug and transmit, faster and more secure.
The transmission is not compressed and does not reduce the sharpness of the photo.
Support batch import and export to save time.
After opening the software, connect the iPhone to the computer with the data cable, and the software will automatically recognize the device information.
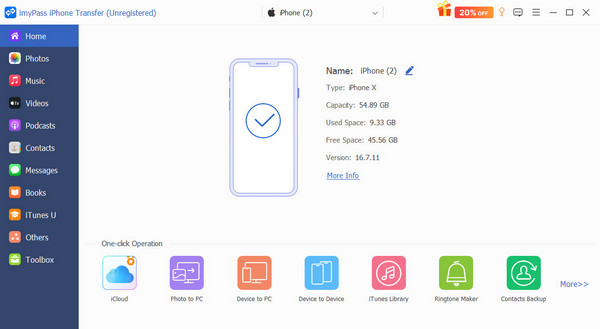
Click the Photos module in the main screen, and the software will scan and display all the albums.
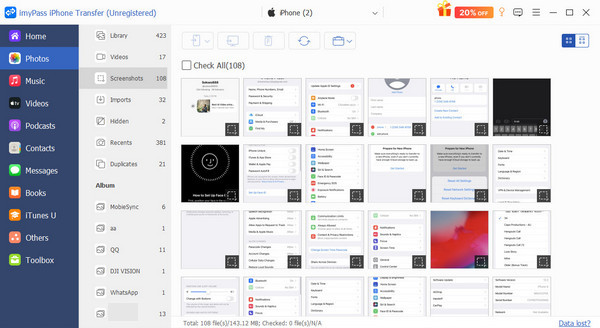
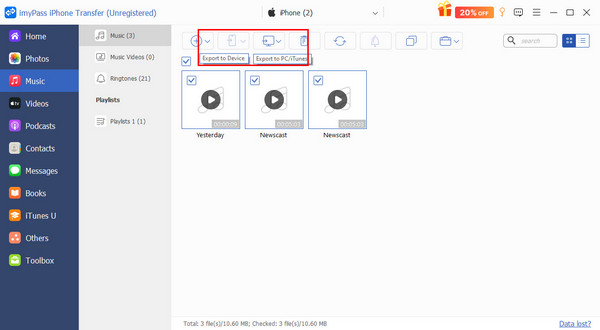
Click Export to PC or Export to Device to start the transfer. The whole process is fast and stable, and the photos retain their original quality.
Conclusion
Sharing photos through iCloud is suitable for users who want to collaborate and sync within the Apple ecosystem, but for those who need more storage, cross-platform sharing or offline Transfer, imyPass iPhone Transfer is undoubtedly a more efficient option. It lets you transfer, back up and manage your photos from device to device, giving you easy control over your image world, whether you rely on iCloud or not.

Clara is an editor from imyPass. She specializes in data recovery. You can find professional tutorials and solutions for recovering lost data from any device. Many users reported that his tutorial is easy and useful.
Hot Solutions
-
Transfer Data
-
Recover Data
-
Unlock iOS
-
iOS Tips
