Easily Sync Notes Between iPhone & Computer Automatically or Manually
![]() Clara Prescott Published on November 11, 2025Transfer Data3-min reading
Clara Prescott Published on November 11, 2025Transfer Data3-min reading
Losing track of ideas because your iPhone notes do not show up on your Mac can be frustrating, especially when switching between devices for work or school. Learning how to sync notes from iPhone to Mac keeps everything updated and accessible, no matter where you edit. This guide covers automatic syncing, manual transfer options, and troubleshooting tips to ensure your notes always stay connected.

In this article:
Part 1. Automatic Syncing
To make sure that you do not have to deal with cables and manual note transfers, setting notes to sync automatically makes that possible. Any edits you make on your iPhone will show up on your Mac or Windows computer in seconds. Here is how to use iCloud or another email account to make that possible.
1. Using iCloud (The Official Apple Way)
Open Settings on your iPhone.
Select your Apple ID name at the top and select iCloud.
Scroll down and tap Notes. Toggle On Sync This iPhone.
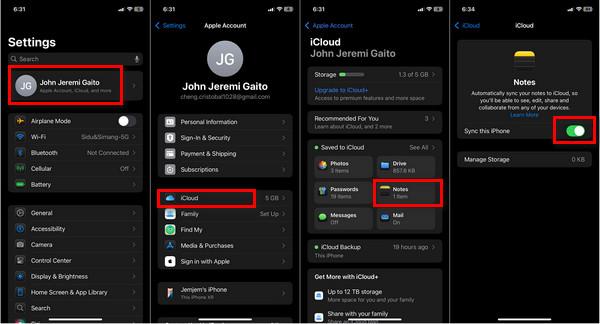
Open Notes and check if your notes are stored under iCloud (not On My iPhone). If they are not, you can move them by tapping the folder button > Move Note > iCloud Notes.
On your Mac, System Settings > Apple ID > iCloud and toggle Notes ON.
- If you have a Windows PC, get iCloud for Windows from the Microsoft Store.
- Sign in with your Apple ID and turn on Notes in the iCloud settings panel.
Open Notes on your Mac or iCloud.com/notes in your computer browser to view and edit your synced notes.
2. Using Another Email Account (e.g., Gmail, Outlook)
If you do not want to rely exclusively on iCloud, you can also sync notes through your email account.
On your iPhone, tap Settings, then Notes, tap Accounts.
Tap Add Account, then select one of the email providers: Google, Outlook, or Yahoo.
Log in to your email, then on the account sync options, ensure Notes is toggled ON.
Open the Notes app, tap on Folders, and you should see either a Gmail Notes folder or an Outlook Notes folder, depending on which account you synced.
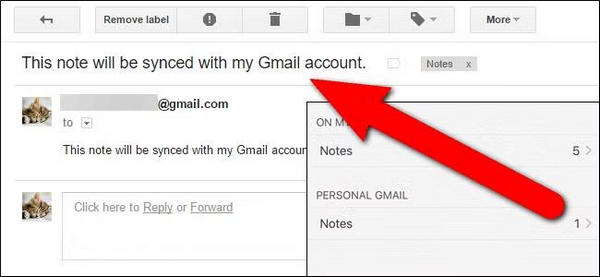
On your computer, log in to the same email account.
- With Gmail, you can go to mail.google.com, and on the sidebar, you will see a notes label.
- With Outlook, you can go to Outlook.com or the Outlook app and go to the Notes section.
Part 2. Manual Transfer & Backup Methods
If you want a Notes local backup and you want to be in control, you can manually transfer and export your Notes. This is a great strategy when switching devices, creating offline copies, or organizing files on your computer.
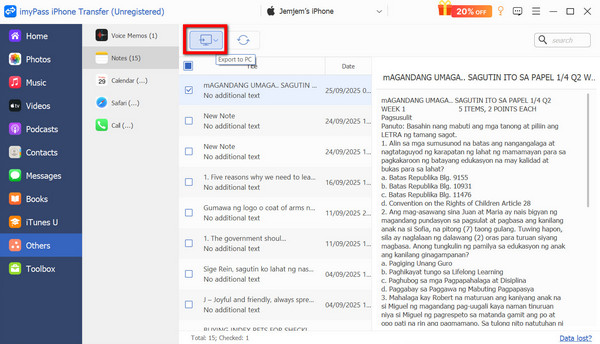
1. imyPass iPhone Transfer (For Bulk Transfer)
imyPass iPhone Transfer is an iPhone data transfer, sync, and management tool consisting of Notes, photos, music, between iPhones, iPads, iPods, and computers. It is an alternative to iTunes and offers iPhone data transfers that are fast, lossless, secure, and flexible. It allows complete control of iOS data.
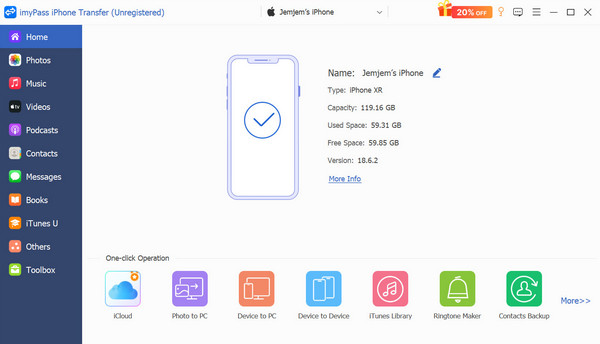
Install the Tool and Connect Your iPhone
Visit the official imyPass site to download and install imyPass iPhone Transfer on your Windows PC or Mac. Launch the application after installation and connect the iPhone or iPad to the computer using a USB cable. The software will recognize your device and will now be ready for use.
SChoose Notes
On the left panel, click on the Others, then select the Notes option. The list of notes will be shown, and you can preview the notes to select some individual notes or select all of them for a complete backup.
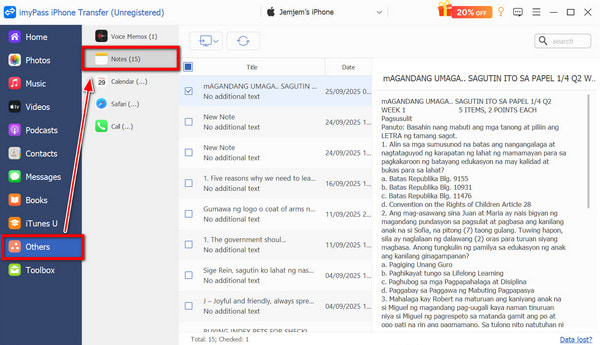
Backup Or Export Your Notes
To help manage notes in an organized manner, imyPass iPhone Transfer provides the option to Export to PC. Pick one of the options, and the notes will be backed up and saved to your computer.
Sync And Manage Your Data
You can also manage the transfer of your pictures, messages, videos, music, calendars, call logs, Safari bookmarks, and your contact list in addition to Notes. The software also provides features to create albums, edit contact information, remove duplicates, and convert files from HEIC to JPG or PNG.
Bonus Tip:
imyPass iPhone Transfer also supports syncing with iTunes directly, so you can rebuild or manage your iTunes library without needing to open iTunes itself.
2. Export Notes as PDF or Text Files
You can also export your Notes manually for backup or sharing into readable formats.
On your iPhone, open the Notes app, and click on the note you aim to export.
Select the Share button (square with an arrow pointing up). From the options, you can:
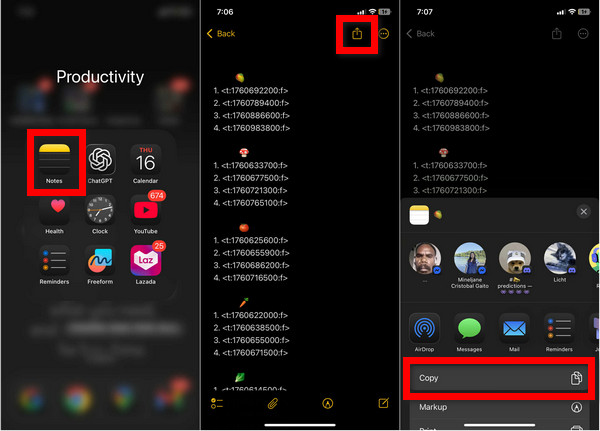
- Choose Send a Copy > Save to Files, and you will have a text-based file.
- Choose Print > Pinch Out on the Preview to Share > Save to Files to save it as a PDF file.
The Files app will have the note you exported, so you can open that to upload or download to your computer via the AirDrop option, Finder, or File Explorer.
Part 3. Notes Not Syncing Between iPhone and Mac
Sometimes, Notes fail to sync correctly from iPhone to Mac, possibly due to problems with the cloud or connection. The tips below were designed to resolve this issue efficiently.
1. Verify iCloud Sync is Enabled
Verify that Notes is on for iCloud on both devices.
- For iPhone, check Settings > [Your Name] > iCloud > Apps Using iCloud > Show All > Notes.
- For Mac, open System Settings > [Your Name] > iCloud and turn on Notes.
Only notes saved in the iCloud folder can sync; those under On My iPhone or On My Mac remain local to each device. When syncing with iCloud is paused or disabled, these notes will not update across devices until the connection is restored.
2. Use the Same Apple ID
For both gadgets to share iCloud information, they both need to have the same Apple ID used on iCloud. You can see this on the iPhone settings under your profile name and on the Mac under System Settings.
3. Check Your Internet Connection and iCloud Storage
A good and stable internet connection is recommended to sync. You need to check if both gadgets are connected to Wi-Fi or cellular data. If they have connected to Wi-Fi, the iPhone has to go on to sync. If Wi-Fi is connected and cellular data is on, cellular data has to be used.
4. Refreshing Sync Settings
Another step is to turn off notes sync on both devices. Wait a while, then re-enable as this app will reconnect your iCloud and often restore a sync.
5. Restart Devices
Both your iPhone and your Mac need to be restarted. This helps clear a temporary cache that might be holding up the sync process. In some cases, an iCloud-locked iPhone may also prevent proper syncing until it's unlocked and signed in with the correct Apple ID.
6. Update iOS and macOS
Outdated technology can lead to incompatibility. To prevent this, ensure that your iPhone and Mac have the most recent iOS and macOS updates installed. This will remove issues when syncing.
Conclusion
When you face notes not syncing between iPhone and Mac, it usually comes down to minor settings or connection issues. With the right setup and tools, you can keep all your notes consistent and accessible. Whether through iCloud, email, or manual transfer, your ideas will always stay in sync.

Clara is an editor from imyPass. She specializes in data recovery. You can find professional tutorials and solutions for recovering lost data from any device. Many users reported that his tutorial is easy and useful.
Hot Solutions
-
Transfer Data
-
Recover Data
-
Unlock iOS
-
iOS Tips
