How to Transfer iPhone to New iPhone Like a Pro Step by Step
![]() Clara Prescott Published on November 14, 2025Transfer Data3-min reading
Clara Prescott Published on November 14, 2025Transfer Data3-min reading
The moment you switch to a new iPhone is always exciting, but the real hassle often lies in how to transfer data to new iPhone. This article will guide you through the most practical data transfer methods, from fast wireless transfers to computer backup and restore, allowing your new iPhone to be ready to use right out of the box and seamlessly continue your previous life.

In this article:
Part 1. Things to Prepare Before Transferring Data to New iPhone
Before officially starting research on how to transfer data to a new iPhone, the most important thing is to make thorough preparations. Many people experience interruptions or data loss during the transfer due to neglecting preliminary steps. Taking a few minutes to confirm the following items before starting can make the entire process extremely smooth.
Update system version
Different iOS versions may cause data migration compatibility issues. Go to Settings > General > Software Update to make sure that both the old and new machines are running the latest system version.

Maintain sufficient power
The data transfer process can take a long time, especially when using wireless methods. To prevent interruption, it is recommended to keep the power level of both devices above 50% or connect them to the power supply.
Connect to a stable Wi-Fi network
If the network is unstable during transmission, synchronization failure is easy. Make sure both iPhones are connected to the same high-speed Wi-Fi network to directly share the Wi-Fi passwords on the iPhone with the new one and avoid switching halfway through.
Back up your old iPhone data
Whether you're ready to use iCloud or iTunes, a full backup of your old device data in advance makes it easy to recover in the event of an accident.
Organize the contents of your old iPhone
Removing unnecessary files and apps speeds up transfers and makes the new device cleaner, which makes the process more efficient.
Once you've done that, your new iPhone is ready to receive all of your data. Next, we'll go into the official steps to learn how to quickly complete the data migration during the setup phase of the new phone, making the new iPhone familiar and complete from the very first moment.
Part 2. How to Transfer Data to New iPhone During Setup
If you're opening a new iPhone for the first time, the setup boot will pop up automatically, which is the perfect time to use the Quick Start feature. For users who want to do all the data migration at once, this official feature is the fastest way on how to transfer data to a new iPhone.
Place your new iPhone next to your old iPhone and make sure both devices have Bluetooth and Wi-Fi turned on.
A Quick Start prompt will appear on the screen of your old device to confirm that you are using your current Apple ID to set up your new device.
Use the old iPhone to scan the animation on the new screen to complete the authentication.
Select Transfer from iPhone on the new iPhone and keep the two devices close together.
Make sure both devices are connected to the power supply and wait for the transmission to complete.

The whole process does not require complicated operation, and the new machine can automatically synchronize the data and Settings of the old device after startup, almost the same as the old device. For users wondering how to transfer everything to a new iPhone, Quick Start is ideal for speed and stability.
Part 3. How to Transfer Data to New iPhone After Setup
If you skip data migration when you first set up your new iPhone, don't worry. Apple offers a variety of ways to transfer data to a new iPhone after setup easily.
iCloud Backup
On your old iPhone, go to Settings > Apple ID > iCloud > iCloud Backup and tap Back Up Now.

Select Erase All Content and Settings and re-enter the Settings wizard.
Place your new iPhone next to your old iPhone and make sure both devices have Bluetooth and Wi-Fi turned on.
When prompted, select Restore from iCloud Backup and sign in with the same Apple ID. Select the most recent backup file and wait for automatic data recovery.

It's simple and efficient, perfect for people who want to know how to transfer everything to a new iPhone. As long as the network is stable, photos, apps, messages and contacts are perfectly synced.
iTunes
Open iTunes on your computer and use Finder for some newer versions.
Connect your old iPhone with a cable and tap Back Up now.
Once the backup is complete, connect the new iPhone and select Restore Backup from this computer.
After the transmission is completed, the data of the new device will be the same as that of the old one.

This method is especially good for poor network conditions and can ensure data integrity, but there are times when iTunes can't restore the iPhone, which can take time to troubleshoot.
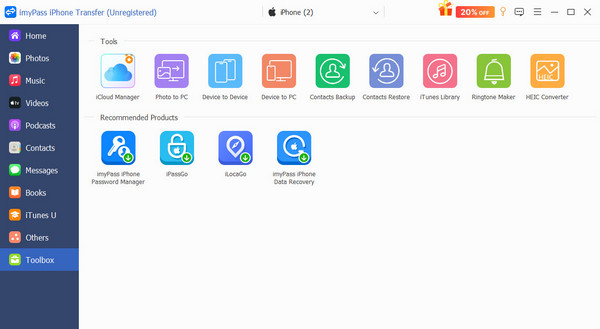
imyPass iPhone Transfer
If you want a more flexible and comprehensive Transfer method, the professional tool imyPass iPhone Transfer is recommended. It can manage and transfer multiple types of data more efficiently than iCloud or iTunes, without network constraints or overwriting the original content.

4,000,000+ Downloads
Supports multiple types of data transfer, such as contacts, photos, videos, music, and messages.
Allow to freely choose the specific content to be transmitted without the need to synchronize the whole machine.
Faster and more stable transfer without network or iTunes support.
Retains the original data without any overwriting or loss.
Download and install imyPass iPhone Transfer on your computer. After you open the app, connect your old and new iPhones to your computer.
The software automatically identifies both devices. On the main page, select Toolbox > Device to Device.
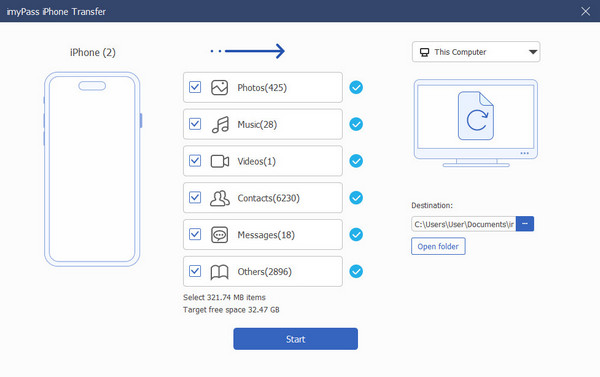
You can then check the type of data you want to transfer, such as photos, contacts, messages, and so on. Click Start and wait for everything to finish copying.
Part 4. What to Do with Old iPhone After Transferring Data
After you have completed the steps of how to transfer to a new iPhone, the old device may still have personal data and login information. In order to ensure privacy and maximize the value of your old machine, the following points are well worth implementing as soon as the migration is complete.
Log out of your account
Before dealing with your old device, make sure you log out of your Apple ID and turn off the Find My feature. This step prevents the device from remaining tied to the account and ensures that activation lock issues do not occur during subsequent resets or sales.
Erase all data
Once you've logged out, go to Settings > General > Transfer or Restore iPhone > Erase All Content and Settings to erase all data. This can completely delete personal information, prevent privacy leakage, and is also Apple's official recommended standard practice.
Check the SIM card and accessories
Don't forget to remove the SIM card from your old iPhone or check if you want to continue using it. Also, check whether the Lightning cable, charger, protective case, etc., are still compatible with the new machine.
Dispose of old equipment properly
If your old machine is still working, there are several options:
• Standby use: can be used as a music player, navigation or children's device.
• Trade-in or resale: Apple's website and some third-party platforms support recycling programs.
• Eco-friendly recycling: if the equipment is aged or damaged, it can be recycled through official channels to avoid e-waste pollution.
No matter which method you choose, make sure you have cleared your data and logged out of your account before you proceed to avoid privacy risks. For many users, it's also the perfect time to think about what to do with old iPhones, both safely and in the best possible way.
Conclusion
Changing to a new iPhone doesn't have to mean starting over; as long as you master the right methods, you can make everything in your old device seamlessly carry over to your new phone. Whether you value Transfer speed, data integrity, or ease of operation, imyPass iPhone Transfer delivers an excellent experience in these areas. Not only does it make it easy to figure out how to transfer iPhone to new iPhone, but it also ensures data security and a clear interface throughout the process, making switching a smooth upgrade rather than a hassle.

Clara is an editor from imyPass. She specializes in data recovery. You can find professional tutorials and solutions for recovering lost data from any device. Many users reported that his tutorial is easy and useful.
Hot Solutions
-
Transfer Data
-
Recover Data
-
Unlock iOS
-
iOS Tips
