Best Ways to Send Your Audio Notes from iPhone to Other Devices
![]() Clara Prescott Published on November 27, 2025Transfer Data3-min reading
Clara Prescott Published on November 27, 2025Transfer Data3-min reading
Do you have a lot of voice memos that consume a lot of space on your device? In that case, the best solution you can do is to share your voice notes with your friends or other devices. If you don't have enough idea of how to share your voice memos effectively, then you are in the right place. In this article, we will give you all the best methods you can use to send your voice notes without any problem. You will also learn how to sync your notes automatically for easier access. Without further ado, you can pay a visit to this guidepost and discover all the methods on how to transfer voice notes from an iPhone.

In this article:
Part 1. How to Send a Voice Note from an iPhone
Do you want to learn how to send voice notes on an iPhone? Well, one of the best solutions you can use is by using the Share feature. With this feature, you can ensure that you can share your voice notes on various platforms. You can share the voice memos through AirDrop, Email, Messages, Messenger, Instagram, and more. What makes the process ideal is because of its simplicity. Even if you are a beginner, you can achieve the result you need without encountering any difficulties.
If you want to start learning the method to share and send your voice notes from iPhone to other platforms, check the detailed steps below.
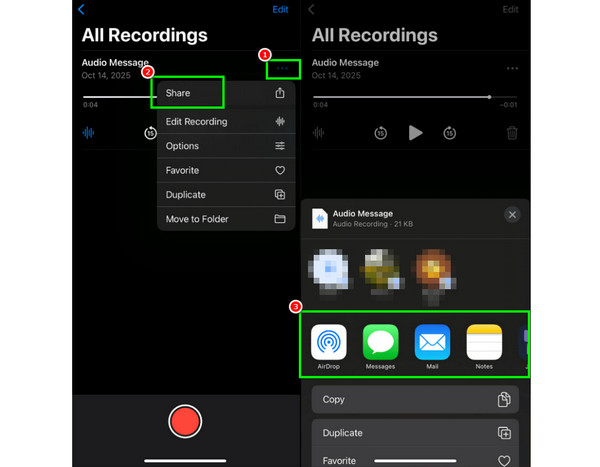
Open your iPhone and proceed to the Voice Memos app and browse the recorded audio you want to share.
After that, you can now press the three dots option and hit the Share option.
When the Share sheet shows up, you can begin sending your notes to various platforms, such as AirDrop, Email, Messages, and more.
Part 2. How to Transfer Voice Notes to a Computer
Are you looking for an effective method to transfer your voice notes from an iPhone to a computer? Then you can rely on this section. You can read all the information below and explore the best ways to transfer your voice notes to your computer smoothly.
Method 1. Transfer Voice Notes to a Computer Using imyPass iPhone Transfer
If you want to send your voice notes from your iPhone to a computer, we suggest using imyPass iPhone Transfer. This program is perfect since it has all the features you need for achieving your desired result. The good part here is that you can send all the notes at once, allowing you to save more time during the process. In addition to that, besides voice notes, you can also share more files, such as music, images, text, documents, and more. With that, when it comes to sharing files, there is no doubt that imyPass iPhone Transfer is among the best file-sharing software you can rely on.
To transfer voice notes from an iPhone to a computer, you can use the step-by-step process below.
Download imyPass iPhone Transfer on your computer. For easier access, you can use the Free Download buttons below.
Once you launch the software's main interface, go to the Others section and start connecting your computer to your iPhone using a cable.
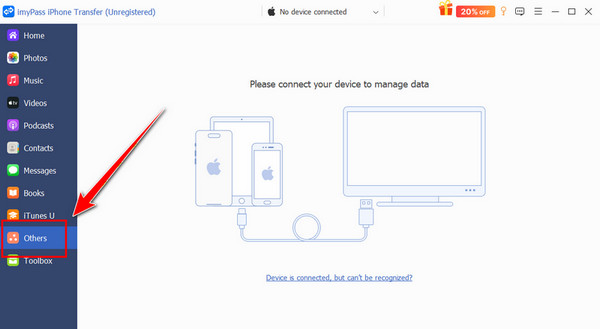
Select the notes you need, and you can start with the voice notes sharing process.
Thanks to this procedure, you can effectively share your voice notes from your iPhone to your computer. The best part here is that you can use the program in many ways. You can send files from iPhone to a Mac, such as music, messages, photos, and more.
Method 2. Transfer Voice Notes to a Computer Using iCloud
iCloud is also an excellent tool you can use for sharing your voice notes with your computer. What makes it ideal is that you can keep as many voice notes as you want, as long as you have enough iCloud storage. Aside from that, you can also decide where you want to save the voice memo, making it more convenient for all users. So if you want to learn more about this process, you can use the instructions below.
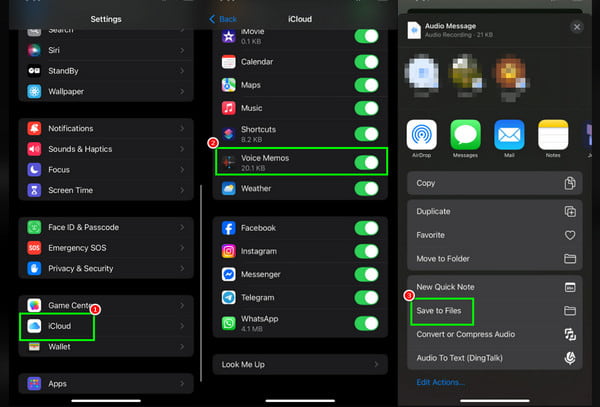
On your iPhone, you can proceed to the Settings app and press the iCloud section.
Then, you can proceed to the Voice Memos app and toggle it on.
After that, launch your Voice Memos app and browse the audio to tap the three dots option. Once done, hit the Save to Files option.
You can now open your iCloud on your computer and proceed to the files where you save the voice notes.
Method 3. Transfer Voice Notes to a Computer Using Finder
Do you want to use Finder to send your voice notes from your Mac to your iPhone? If so, the task is possible. Finder has the AirDrop feature that allows you to access an effective sharing process. The good thing about this feature is that it can offer an easy and fast process, making it convenient for Apple users. Aside from that, you can also use this feature for sharing more files, like music, documents, pictures, and more. Thus, if you want to start sending your voice notes from Mac to iPhone using Finder, see the instructions below.
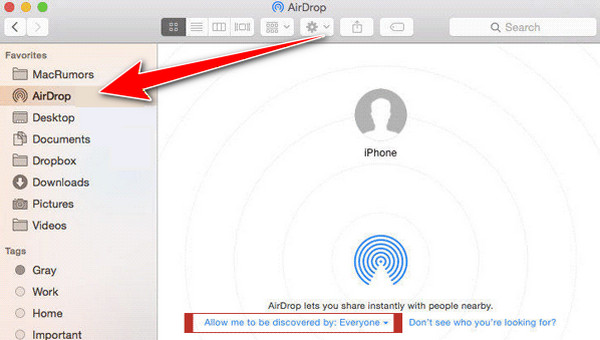
On your Mac, launch the Finder tool and select the AirDrop feature from the left interface.
Ensure that the iPhone's AirDrop feature is turned on, including Bluetooth.
With that, you can begin clicking and dragging the voice notes file to the recipient's device.
Part 3. How to Sync Voice Notes Automatically via iCloud
Syncing your voice notes with iCloud is ideal if you want to access the file on your Mac, iPhone, iPad, and other Apple devices. With this process, you can ensure that all your voice notes won't disappear on your devices. What's more, what we like about iCloud is that you can sync more apps. You can sync Apple Music library, Messages, Maps, and more.
If you want to sync voice notes automatically, you can use the simple methods below.
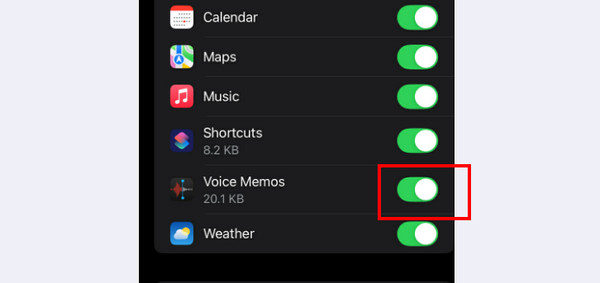
Run the Settings app and tap the iCloud option.
Then, click the Voice Memos app and enable it. With that, your voice notes are already in sync.
You can now use your Mac or iPad to see the voice notes. Ensure that you are operating the same Apple ID account for successful access.
Conclusion
To effectively send audio notes from an iPhone to various platforms, you can use the steps provided in this tutorial. You even learned how to share voice notes from Mac to iPhone and the best way to sync your audio notes via iCloud. Plus, if you want an excellent method to send voice notes from your iPhone, we recommend using imyPass iPhone Transfer. This program ensures that you can share any files from your iPhone to your PC and vice versa, making it an astounding software for all users.

Clara is an editor from imyPass. She specializes in data recovery. You can find professional tutorials and solutions for recovering lost data from any device. Many users reported that his tutorial is easy and useful.
Hot Solutions
-
Transfer Data
-
Recover Data
-
Unlock iOS
-
iOS Tips
