How to Transfer Photos from PC to iPhone [6 Easy & Effective Methods]
![]() Clara Prescott Published on October 23, 2025Transfer Data3-min reading
Clara Prescott Published on October 23, 2025Transfer Data3-min reading
Consider you are trying to remember and enjoy an amazing holiday, and there are hundreds of photos and memories to relive, but you are still stuck to your computer to do so, and trying to figure out how to transfer photos from PC to iPhone would be one of the more complex Apple tasks. iTunes is too limited, iCloud, if you are lucky, and email for one or two. There was a gap in the system for customers and for Apple. Now there are many for all types of customers, wired or wireless, iPhone or computer, you will be able to get your photos and memories to your phone.

In this article:
Method 1: Using a Transfer Software
If you want to move a large selection of photos to your iPhone from your computer and do not want to use iTunes, imyPass iPhone Transfer is the solution for you. The software prioritizes simplicity, speed, and reliability when transferring photos. iTunes can feel restricting; however, imyPass iPhone Transfer allows you to manipulate your files and decide how you want to send and organize your photos.

4,000,000+ Downloads
Move hundreds or even thousands of photos to your iPhone in minutes.
Create new albums or batch-move photos directly from your computer.
Automatically converts HEIC images into JPG or PNG when needed.
Lets you view details like date, location, size, and format.
For Windows or Mac systems, you can download imyPass iPhone Transfer from its official website, and then you can continue with the installation process.
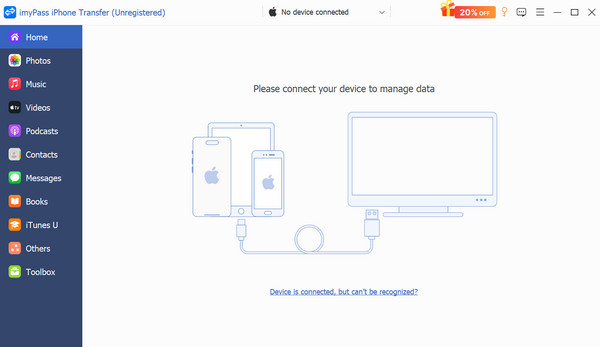
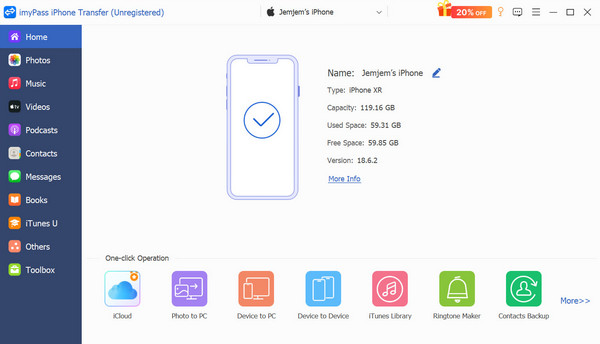
After that, you can use a cable to connect your iPhone to the computer. The software opens, and your iPhone is automatically detected.
From the main interface, select the Photos option to access the photo management interface for your iPhone.
Click the Add button, then select the photos or entire folders you wish to import from your computer.
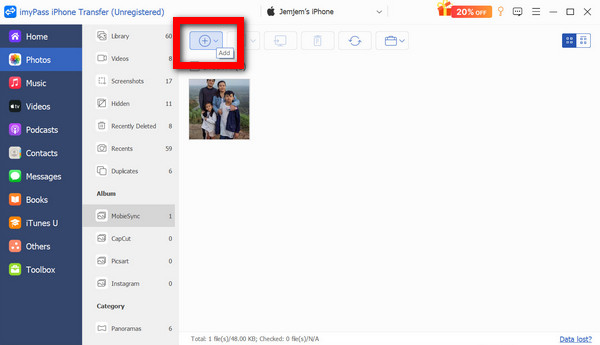
After you confirm your choice, the photos will be transferred to your iPhone in a matter of seconds. The imported photos can also be organized in the software, or new albums can be created during the transfer process.

Method 2: Using a USB Cable & iTunes/Finder
For photo syncing on Windows, Apple iTunes uses Finder on Mac. This method may not be the fastest, but it is also a dependable method for moving many images at once.
Use iTunes on Windows or Finder on macOS to install the software.
Use a USB cable to connect your iPhone to your computer.
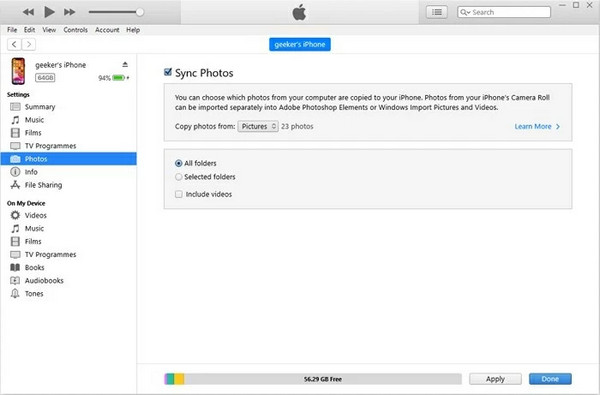
iTunes/Finder will open, and you will need to click on your device icon.
Click Photos, and then check the box for Sync Photos.
Select which folders or albums you wish to sync, then click Apply to transfer.
Method 3: Using iCloud Photos
Keeping your images in sync across multiple devices is even more easily accomplished with iCloud Photos. Once you upload your photos to iCloud from your PC, you can access and download iCloud photos from your iPhone in any location at any time.
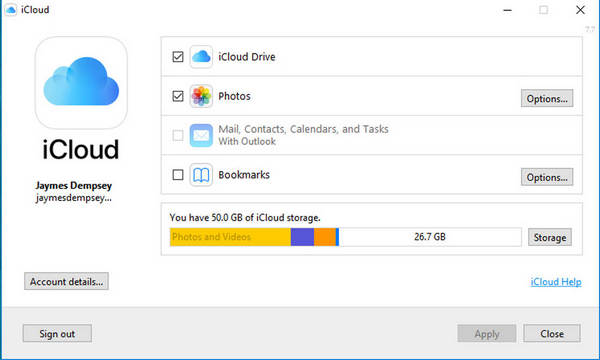
First, on your PC, install iCloud for Windows.
Log in with your Apple ID.
After that, check iCloud Photos, and then select Photos.
Put the photos you want to keep on iCloud.
Open the Photos app on your iPhone to view your photos.
Method 4: Using AirDrop
On the Mac, the most fuss-free way to send photos wirelessly to the iPhone is by AirDrop. You can send multiple files at once, and there are no cables, apps, or cloud services to deal with to retrieve AirDrop files.
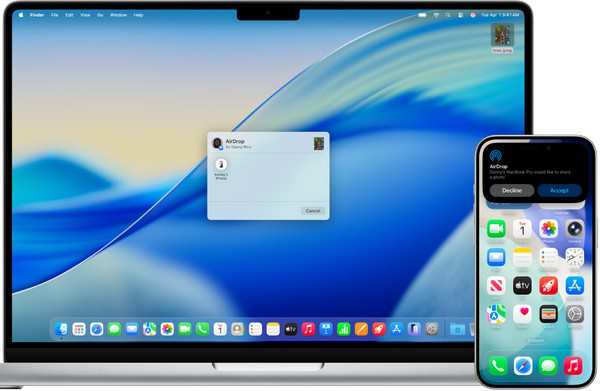
From the Control Center on your iPhone, AirDrop is available in Settings.
After that, on your Mac, open Finder and get the photos you want to send.
Then, right-click to open a menu and select Share, followed by AirDrop.
From the devices listed, select your iPhone.
After that, accept the file to save the photos on your iPhone.
Method 5: Using Third-Party Cloud Services
Google Photos, Dropbox, and OneDrive are also excellent options to get your photos from a PC to your iPhone. You can upload to your computer, then download or view the photos on your iPhone anytime.

Install whichever cloud service you like best on your PC and iPhone.
On both devices, log in using the same account.
From your PC, upload the desired photos into the designated cloud folder.
Go to your iPhone and open the app.
You can keep the photos directly in the app or download them locally to your phone.
Method 6: Using Email or Messaging Apps
For those times when you need to transfer only a few photos, the simplest option is to use email or messaging apps. You can send a message to yourself with the photos you need to transfer, then open the message on your iPhone to download the photos directly to your device.

On your PC, open your email client or messaging app.
Create a new message, then attach the photos you want to send.
Send the message to your own email address or chat.
Go to your iPhone and open the app.
Save the attached photos to your device.
Which Method is Best for You?
A quick-reference table is provided to help you choose the most efficient way to transfer photos from PC to iPhone. Comparing the different methods based on speed, ease of use, and reliability lets you find the most suitable option for your needs, and, based on this table, the most efficient is imyPass iPhone Transfer.
| Method | Speed | Keeps Photo Quality | Bulk Transfer | Easy to Use | Risk of Overwriting | Best For |
| imyPass iPhone Transfer | ✅ | ✅ | ✅ | ✅ | ✅ | Best overall |
| iTunes/Finder | ❌ | ✅ | ✅ | ❌ | ❌ | Traditional syncing |
| iCloud Photos | ❌ | ✅ | ✅ | ✅ | ❌ | Seamless syncing |
| AirDrop (Mac only) | ✅ | ✅ | ❌ | ✅ | ✅ | Quick Mac transfers |
| Third-Party Cloud | ❌ | ✅ | ✅ | ✅ | ❌ | Cross-platform use |
| Email/Messaging Apps | ❌ | ✅ | ❌ | ✅ | ✅ | Small file sharing |
Conclusion
To copy photos from a PC to an iPhone is all up to the computer user. Turn off the computer and do not do anything else. Moving your photos to your phone is dependent on the user. If you want the easiest tool that transfers in large batches, has multiple controls, and for each tool, you get the fastest output, and you transfer a user-friendly tool, it is the imyPass iPhone Transfer.

Clara is an editor from imyPass. She specializes in data recovery. You can find professional tutorials and solutions for recovering lost data from any device. Many users reported that his tutorial is easy and useful.
Hot Solutions
-
Transfer Data
-
Recover Data
-
Unlock iOS
-
iOS Tips
