Restore iPhone from iTunes Backup Conveniently [Complete Guide]
![]() Clara Prescott Published on January 23, 2026Recover Data3-min reading
Clara Prescott Published on January 23, 2026Recover Data3-min reading
Your iPhone keeps important parts of your daily life, from photos and messages to app data and settings. When something goes wrong or you move to a new device, restoring that data becomes critical. This guide explains how to back up and restore an iPhone using iTunes simply and practically, using clear steps based on how Apple tools work today. You will learn what to prepare and what to expect before restoring. First, it is important to review a few key requirements before you begin.

In this article:
Before You Start - Crucial Prerequisites
1. Locate Your Backup
Check beforehand that you have a backup file and that it is available on your computer. Click on iTunes and look at the list of devices backed up to confirm that it has the correct date and size. This makes the data complete and useful. The absence of or the out-of-date file might halt the process or reestablish the information that is no longer available. Taking a moment to locate the correct backup reduces errors during backup and restore iPhone iTunes and saves time later.
2. Update Your Software
The most frequent reason for restore failure is old software. Ensure that iTunes is updated to the most current version on Windows and older macOSes. Updates ensure bugs and enhancements in the compatibility of the devices. When the software versions are not aligned with the existing system requirements, then the restore can either stop working or the system can freeze. Keeping everything current is essential when you restore an iPhone from an iTunes backup safely and without interruptions.
3. Prepare Your iPhone
Before connecting with your iPhone, you have to prepare it. Unplug the battery, and at least charge it to fifty percent, and set Find My iPhone to off. A steady machine eliminates unwanted interruptions during the operation. Preparation serves to prevent biased results or mistakes. These steps are especially important for a smooth iPhone iTunes backup restore that keeps your data intact.
4. Use the Right Cable
A Lightning cable should be Apple-certified or original. Damaged or cheap cables may disconnect in the process of data transfer. Even a brief interruption can bring about a restore failure. A safe connection enables iTunes to interact with your device accordingly. Using the correct cable improves stability when you restore an iPhone backup from iTunes and reduces the risk of data corruption.
Step-by-Step Restore Guide
Restoring your iPhone does not have to be complicated. Whether you use a Windows PC, an older Mac with iTunes, or a modern Mac with Finder, these steps will help you recover your data safely and completely.
1. On Windows PC or Older Mac (Using iTunes)
This option is best for users who manage their iPhone data through iTunes on a Windows PC or an older Mac. It works well when you need a full device restore from a local backup stored on your computer. It is a steady process that does not depend on access to clouds and provides you with a clear picture of what backups are available. When performed correctly, it provides a reliable means of restoring an iPhone using iTunes backup without the danger of losing part of the data.
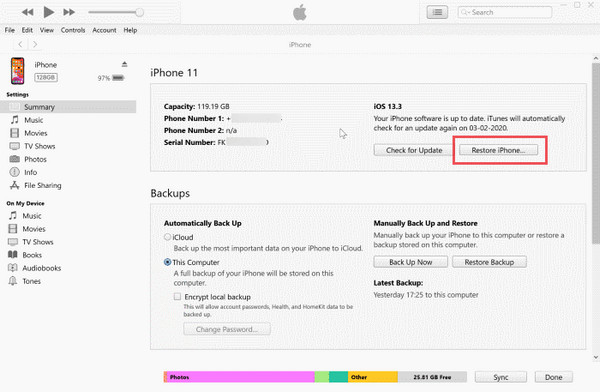
Start iTunes and let it load fully so the software can detect backups and prepare the restore tools.
Use a USB cable to connect your iPhone, then select the device icon and open the Summary section.
Click Restore Backup, choose the backup you need, and confirm. Keep the device connected until the restore finishes.
2. On Modern Mac (macOS Catalina and Later - Using Finder)
Finder is used in place of iTunes in newer Macs, and the restoration of iPhones is also done via macOS. This in-built solution is less cumbersome and more efficient, and it also provides the same backup access. It is a good product to use when the user would like to have a clean interface and system-level stability. With the help of Finder, it is possible to restore a full iPhone iTunes backup without the need to install extra software. Using Finder allows a complete iPhone iTunes backup restore without installing additional software.
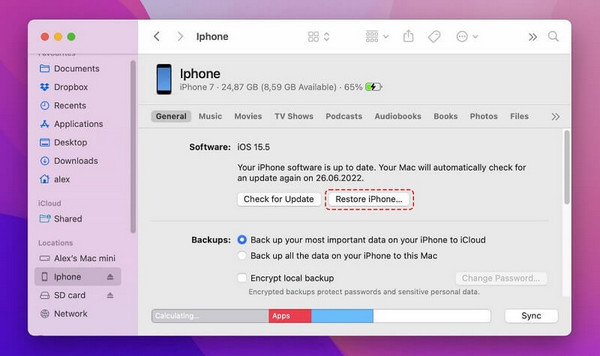
Establish a connection on your iPhone to the Mac with a USB or USB-C cable and open Finder.
Pick your iPhone from the sidebar and tick the General tab to view restore options.
Tick Restore iPhone, choose the backup you want, and confirm. Leave the device connected until the process completes.
What Gets Restored? (iTunes vs. iCloud Backup)
When you restore an iPhone backup from iTunes, you regain most of your personal information, applications, and settings on your iPhone just as you had left them when the iPhone backup was created. iTunes gives a more comprehensive local recovery of the iCloud backup, such as material not backed up to the cloud. A list of what is restored is broken down into the following:
1. Photos and Videos
iTunes restores all photos and videos stored on your iPhone, including those not synced with iCloud. This ensures that every image and video you captured or saved locally is recovered exactly as it was.
2. Messages and Call History
All SMS, MMS, iMessages, and call history are recovered from the backup. This makes sure that important conversations and call logs remain intact after the restore.
3. App Data and Documents
Data on the apps, documents saved and preferences are restored to their old form. In contrast to iCloud, iTunes is able to restore specific information about the applications that are saved on the device.
4. Device Settings
Wi-Fi networks, wallpapers, display settings and system preferences are completely restored. This does away with the reconfiguration of your iPhone once it has been restored.
5. Health and Activity Data
If your backup is encrypted, all Health app data and activity information are restored. This ensures that fitness, medical, and activity records are preserved.
6. Safari Data
Safari preserves bookmarks, browsing history, and reading lists that enable one to resume browsing the web at the point of abandonment.
7. Ringtones and Custom Sounds
Every ringtone, alarm and other personalized sounds stored on the device are retrieved, hence your personalized alerts are retained.
iTunes backups provide a full snapshot of your iPhone, while iCloud focuses mainly on cloud-synced data. For a complete and reliable recovery of your device, restoring from an iTunes backup is usually the best choice. When you can not restore an iPhone with the Apple device app, then use the bonus tool below, as it solves the issue of restoring lost or deleted content.
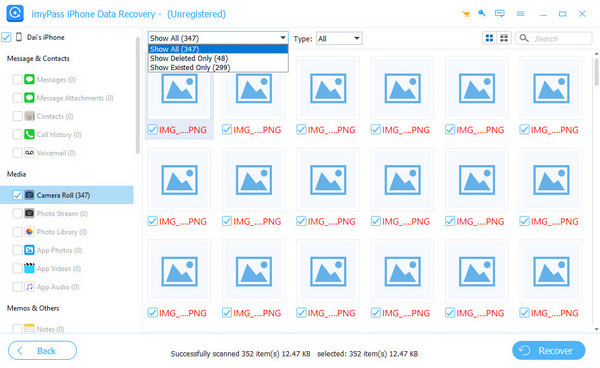
Bonus: Restore Your iPhone Easily with imyPass
imyPass iPhone Data Recovery provides a straightforward way to recover lost iPhone data without relying solely on iTunes or iCloud. It is able to access photos, messages, contacts and app files even with missing and incomplete backups. The user-friendly interface of the tool is fast and simple; it takes a short time, and the preview feature allows you to select exactly what you want to restore. To all those who seek an effective, safe, and adaptable backup option to the traditional backups, imyPass can be the effective choice in restoring information back to its original state and location.
Conclusion
You do not have to make it complicated to restore your iPhone. The above steps will allow you to recover your apps, photos, messages, and settings safely because iTunes gives you a complete local backup. In case your data cannot be recaptured using iTunes or iCloud, you can use such tools as imyPass as a means of recovering your lost files. By using these methods, you can quickly and safely restore an iPhone from an iTunes backup without losing important information.

Clara is an editor from imyPass. She specializes in data recovery. You can find professional tutorials and solutions for recovering lost data from any device. Many users reported that his tutorial is easy and useful.
Hot Solutions
-
Recover Data
- Recover WhatsApp View Once Photo
- Recover Deleted TikTok Videos on Mobile
- Recover Deleted Facebook Photo
- Recover Viber Messages, Photos, etc.
- Recover Deleted Snapchat Photos
- 5 Best Contact Recovery Apps
- Recover Deleted Discord Messages
- AppGeeker iOS Data Recovery Review
- Recover Data from DFU Mode
- Cannot Restore iPhone Backup
-
Unlock iOS
-
iOS Tips
-
Password Tips
