How to Restore an iPhone or iPad When It is Disabled
![]() Clara Prescott Published on April 03, 2026Recover Data3-min reading
Clara Prescott Published on April 03, 2026Recover Data3-min reading
With the passcode, you can unlock an iPhone quickly. However, if you forgot your passcode, you will have 10 attempts to try your passcode. Then, your device will become disabled and locked permanently. You should see the iPhone Unavailable message on iOS 15.2 and above or iPhone Disabled on old iOS versions. To regain access to your device, you have to restore the disabled iPad or iPhone. This guide demonstrates the available methods.

In this article:
Part 1: How to Restore Disabled iPhone with iTunes
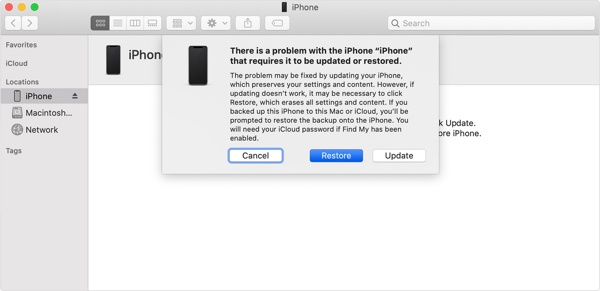
The traditional way to restore an iPhone when it is disabled is to use iTunes or Finder. This method requires a computer, a compatible USB cable, and the latest version of iTunes or Finder.
Connect the disabled iPhone to a computer with a USB cable.
Open iTunes on Windows and macOS Mojave or earlier. Run Finder on macOS Catalina or later.
Put your iPhone in Recovery Mode:
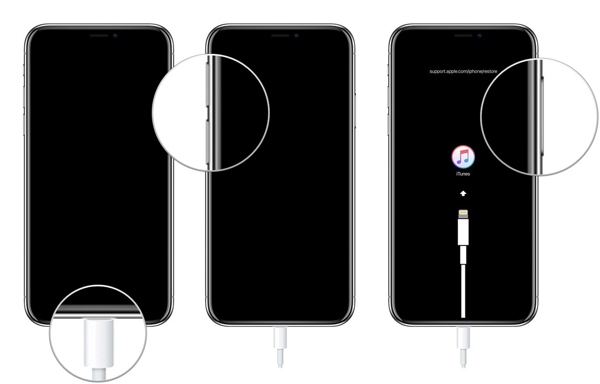
On iPhone 8 or later
Quickly press and release the Volume Up button.
Do the same thing with the Volume Down button.
Hold the Side button until the Recovery Mode screen appears.
On iPhone 7/7 Plus
Press and hold the Volume Down + Side buttons together.
Once it enters Recovery Mode, release the buttons.
On iPhone 6s or earlier
Long-press the Home + Power buttons simultaneously.
When you see the Recovery Mode screen, let the buttons go.
Once iTunes or Finder detects your iPhone in Recovery Mode, click the Restore button.
Part 2: How to Restore Disabled iPhone via Security Lockout
Since iOS 15.2, Apple has introduced the Security Lockout feature into all iOS devices. It comes with two options on the iPhone Unavailable screen that allow you to restore a disabled iPhone or iPad to factory settings with your Apple ID password.
On iOS 17 and above
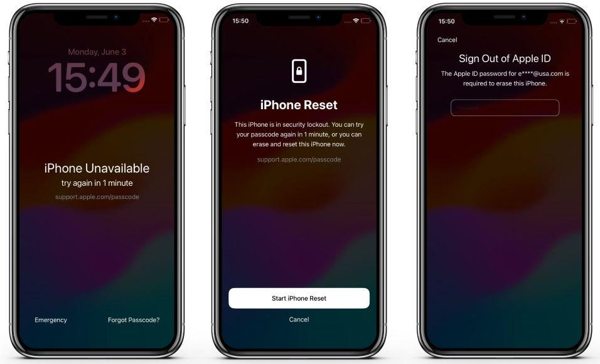
Tap the Forgot Passcode option at the bottom.
Choose Start iPhone Reset.
Input your Apple ID password and begin restoring the disabled iPhone to factory settings.
On iOS 15.2 and above
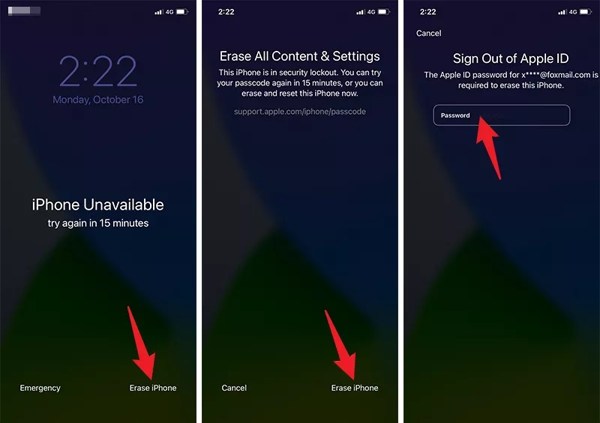
Tap the Erase iPhone option on the iPhone Unavailable screen.
Read the message and tap Erase iPhone again.
Type in your Apple ID password to confirm restoring a disabled iPad or iPhone.
Part 3: How to Restore Disabled iPhone by Find My
If you intend to restore a disabled iPhone without iTunes, the Find My app is available. The prerequisite is that you have enabled Find My iPhone or Find My iPad on your device before it is disabled.
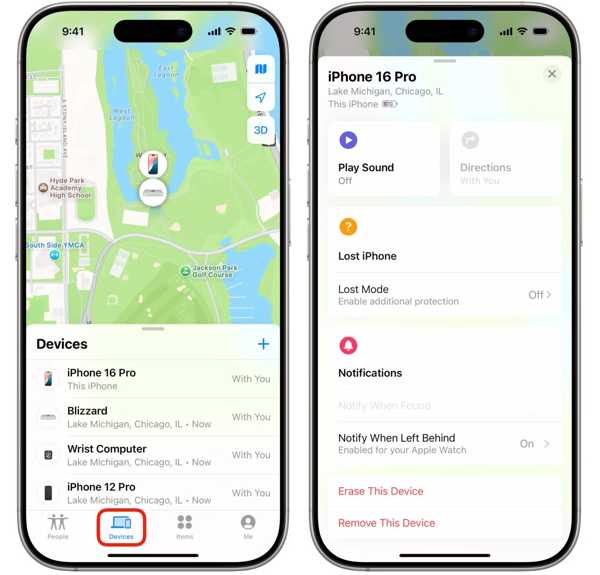
Open the Find My app on an accessible Apple device, like another iPhone, iPad, or a MacBook.
Go to the Devices tab and pick your iPhone from the list. If you cannot find it on the list, tap Add next to Devices, choose Add AirTag, and add your iPhone by entering your Apple credentials.
If you don’t have another Apple device, log in to www.icloud.com/find/.
Tap the toolbar at the bottom.
Select Erase This Device.
Tap Continue, enter your phone number, and hit Erase to factory reset your iPhone.
Part 4: Bonus Tip: How to Recover Data after Restoring a Disabled iPhone
Restoring a disabled iPhone or iPad will erase all data on your device. If you forgot to make a backup, imyPass iPhone Data Recovery can help you get back your data. It can scan your iPhone's memory and look for any data.

4,000,000+ Downloads
Retrieve data from a disabled iPhone or iPad.
Open an iTunes or iCloud backup for data recovery.
Preview lost files for selective recovery.
Support a wide range of data types and file formats.
Compatible with the latest versions of iOS and iPadOS.
How to Recover Data after Restoring a Disabled iPhone
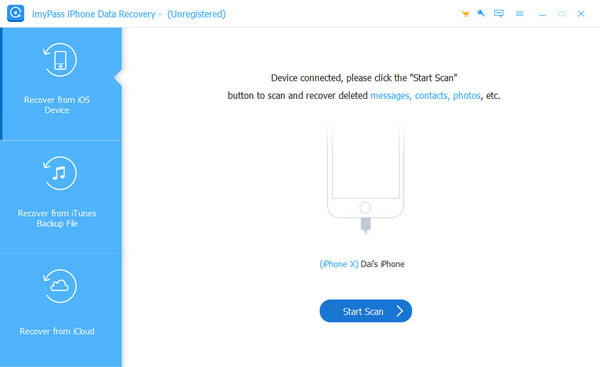
Connect to your device
Start the iPhone recovery software after you install it on your PC. There is another version for Mac. Plug your disabled iPhone into your PC with a Lightning cable. Choose the Recover from iOS Device tab, and click the Start Scan button.
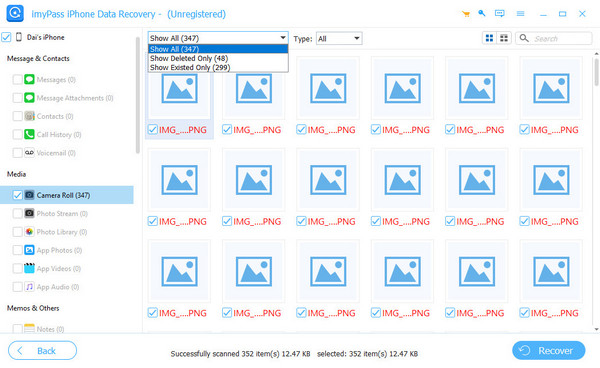
Preview your data
Once the data scan is complete, you will be presented with the main interface. You can view iPhone data by type, like Camera Roll, Contacts, Messages, and more.
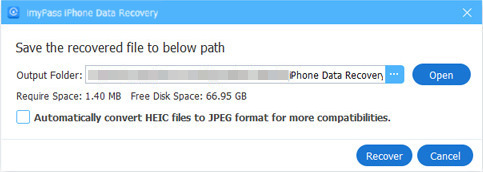
Retrieve iPhone data
Select all files and items you want to restore, and click the Recover button. Click the Open button, set an output folder, and hit Recover.
Extended Reading:
Conclusion
This tutorial discussed how to restore a disabled iPad or iPhone in various situations. iTunes is an option if you forgot your Apple ID password. The Security Lockout screen enables you to restore your device directly. The Find My app is another option if you have enabled Find My iPhone or Find My iPad. imyPass iPhone Data Recovery is the ultimate solution to recover data after restoring your disabled device.

Clara has over 8 years of experience helping users recover lost files and transfer data. She previously worked as a data recovery technician for a major IT service company. Certified in Data Recovery and Digital Forensics, her articles focus on simple solutions that make complicated recovery tasks easier for everyday users.
Hot Solutions
-
Recover Data
- AppGeeker iOS Data Recovery Review
- Disk Drill iPhone Data Recovery Review
- How to Get iPhone Out of Recovery Mode
- How to Fix support.apple.com/iphone/restore
- How to Recover Data from DFU Mode
- Gbyte iPhone Data Recovery Review
- How to Recover iPhone Deleted Photos After 30 Days
- How to Recover Deleted Photos on iPad
-
Unlock iOS
-
Transfer Data
-
iOS Tips
