How to AirDrop from iPhone to Mac - Simple Steps, Fixes & Alternativess
![]() Clara Prescott Published on November 07, 2025Transfer Data3-min reading
Clara Prescott Published on November 07, 2025Transfer Data3-min reading
How to AirDrop from iPhone to Mac without using cables or complicated software? Many Apple users ask this when they want to move photos, videos, or documents quickly between devices. AirDrop is a built-in wireless transfer tool of Apple that works through Wi-Fi and Bluetooth. In this guide, you will learn how to send files from iPhone to Mac, enable AirDrop on Mac, and fix common issues.

In this article:
Part 1. How to AirDrop from iPhone to Mac
AirDrop allows you to transfer files, pictures, and videos from your iPhone to your Mac without an internet connection or any wires. This transfer technique works without any complex settings. It is safe, quick, and your files automatically go to the Downloads folder for immediate access.
Locate the file on your iPhone, for example, in the Photos app.
Tap the file or photo you want to share and select the Share button.
Then choose the AirDrop option.
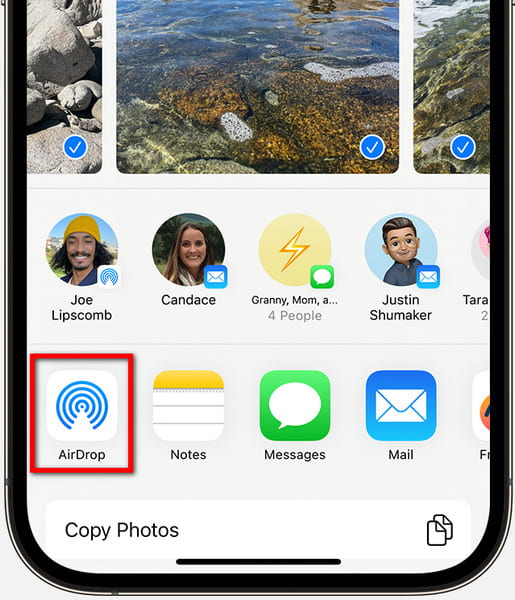
Your Mac will appear on the AirDrop list. Tap on it to select.

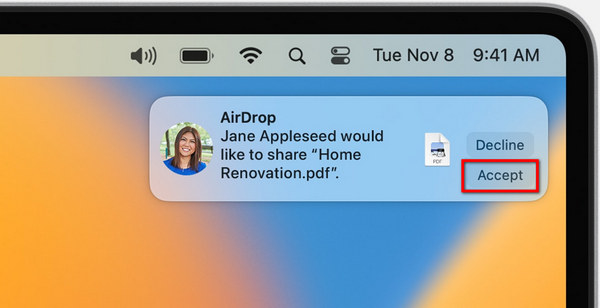
Your Mac will prompt you to Accept it. The file will save to your Downloads folder.
Part 2. How to Find and Turn On AirDrop on Your Mac
To use AirDrop, it must be enabled on your Mac so that it is visible to nearby devices. It establishes a direct connection using both Bluetooth and Wi-Fi. These connect your iPhone to the Mac for transfer.
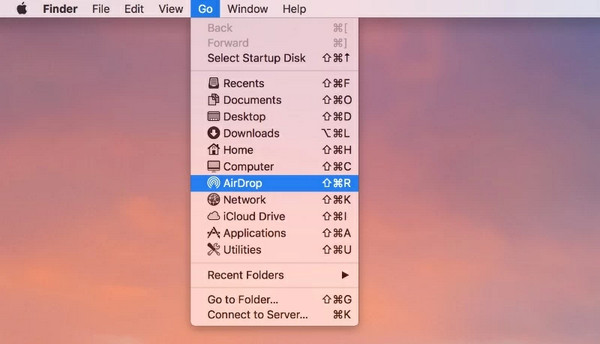
Launch Finder on your Mac.
Now select AirDrop from the sidebar.
Ensure Wi-Fi and Bluetooth are enabled.
From the bottom of the AirDrop window, please change the setting to Allow me to be discovered by Contacts Only or Everyone.
Part 3. Can I AirDrop Files from Mac to Other Devices?
You can also send files from your Mac to an iPhone, iPad, or another Mac using AirDrop. This enables you to transfer documents, images, or videos wirelessly and instantly between your devices, with no need for cables, external storage, or even needing to unlock Mac without password interruption.
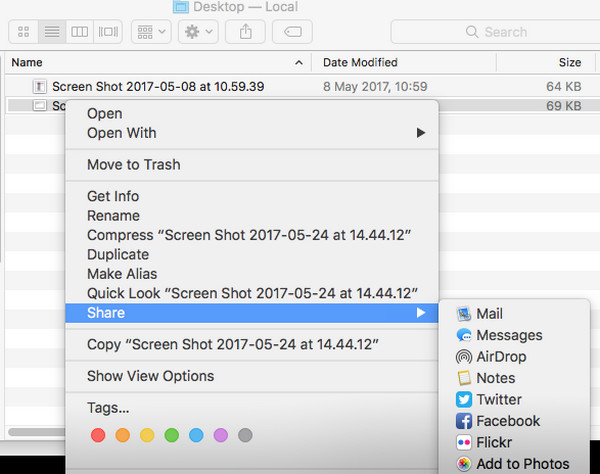
Open Finder and find the file(s) you would like to share.
Right-click the file and choose Share > AirDrop, or use the Share option in Finder.
Look in the AirDrop list to see if the recipient iPhone, iPad, or Mac is there.
Choose the recipient device and click on it.
On the receiving device, tap or click Accept. The file will open in the correct app (Photos for images, Files for documents, etc.).
Part 4. Best AirDrop Alternative to Transfer Data on Mac
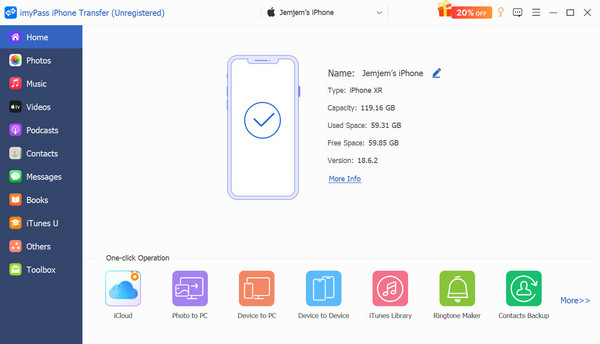
AirDrop is convenient in many situations, but when it comes to transferring large files, working on multiple platforms, or managing complex tasks, it may not be the ideal solution. Here, imyPass iPhone Transfer provides greater flexibility. No iTunes or iCloud is required. iPhone data can be transferred, synced, and managed on both Windows and Mac computers. It handles almost all data types and provides fast transfers, along with powerful management features, to help keep your data organized and secure.

4,000,000+ Downloads
Transfer photos, videos, music, contacts, and more between iPhone and Mac.
Move files both ways, iPhone to Mac or Mac to iPhone, without data loss.
Manage and convert files, such as HEIC to JPG/PNG or music to iOS formats.
Edit, delete, de-duplicate contacts, and export iMessages or WhatsApp chats.
Back up and restore contacts, create ringtones, and sync iTunes files easily.
Download and Install the Tool
To get started, visit the official imyPass website and download the iPhone Transfer for Mac version. Install it on your system. After the installation is completed, launch the application.
Link Your iPhone to Mac
Connect the iPhone, iPad, or iPod to the Mac using a USB cable. The software will identify your device and present the data categories available on your device.
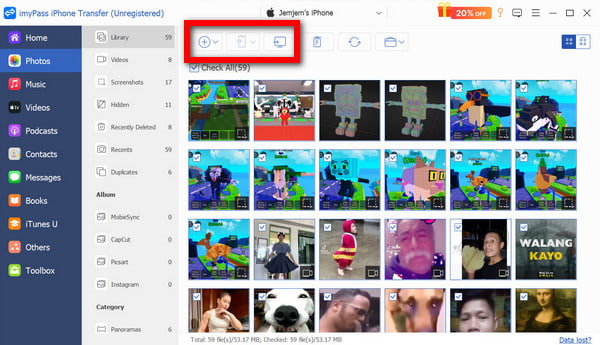
Choose the Data You Would Like to Move
From the main page of the software, select the data type you would like to transfer, such as Photos, Music, Contacts, or others. You can review the files to guarantee you have chosen the correct ones before moving them.

Start the Transfer
To transfer the files to your Mac, click the Export to Mac button. To transfer data to your iPhone, click the Add button to upload files from your Mac to your iPhone.
Manage Files on Mac
Once the transfer is complete, you can utilize the organizational features to sort your photos into albums, edit song details, or merge duplicate contacts, all directly from your Mac.
Part 5. Why is AirDrop on Mac Not Working & How to Fix
Transferring files from iPhone to Mac is seamless, but there are occasions when your Mac does not show up or the transfer gets stuck. Improper settings, outdated software, or an unstable connection can cause this issue. Below are the most common reasons for these problems, how to retrieve AirDrop files, and the steps to fix them.
Common Reasons AirDrop Does not Work on Mac:
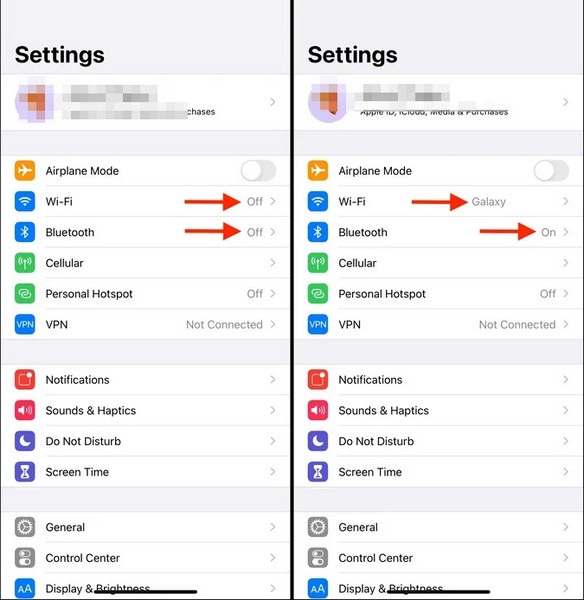
• Bluetooth or Wi-Fi is turned off.
• Devices are too far apart (more than 30 feet).
• Drop Visibility is set to Receiving Off.
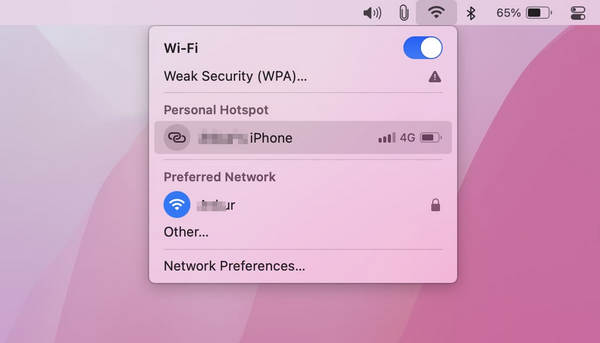
• Your iPhone has Personal Hotspot active.
• Your iOS or macOS software is out of date.
• Network and firewall restrictions.
How to Fix AirDrop on Mac
Fix 1. Check Wi-Fi and Bluetooth
Ensure that Wi-Fi and Bluetooth are enabled on both your iPhone and Mac. AirDrop will not function if either is turned off.
Fix 2. Change AirDrop Visibility
• On iPhone: Settings > General > AirDrop > choose Contacts Only or Everyone.
• On Mac: Finder > AirDrop and set the same option.
Fix 3. Keep Devices Close
Your iPhone and Mac need to be within 30 feet (9 meters) for a reliable connection.
Fix 4. Disable Personal Hotspot
Go to Settings > Personal Hotspot and turn it off on your iPhone. It can prevent AirDrop from working.
Fix 5. Restart Devices
This will clear temporary glitches. Restart both your iPhone and your Mac.
Fix 6. Update Software
Update to the latest iOS and macOS versions to get the new AirDrop improvements that Apple includes with every update.
Fix 7. Check Firewall Settings
On your Mac, go to System Settings > Network > Firewall. Ensure that Block All Incoming Connections is turned off.
Conclusion
In this article, the process of AirDropping from a Mac to an iPhone and other devices is clearly explained, along with enabling AirDrop, transferring files, and troubleshooting issues that may arise when it fails to work. You also discovered imyPass iPhone Transfer as the best alternative, making file sharing between iPhone and Mac smooth, flexible, and reliable.

Clara is an editor from imyPass. She specializes in data recovery. You can find professional tutorials and solutions for recovering lost data from any device. Many users reported that his tutorial is easy and useful.
Hot Solutions
-
Transfer Data
-
Recover Data
-
Unlock iOS
-
iOS Tips
