How to AirDrop on iPad - Send, Receive, Enable & Fix AirDrop Issues
![]() Clara Prescott Published on November 07, 2025Transfer Data3-min reading
Clara Prescott Published on November 07, 2025Transfer Data3-min reading
Learning how to AirDrop on iPad makes file sharing between Apple devices fast and convenient. Whether you want to send photos, videos, or documents, AirDrop uses Wi-Fi and Bluetooth to transfer content securely. This guide covers sending, receiving, enabling AirDrop, fixing issues, and even the best alternative to AirDrop for PC-to-iPad transfers.

In this article:
Part 1. How to Use AirDrop to Send Files from Your iPad
The AirDrop feature lets you share multiple file types wirelessly among Apple devices like iPhones, iPads, and Macs. AirDrop transfers data using a combination of Bluetooth and Wi-Fi technology. It is instantaneous, Bluetooth is used for short distances, and Wi-Fi is used for long distances. If you want to transfer files using your iPad, you can follow a few simple steps.
On your iPad, open the file you want to share. It can be a photo or a video, and it can be located in the Photos app, the Files app, or in any other app that has the Share feature.
To see the sharing options, tap the Share button, which is a box with an upward arrow.
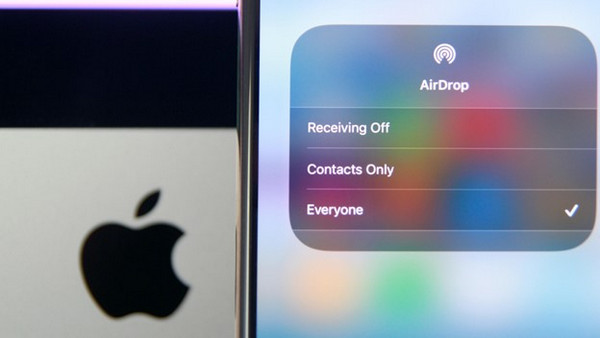
On your iPad, tap AirDrop from the sharing options. Your device will search for nearby Apple devices with AirDrop enabled. For best results, set AirDrop to Everyone so your iPad can connect instantly with the target device and start the transfer.
From the available devices, select the one you intend to share your file with. It can be an iPad, an iPhone, or a Mac.
The receiving device will be shown a notification that will ask to accept the file, which is when the file starts to transfer. The file will be sent through the app that is appropriate for the file type and will be saved there.
Part 2. How to AirDrop Files from PC to iPad
Transferring files from a Windows PC to an iPad does not feature AirDrop. However, using imyPass iPhone Transfer, one can easily share files across platforms. This software also functions as an AirDrop alternative since it enables PC to iPad transfer without fears of losing quality or dealing with compatibility issues.

4,000,000+ Downloads
Transfer files between Windows/Mac and iOS devices like iPhone, iPad, and iPod.
Move photos, videos, music, contacts, messages, notes, and more.
Fast transfers with no data loss or overwrites, keeping your files safe.
Manage media, sort contacts, edit music info, and convert HEIC to JPG/PNG.
Create ringtones, sync iTunes, and back up contacts.
Download and Install the Tool
To get the software on your Windows PC or Mac, navigate to the official website of imyPass, then follow the instructions on the screen to install it.
Connect Your iPad to the PC
Connect your iPad to your PC using a USB cable. If asked, on your iPad, tap Trust.
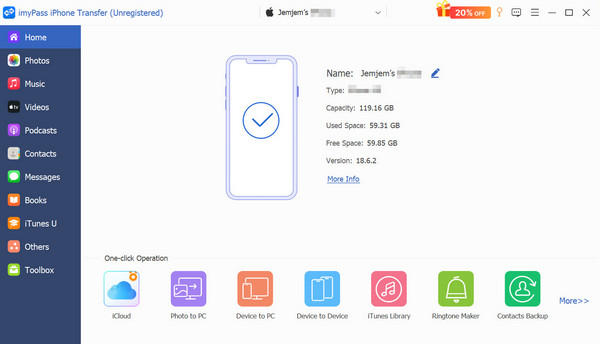
Launch the Software
Once your iPad is connected to your Windows, open imyPass iPhone Transfer. Your iPad will be displayed on the main interface once the software recognizes your iPad.
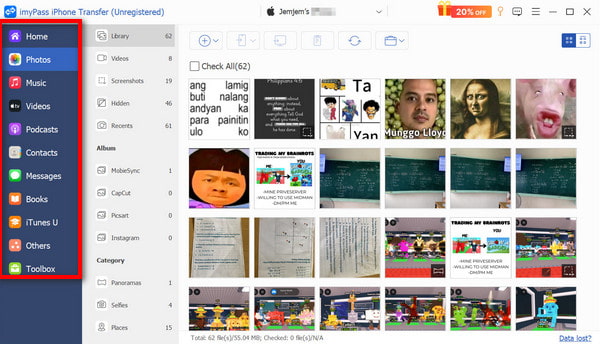
Select the Data to Transfer
To select the files to transfer, choose the data type from the left sidebar. This can be Photos, Music, Videos, Contacts, or Messages. The software will then display the files available from the selected category on your PC screen.
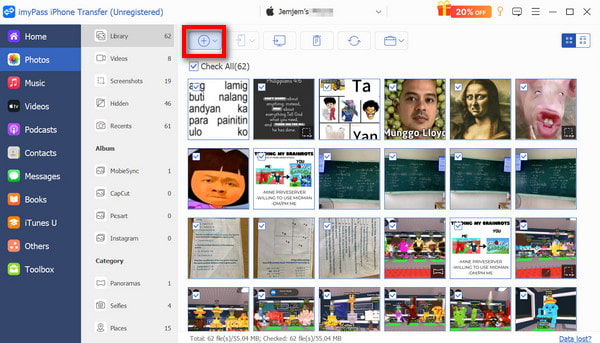
Begin the Transfer of Files
To choose files from your computer, click on the Add button. After that, click Open to finalize your selection. The files will be uploaded to your iPad right away.
Part 3. How to Receive Files with AirDrop on Your iPad
To receive files on your iPad using AirDrop is speedy and easy. Even if you are dealing with an iCloud-locked iPad, here is how to do it:
When another Apple device is directed to your iPad, a pop-up notification is displayed showing the name of the sender and the type of file being shared.
Tap Accept to confirm that you want to download and receive the file. Alternatively, if you do not want the file, you can click on Decline.
The file that you accepted will open automatically in an app where you can view or use it. For instance:
• Photos and videos will be open in the Photos app.
• Documents, PDFs, and other files will be open in the Files app.
• Website links will open in Safari.
After the transfer is complete, you can open the file in the app you saved it in, even offline.
Part 4. How to Turn On AirDrop on Your iPad
Both Wi-Fi and Bluetooth need to be switched on for AirDrop to function on your iPad. Also, your iPad has to be set to discoverable so that other Apple devices can connect to you. AirDrop can be turned on in two ways.
1. Using the Control Center
To access the Control Center, swipe down from the upper-right corner of your iPad screen.

The Control Center will show a network settings panel that you can expand by pressing and holding the square that has the WiFi, Bluetooth, and Airplane mode buttons.
From the expanded options, select the AirDrop button.
You can pick who can send you files by selecting one of the options.
• Contacts Only: Only people you have saved in your contacts can send you files.
• Everyone: Any nearby Apple devices can detect your iPad and send you files.
2. Using the Settings App
You can get to the Settings app from the iPad home screen.
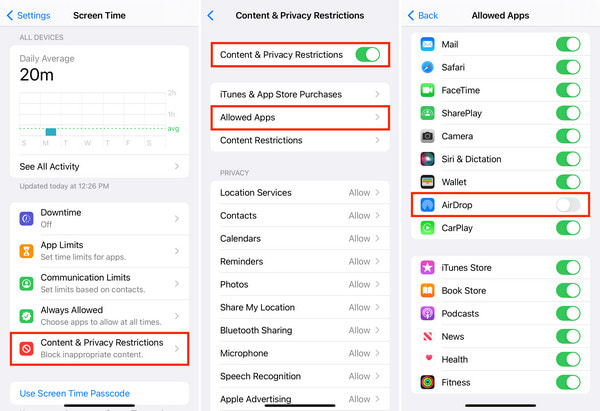
Go to the General section by scrolling down.
Tap AirDrop settings.
Pick from the options to set your preferences:
• Receiving Off: The iPad will not be visible to other devices, and you will not be able to receive files.
• Contacts Only: Only your saved contacts can send AirDrop files to you.
• Everyone: Any nearby Apple device can share files with your iPad.
Part 5. AirDrop on iPad Not Working
If your iPad is not functioning properly with AirDrop, consider the following troubleshooting tips:
• Check for Compatibility: Confirm that the other sending device (iPhone, iPad, or Mac) is compatible with AirDrop. AirDrop is not compatible with Windows computers.
• Check for Wi-Fi and Bluetooth: Ensure both Wi-Fi and Bluetooth are activated, as both are required for AirDrop to function.
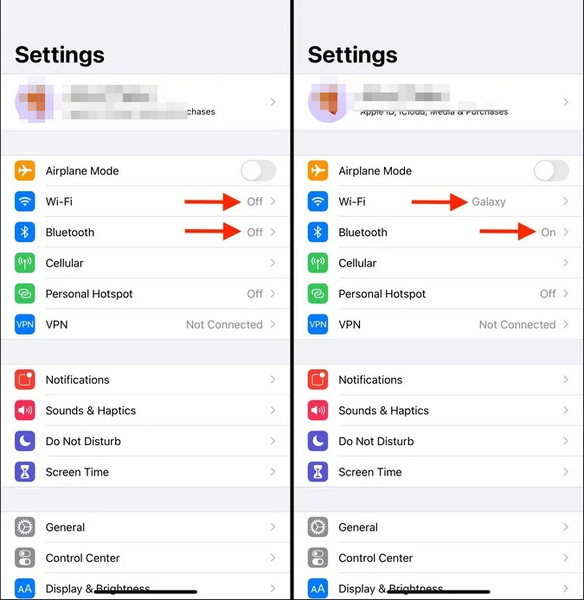
• Check for Bluetooth and Wi-Fi Range: AirDrop functions only when both devices are within range of Bluetooth and Wi-Fi.
• Reboot Devices: Reboot Devices: Rebooting the iPad and the other Mac/iPhone device usually resolves any connection problems and ensures you can retrieve AirDrop files without issues.
Conclusion
Knowing how to turn on AirDrop on the iPad means that sending and receiving files on other compatible Apple devices is easy. Windows users will find tools such as imyPass iPhone Transfer to be the best alternative for AirDrop for seamless sharing from a Windows PC to an iPad.

Clara is an editor from imyPass. She specializes in data recovery. You can find professional tutorials and solutions for recovering lost data from any device. Many users reported that his tutorial is easy and useful.
Hot Solutions
-
Transfer Data
-
Recover Data
-
Unlock iOS
-
iOS Tips
