Simple Methods to Transfer Music Between iPhone and Computer Fast
![]() Clara Prescott Published on November 07, 2025Transfer Data3-min reading
Clara Prescott Published on November 07, 2025Transfer Data3-min reading
Learning how to transfer music from a computer to an iPhone is essential for anyone who wants their favourite songs available on the go. At the same time, knowing how to move tracks from the iPhone back to a computer ensures your collection stays safe and organised. Whether you prefer the built-in tools of Apple, like iTunes, Finder, and iCloud, or a more straightforward, all-in-one solution like imyPass iPhone Transfer, this guide covers the best ways to manage music transfers in both directions.

In this article:
Part 1. Best Method to Handle Music Transfer
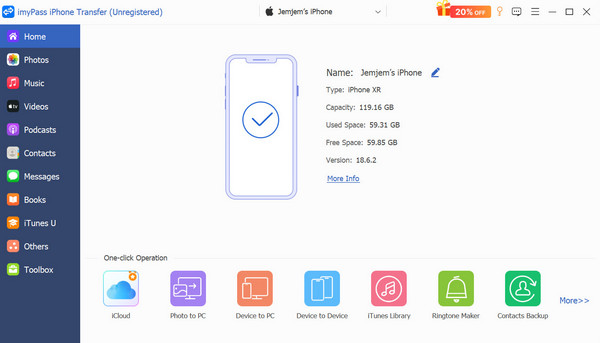
For users of iPhones, iPads, and iPods, imyPass iPhone Transfer is a fully competent application for managing and transferring files between devices. For transferring music between iPhones and computers, it is the best option because, unlike iTunes, it is flexible and straightforward. You have complete control over your data and do not have to deal with any complicated software layers. With this tool, you do not have to worry about compatibility issues or losing existing files on your device. Every transfer is safe, fast, and highly organised.

4,000,000+ Downloads
Transfer songs between your iPhone and computer without using iTunes.
Transfer music easily between your iPhone and computer.
Edit ID3 tags, create playlists, and organise or delete songs from your computer.
Auto-convert unsupported audio formats to iOS-friendly ones.
Secure, lossless, and fast music transfers.
Follow these steps to move your songs easily:
Download and Install the Tool
To obtain the software for either Windows or Mac, visit the official imyPass website. iPhone Transfer is straightforward to install.
Connect the iPhone to the Computer
Connect your iPhone to the computer using a USB cable. After you connect your iPhone, imyPass iPhone Transfer will recognize your device.
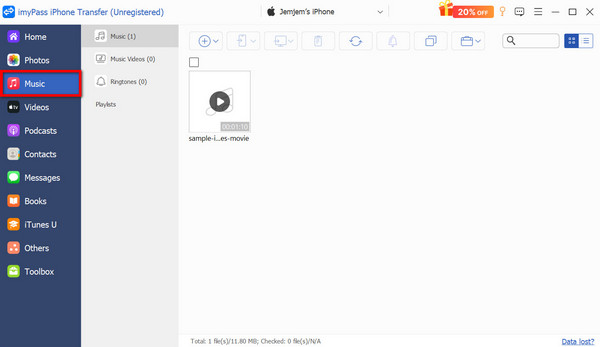
Select Music Files
Go to the main dashboard and click the Music tab to view all the songs available on your iPhone, including your albums and playlists.
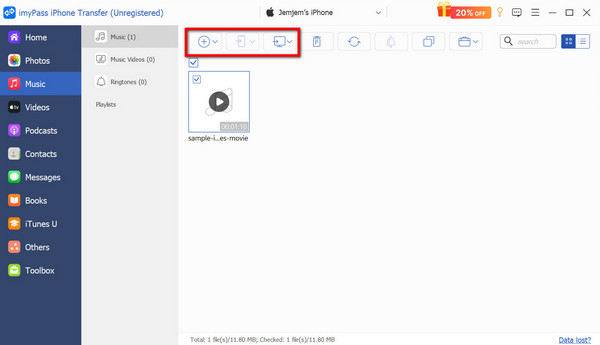
Transfer Music
- Select the songs you want and choose the Export to Device option if you want to transfer songs from your iPhone to your computer.
- To transfer songs from your computer to your iPhone, click the Add button, and the software will convert them if necessary.
Manage Music on a Computer
Once you have finished transferring, you have the option to update the music details, create new playlists, or use the imyPass iPhone Transfer management interface to remove any unwanted songs.
Part 2. How to Transfer Music from Computer to iPhone
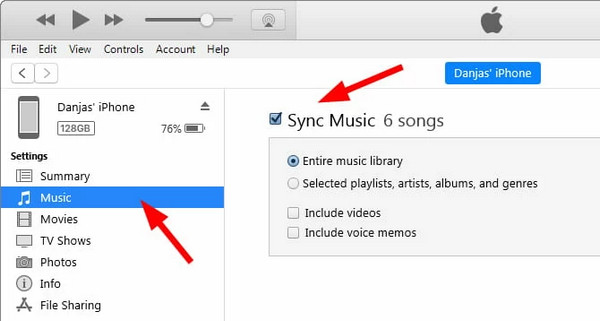
1. Using iTunes (Windows & Older Macs)
iTunes has been the official means of transferring music to your iPhone and from your computer for ages. It offers the functionality of syncing whole music libraries or managing specific tracks on a more granular level. While somewhat outdated, it remains the primary option for Windows users and those using older versions of macOS.
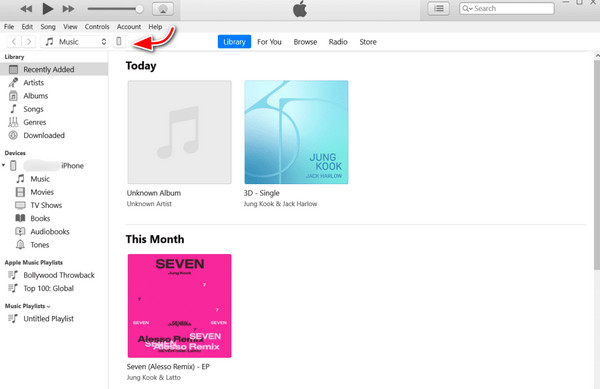
Connect your iPhone to your computer using a USB cable and launch iTunes. Wait for iTunes to detect your device.
In iTunes, click the Device button at the top. From the left sidebar, choose Music under Settings.
Check the box for Sync Music, then select Entire music library or Selected playlists, artists, albums, and genres based on your preference.
Click Apply or Sync at the bottom-right corner to start transferring music from your computer to your iPhone. Once the process completes, open the Music app on your iPhone to find all the newly added songs.
2. Using Finder (Modern Macs)
For macOS Catalina and later, the Finder has replaced iTunes for device management. Transferring music from your computer to your library is as easy as drag and drop.
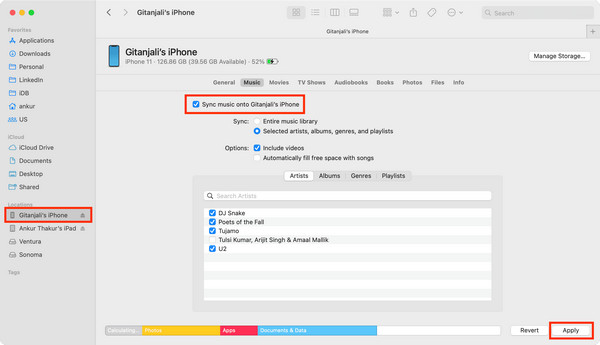
Use a USB cable to connect your iPhone to your Mac.
Open Finder, and you will see your iPhone under Locations.
Click on the Music tab.
Turn on Sync for Music on [device name].
Decide if you want to sync your whole library or just specific playlists, artists, or albums.
Press Apply to start the transfer.
When the transfer is done, safely eject the iPhone.
3. Using iCloud Music Library / Sync Library (Wireless)
For those who want to rely on iCloud Music Library or Sync Library to access their songs on all Apple devices without the hassle of wires, Apple Music or iTunes Match is required. This feature also helps you restore your Apple Music library across devices with the same Apple ID.
On your PC, start iTunes or Music on your Mac.
Under the Sync Library, access Preferences > General, and check the box to activate it.
Apple ID credentials need to be entered to upload your music to the system.
On your iPhone, go to Settings > Music and activate Sync Library.
With all your songs uploaded, your iPhone Music app will access the songs and play them.
Part 3. How to Transfer Music from iPhone to Computer
1. Using a Cloud Service (Indirect)
For those who prefer not to rely on wires or iTunes, you can also use iCloud Drive, Google Drive, Dropbox, or OneDrive to upload songs from your iPhone and download them to your computer.
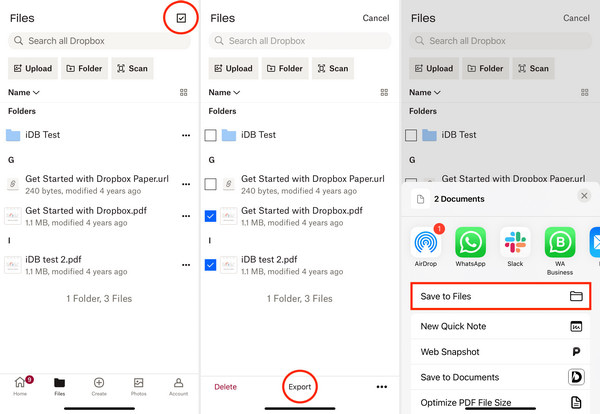
Download your preferred cloud app (e.g., Google Drive, Dropbox) to your iPhone.
Transfer the music files from your iPhone to the cloud service.
Launch the cloud service website or app on your computer.
Save the songs that were uploaded to your PC or Mac.
You can play or manage the songs as you wish.
2. Purchased Music from the iTunes Store
If you purchased music from the iTunes Store, you do not need any cables. Downloads of your past purchases can go directly to your computer, making it easy to restore music from iTunes whenever needed.
Launch iTunes (Windows) or the Music app (Mac).
Ensure you use the same Apple ID as the one associated with your iPhone.
Click on Account > Purchased > Music.
Look through your past purchases and select the songs you want by clicking the Download button.
All purchased songs will be saved directly to your computer.
Comparison Table: Choosing the Right Method
To help you quickly compare, here is a side-by-side look at each method:
| Method | Windows Support | Mac Support | Two-Way Transfer | Wireless | Easy to Use | Keeps Playlists |
| imyPass iPhone Transfer | ✓ | ✓ | ✓ | ✗ | ✓ | ✓ |
| iTunes | ✓ | ✓ | ✓ | ✗ | ✗ | ✓ |
| Finder | ✗ | ✓ | ✓ | ✗ | ✓ | ✓ |
| iCloud / Sync Library | ✓ | ✓ | ✓ | ✓ | ✓ | ✓ |
| Cloud Service | ✓ | ✓ | ✗ | ✓ | ✓ | ✗ |
| Purchased iTunes Store Music | ✓ | ✓ | ✗ | ✓ | ✓ | ✓ |
Conclusion
To transfer music from PC to iPhone or back again is simple once you choose the right method. iTunes, Finder, iCloud, and Cloud Services will work, but each has its own restrictions. For the fastest, safest, and most flexible experience from all the options you listed, imyPass iPhone Transfer is the easiest and best way to manage and transfer your songs.

Clara is an editor from imyPass. She specializes in data recovery. You can find professional tutorials and solutions for recovering lost data from any device. Many users reported that his tutorial is easy and useful.
Hot Solutions
-
Transfer Data
-
Recover Data
-
Unlock iOS
-
iOS Tips
