How to Transfer and Sync Photos from iPhone to iPad
![]() Clara Prescott Published on December 19, 2025Transfer Data3-min reading
Clara Prescott Published on December 19, 2025Transfer Data3-min reading
There are a few reasons why you need to transfer photos from iPhone to iPad. If you have both an iPhone and an iPad, you may want to watch your photos across the two devices. Sometimes, you need to share photos with your family or friends who are using iOS devices. The good news is that you have multiple methods to complete the job. Plus, you can learn proven methods in this single guide.

In this article:
- Part 1: How to Sync Photos from iPhone to iPad by iPhone Transfer
- Part 2: How to Transfer Photos from iPhone to iPad via AirDrop
- Part 3: How to Transfer Photos from iPhone to iPad by Shared Albums
- Part 4: How to Transfer Photos from iPhone to iPad Automatically via iCloud
- Part 5: How to Move Pics from iPhone to iPad Using iTunes
Part 1: How to Sync Photos from iPhone to iPad by iPhone Transfer
If you want to put specific pictures from iPhone to iPad, imyPass iPhone Transfer is the best option. It allows you to sync a variety of data types between iOS devices directly. Moreover, it lets you view photos before syncing.

4,000,000+ Downloads
Send photos between iPhone and iPad directly.
Preview photos for selectively transferring.
Offer multiple view modes.
Support both Camera Roll and app photos.
Compatible with the latest models of iPhone and iPad.
How to Move Pictures from iPhone to iPad Directly
Link your iPhone to iPad
Start the best photo transferring software once you install it on your computer. It is available for Windows 11/10/8/7 and macOS 10.12 or above. Link both your iPhone and iPad to your computer with Lightning cables. The software will detect them immediately.
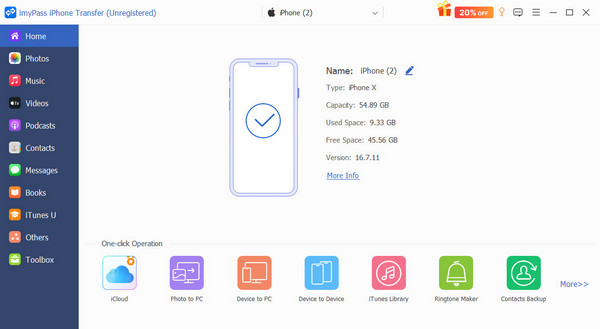
Preview photos
Choose the source device from the top option. Go to the Photos tab on the sidebar, and preview photos in Library or specific albums.
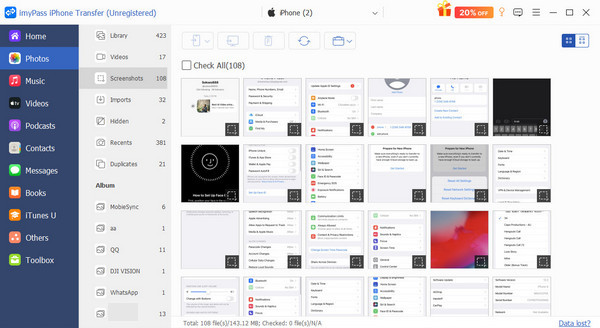
Sync photos between iPhone and iPad
Check the photos you want to sync. Click the Phone button on the top ribbon and choose the target device. When it is done, the new photos will be merged with the existing pictures. Finally, disconnect iPhone and iPad.
Part 2: How to Transfer Photos from iPhone to iPad via AirDrop
AirDrop is a simple way to send photos from an iPhone to an iPad wirelessly. It is the built-in wireless connection between Apple devices, which means you can also use AirDrop on Mac. It allows you to sync a few photos between an iPhone and an iPad in real time.
Enter the Control Center on one iOS device.
Turn on Wi-Fi and Bluetooth. You don’t need to connect to a real Wi-Fi network.
Long-press the network settings button, and tap AirDrop.
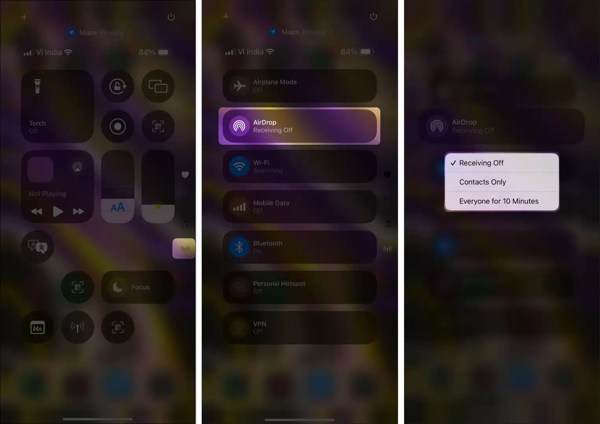
Next, choose Everyone for 10 Minutes.
Repeat the steps above to set up AirDrop on the other device.
Run the Photos app on the source device.
Select one or multiple photos you wish to share, and tap the Share button.
Choose AirDrop and choose the target device.
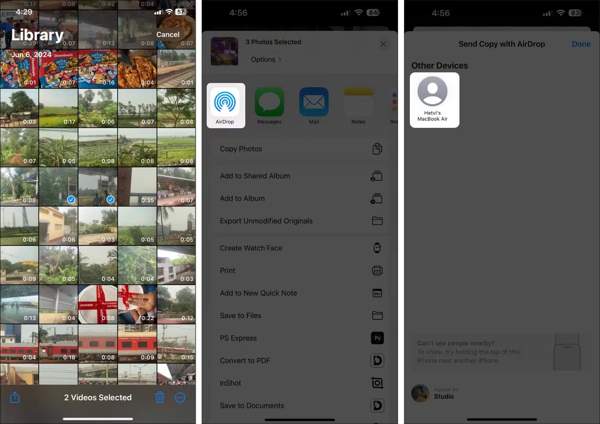
Once you receive the notification on the target device, tap Accept to begin getting photos from iPhone to iPad.
Part 3: How to Transfer Photos from iPhone to iPad by Shared Albums
Shared Albums are the built-in feature on iPhones and iPad devices. As the name indicates, they allow you to share photos from your iPhone to your iPad. This method lets you share up to 5,0000 photos and videos with a maximum size of 1GB.
Open the Settings app on your iPhone.
Tap on your profile and choose iCloud.
Press Photos and toggle on Shared Albums.
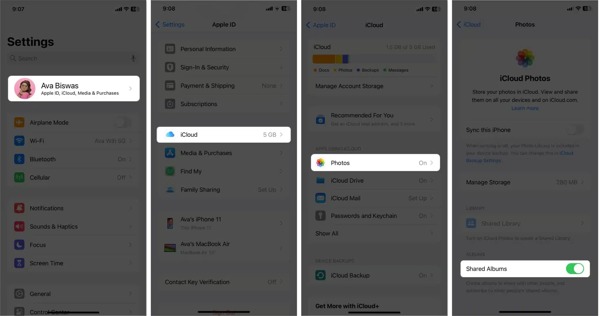
Next, run the Photos app, and go to Albums.
Tap the Add button, choose New Shared Album, enter a name, and hit Next.
Enter the recipient’s contact number, and hit Create.
Then, enter the Library album and move the desired photos to the new shared album.
When the recipient device receives the invitation, run the Photos.
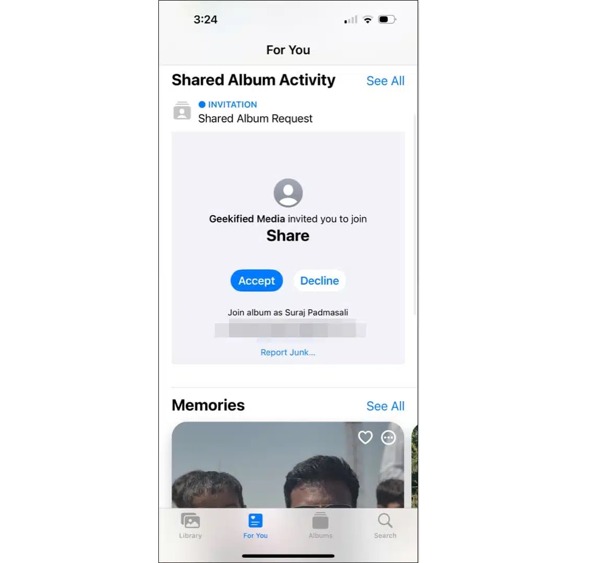
Go to For You, choose Shared Album Activity, and tap Accept.
Part 4: How to Transfer Photos from iPhone to iPad Automatically via iCloud
If you wish to transfer photos from iPhone to iPad automatically, iCloud is a simple option. You can sign in with the same iCloud account on the two devices. Once photos are synced to iCloud, you can access them on both iPhone and iPad.
Make sure to sign in with the same Apple ID on both iPhone and iPad.
Run the Settings app on your iPhone, and connect to a Wi-Fi network.
Tap on your profile and choose iCloud.
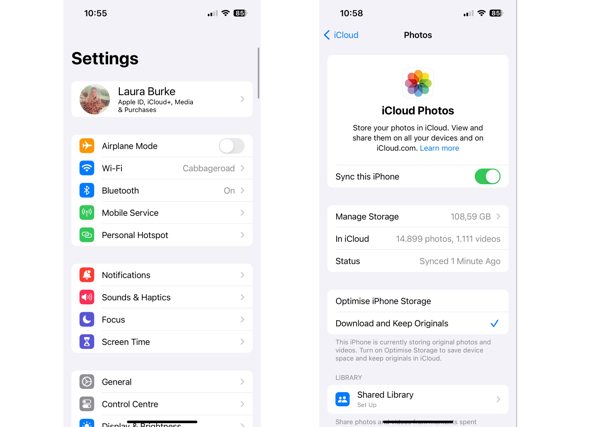
Tap Photos, and toggle on Sync this iPhone on iCloud Photos screen.
Then, turn on your iPad, go to Settings, and tap on the profile.
Navigate to iCloud and Photos.
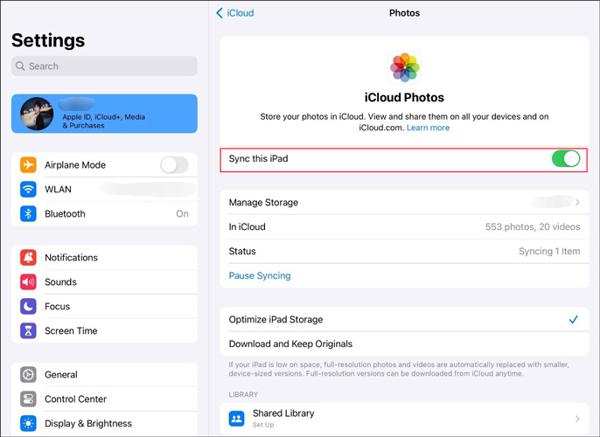
Select Download and Keep Originals, and enable Sync this iPad. Then, your iPad will download iCloud photos automatically.
Part 5: How to Move Pics from iPhone to iPad Using iTunes
If you cannot sync photos from an iPhone to an iPad wirelessly, iTunes may be helpful. You can move pics from iPhone to iPad with a computer and a USB cable. This method requires the latest version of iTunes or Finder.
Connect your iPhone to your PC with a USB cable.
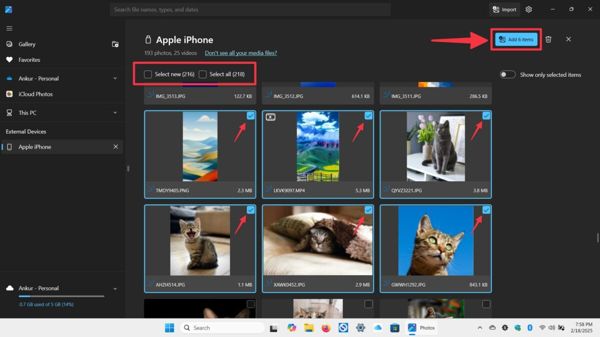
Open the MS Photos app on your PC.
Click the Import button, and select Apple iPhone under Connected devices.
Select the desired photos and click Add N items.
Next, choose a location folder.
Disconnect your iPhone and connect your iPad to your computer.
Open iTunes and click the Device button.
Go to the Photos tab under Settings.
Check Sync Photos, and select the location folder from the Copy photos from option.
Click the Apply button at the bottom.
Conclusion
Now, you should learn multiple methods to sync photos from iPhone to iPad. You can migrate photos between iOS devices wirelessly using Shared Albums, AirDrop, and iCloud. Moreover, iTunes allows you to transfer photos between an iPhone and an iPad. imyPass iPhone Transfer is the best option to sync files between iOS devices directly. Plus, the intuitive interface is easy to navigate for ordinary people.

Clara is an editor from imyPass. She specializes in data recovery. You can find professional tutorials and solutions for recovering lost data from any device. Many users reported that his tutorial is easy and useful.
Hot Solutions
-
Transfer Data
-
Recover Data
-
Unlock iOS
-
iOS Tips
