How to Find Deleted Photos on iPad and Restore Them Safely
![]() Clara Prescott Published on January 23, 2026Recover Data3-min reading
Clara Prescott Published on January 23, 2026Recover Data3-min reading
Photo loss can happen in a moment, and it often takes you by surprise. One wrong tap, a storage alert, or a sync issue can remove photos that you still need. The good news is that you can bring them back if you follow the right steps. If you need help on how to recover deleted photos from an iPad, this guide will show you the process in a clear and easy way. You will learn five simple methods, see which one fits your situation, and pick up habits that help keep your photos safe in the future.

In this article:
Part 1. 5 Ways to Recover Deleted Photos from iPad
1st Way. imyPass iPhone Data Recovery
If you want a fast and dependable tool, this is the best place to start. imyPass iPhone Data Recovery gives you a clear way to scan your device and bring back files that you still need. This option works even when your backup is old or missing, so it is helpful when other methods fail. Use this when you want the safest way to handle recently deleted iPad photos without stressing over lost data.
Go to the official imyPass website and download the iPhone Data Recovery tool. Install it on your computer and open the program once the setup is complete.
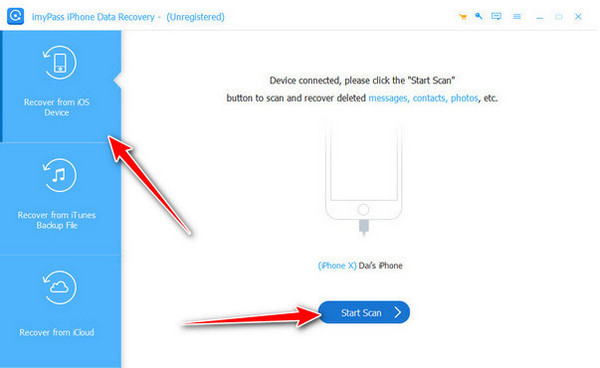
Choose the option to recover from an iOS device. Plug your iPad or iPhone into the computer with a USB cable. Unlock your device and choose Trust when prompted. After the program notices your device, tick Start Scan to begin checking your data.
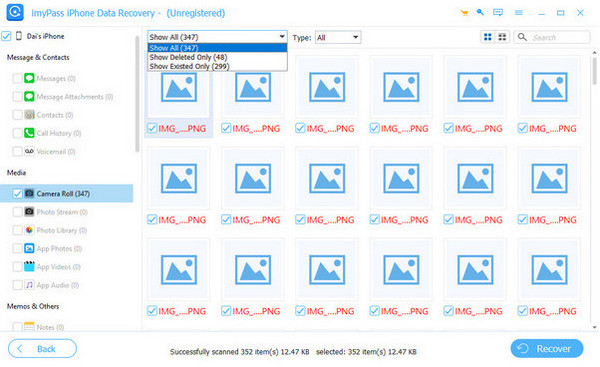
When the scan is done, you will see all the detected items on the left panel. Switch to Deleted Only if you want a shorter list. Select the files you want by ticking their boxes.
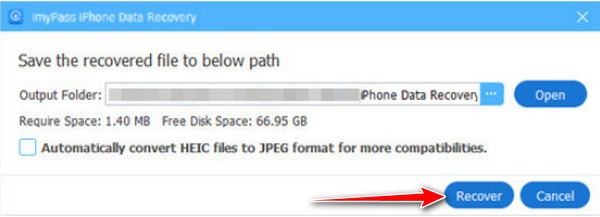
Click the Recover button. A window will ask where you want to store the recovered files. Pick a folder on your computer and confirm. The program will restore the data and save it as a backup.
2nd Way. Recently Deleted Section
This built-in folder is the first place to check when you want to know how to find deleted photos on an iPad. Your device keeps removing images for a short period, so you may still catch them before they vanish for good.
Open the Photos app from your Home screen. Tap the Albums tab to see all folders.
Scroll down and pick the Recently Deleted folder. Browse the thumbnails for the photos you lost.

Select the images you want to bring back. Tap the Recover button to place them back in your library.
3rd Way. iTunes or Finder Backup
A backup on your computer can help when the missing photos existed during an earlier save. This is a solid choice for users learning how to get deleted photos from an iPad through a device restore.
Open Finder on newer macOS versions or launch iTunes on older systems. Plug your iPad into your desktop with a USB cable.
Select your device when it appears on the screen. Look for the option to Restore Backup.
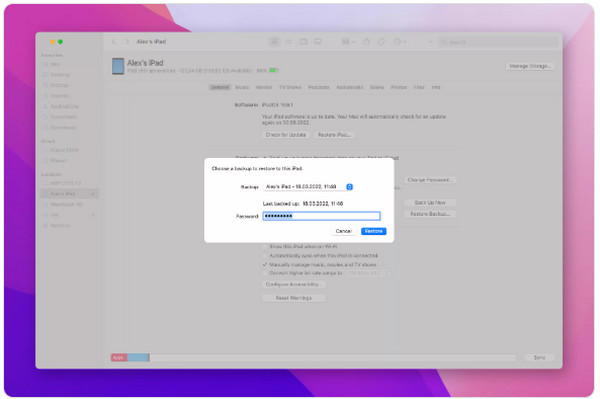
Review the dates and pick the backup that likely holds your photos. Start the restore and wait until your iPad finishes updating.
4th Way. iCloud Photos
If you keep iCloud sync on, your missing pictures might still be stored online. This method is helpful when you want to recover deleted photos iPad without wiping your device.
Use a computer browser and go to the iCloud website. Log in with the Apple ID connected to your iPad.
Open the Photos section. Click the Recently Deleted folder on the sidebar.
Look for the images you want to return. Highlight the photos you need and click the Recover option to restore them.

5th Way. iCloud Backup
This option works when your photos were saved in a previous cloud backup. It is a strong choice when you cannot find any trace of your deleted photos on your iPad in local folders or the cloud library.
Open Settings on your iPad. Go to General and find the reset options.
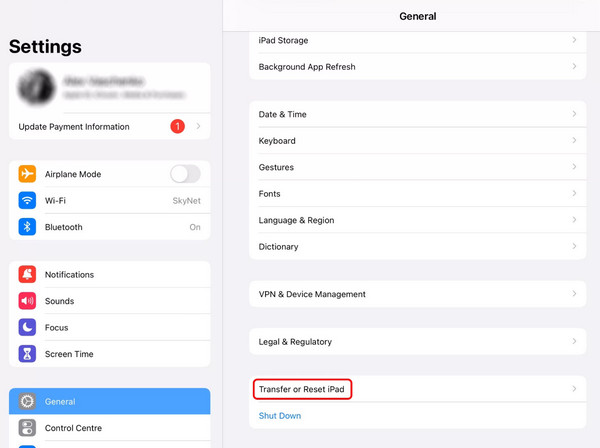
Choose the setting that removes all content from the device. Confirm the action and wait for the reset to finish. Turn the device back on and begin the setup process.

When you reach the Apps and Data screen, choose the iCloud restore option. Sign in with your Apple ID. Pick a backup that includes the photos you want
Stay connected to Wi Fi and wait while the data loads back in.
Part 2. Which Method Should You Use
The best method depends on when and how the photos disappeared. If the loss happened only a short time ago, start with the Recently Deleted photos folder because it gives the fastest results with no risks. If the photos are not there, move to iCloud Photos to check if your sync saved a copy online. When both folders are empty, a backup restore is the next path. Use iTunes or Finder if you keep computer backups, or try an iCloud backup if you save your data in the cloud.
For deeper recovery and a higher chance of success, use imyPass iPhone Data Recovery. It can scan your device and locate iPad deleted photos that do not appear in any folder or backup.
Part 3. Tips to Avoid Losing Photos on iPad Again
1. Enable iCloud Photos
Turn on iCloud Photos to keep your images synced automatically. This ensures your pictures are backed up online, so you can recover photos on iCloud if you accidentally delete them.
2. Check the Recently Deleted Folder Regularly
Make it a habit to review your iPad photos recently deleted folder. This helps you recover images quickly before they are permanently removed.
3. Create Regular Backups
Use iTunes, Finder, or iCloud to back up your device often. Regular backups give you an extra layer of protection in case of accidental deletion or device issues.
4. Use a Secondary Cloud Service
Consider saving important photos to another cloud service like Google Photos or Dropbox. This gives you a separate copy outside of your iPad.
5. Be Careful When Deleting
Double-check before deleting any images. Accidental taps are the most common cause of losing pictures. Keeping an eye on your albums can prevent mistakes.
6. Set Up Automatic Device Sync
Enable automatic syncing for your iPad with your computer or cloud accounts. This ensures recently deleted iPad photos can still be recovered if needed.
Conclusion
Losing photos on your iPad can be upsetting. The good news is that most pictures can be saved. Check the iPad recently deleted photos folder first. You can also use backups or recovery tools to bring your photos back. Make it a habit to back up your iPad and be careful when deleting images. These small steps help protect your memories and make it easy to recover photos if you lose them again.

Clara is an editor from imyPass. She specializes in data recovery. You can find professional tutorials and solutions for recovering lost data from any device. Many users reported that his tutorial is easy and useful.
Hot Solutions
-
Recover Data
- Recover WhatsApp View Once Photo
- Recover Deleted TikTok Videos on Mobile
- Recover Deleted Facebook Photo
- Recover Viber Messages, Photos, etc.
- Recover Deleted Snapchat Photos
- 5 Best Contact Recovery Apps
- Recover Deleted Discord Messages
- AppGeeker iOS Data Recovery Review
- Recover Data from DFU Mode
- Cannot Restore iPhone Backup
-
Unlock iOS
-
iOS Tips
-
Password Tips
