iPad & iPhone Auto Lock Greyed Out - Fix the Issue with 6 Solutions
![]() Penny Warren Published on August 01, 2025Unlock iOS3-min reading
Penny Warren Published on August 01, 2025Unlock iOS3-min reading
You grab your iPhone, head into settings, and try to change the screen timeout, only to find Auto Lock stuck in gray. Frustrating, right? The good news? There are clear reasons why this happens, and even better fixes to get things working again. If you have ever wondered why the iPhone Auto Lock greyed out issue shows up and how to solve it, this guide breaks it all down from Screen Time to hidden profiles so that you can take back control in just a few taps.

In this article:
Why Does the Auto Lock Gets Greyed Out?
If you are wondering why the auto lock greyed out on your iPhone, the answer often lies in a few hidden settings that control how your device behaves. One common cause is Low Power Mode. When enabled, it shortens the Auto-Lock time to 30 seconds and prevents changes to save battery. Another reason could be Screen Time restrictions. If Downtime or app limits are active, your screen might lock regardless of the set timer. Finally, if your device is managed by a school or company, an MDM profile may be enforcing lock settings. These restrictions can all make the Auto-Lock option unchangeable.
Fix 1: Check Screen Time Restrictions
Screen Time is a handy setting that assists you in controlling your device use, but under some circumstances, it hinders some other configurations, such as Auto Lock. Restrictions may also prevent you from ever changing this, especially when Active Downtime or Content & Privacy restrictions are applied. It can cause the Auto Lock setting to be dimmed out and unable to be changed. The next step is to turn it off temporarily to see whether the option appears again, thus confirming that it is Screen Time that takes some options away.
Open the Settings app on your iPhone.
Just move down the page and click on Screen Time.
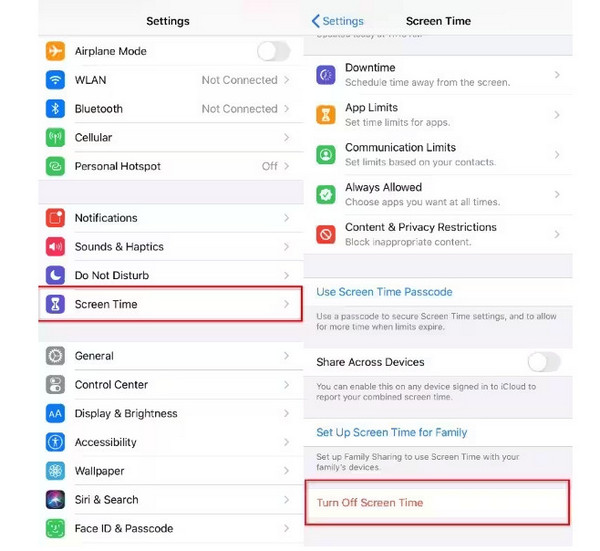
Swipe down and select Turn off screen time.
In case you have the Screen Time passcode, type it in.
Go back to Display & Brightness and see whether the Auto Lock option has been enabled.
Fix 2: Disable Guided Access
Another reason why the iPad Auto Lock is greyed out could be that Guided Access is turned on. This feature is designed to keep your device focused on a single app, often used for kids, education, or accessibility needs. But when it is active, it locks more than just the app; it can also freeze key settings like Auto Lock. You may not even realize it is enabled until Auto Lock disappears from your options. Turning off Guided Access can quickly restore your ability to adjust screen timeout settings.
Open the Settings app and tap Accessibility.
Scroll down and select Guided Access.
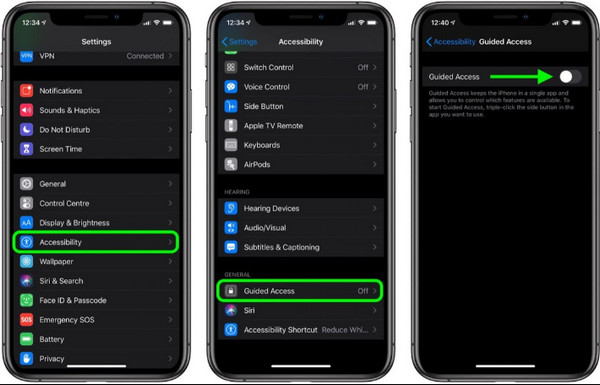
To disable the feature, turn the toggle off.
Restart your iPad or iPhone to apply changes.
Fix 3: Remove MDM Profiles
imyPass iPassGo offers a streamlined, technically solid solution: it supports both macOS and Windows, works across the latest iOS and iPadOS devices, and removes MDM profiles with a few clicks without risking data loss.
Unlike tools that require jailbreaking or technical know‑how, iPassGo handles locked-down devices even when administrator credentials are unavailable. After the MDM profile is removed, default settings like Auto Lock regain normal functionality, restoring screen timeout controls instantly.
Download the software on your PC by ticking the button that we have here, follow the installation process, and launch it afterwards.
As the app starts, click the Remove MDM mode from the main interface, establish a connection on your iOS via USB cable, and click Start.
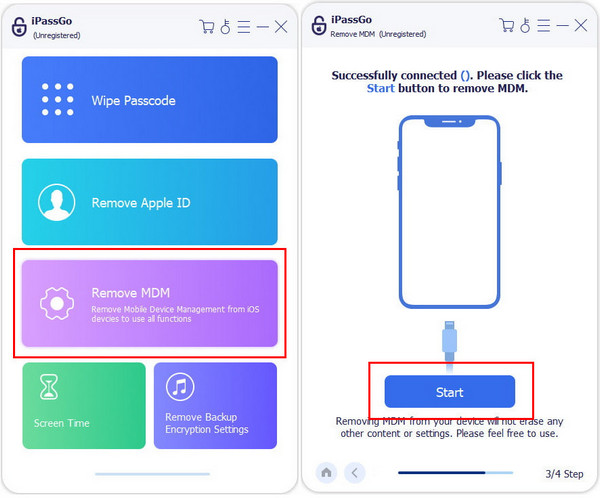
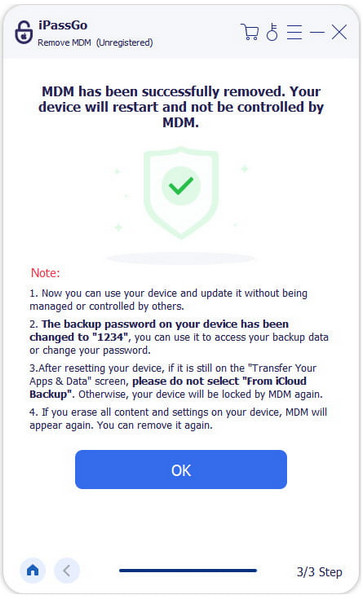
The software automatically removes the MDM, and when the result says successfully removed, it means that your device is freed from being controlled by the MDM. Wait for a quick restart before it takes effect.
Fix 4: Reset All Settings
If you have tried the previous methods and still wonder why the auto lock is greyed out on iPad, it might be due to a system glitch or a conflicting setting buried deep within your device. To solve this, Reset All Settings can be used. This one does not wipe any of your data, but it does restore the machine settings, such as network preferences, privacy settings, and display settings to their defaults.
Enter the Settings app on your iPad.
Scroll and tap General, then tap Transfer or Reset iPad.
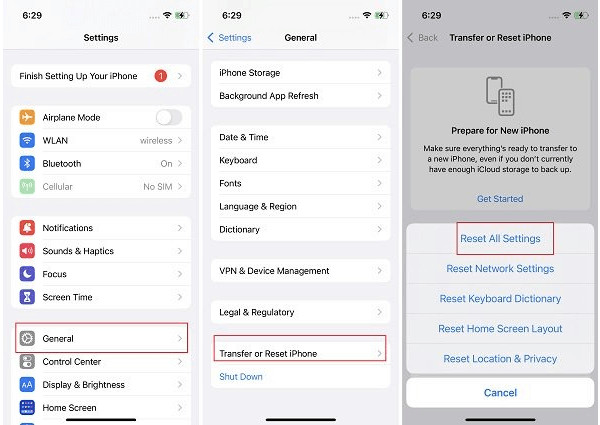
Tick on Reset and tap on Reset All Settings.
The device would ask you to enter a passcode. Confirm the action to restart your iPad.
Fix 5: Check for Software Updates
When Auto Lock is still in grey, iPadOS may be using an older version of iPadOS. Even some software bugs might make settings such as Auto Lock glitch or unavailable. Such problems may be resolved by updating your device to a new version and getting access to the lost option again.
Open the Settings app.
Tap General, then choose Software Update.

If an update is available, tap Update Now.
Enter your passcode if asked, and wait for the update to finish.
Fix 6: Special Case - Stuck on 2 Minutes
Some rare exceptions allow your Auto Lock not to be fully greyed out, but to be on exactly 2 minutes with nothing beyond it. When you are wondering why this is taking place, perhaps it could be explained by the interaction between your iPad and a Smart Cover or magnetic case.
Depending on the sensors used to detect when the cover is closed, such a device can be hampered if the sensors are blocked or misdetected because of dust, damage or in some instances, it may also interfere with Auto Lock settings. To rectify the condition, place your case or cover aside and carefully clean the edges of the screen and the magnet region, in order to bring the screen back to normal.
When Nothing Works - Advanced Solutions
In case the solutions mentioned above did not resolve the problem and the Auto Lock option remains unresponsive, more serious solutions should be considered. These are built to re-boot underlying system problems that may be behind the trouble. The first step is a force restart, which does not delete any files, but can eliminate temporary bugs. Failing that, think of using a complete backup and restore with iTunes or Finder to restore your system and preserve your content. As a last resort, you can perform a DFU mode restore, which fully reinstalls iOS, and you can even recover data from DFU. Use this only if all else fails.
Conclusion
If you have been asking why the auto lock is greyed out on iPhone, the answer often points to settings like Low Power Mode, Screen Time, Guided Access, or MDM restrictions. These features can block changes to your screen timeout without you even realizing it. Luckily, most of these problems can be fixed with a few simple adjustments. And if they do not work, advanced methods like resetting settings or restoring the device can help. By following the right steps, you can get your Auto Lock setting back and keep your iPhone working the way you need it to.

Penny is a senior editor from imyPass. She has focused on discovering perfect GPS location solutions in all scenarios, and also has experience in fixing computers.
Hot Solutions
-
Unlock iOS
- Review of the Free iCloud Unlock Services
- Bypass iCloud Activation With IMEI
- Remove Mosyle MDM from iPhone & iPad
- Remove support.apple.com/iphone/passcode
- Review of Checkra1n iCloud Bypass
- Bypass iPhone Lock Screen Passcode
- How to Jailbreak iPhone
- Unlock iPhone Without Computer
- Bypass iPhone Locked to Owner
- Factory Reset iPhone Without Apple ID Password
-
iOS Tips
-
Unlock Android
-
Windows Password
