What is iCloud DNS Bypass and How It Works for iOS Devices
![]() Penny Warren Published on November 14, 2025Unlock iOS3-min reading
Penny Warren Published on November 14, 2025Unlock iOS3-min reading
Apple's iCloud activation lock is an important security feature. It is designed/created to prevent unauthorized access to stolen or lost iOS devices. While this protection is good for device owners, it can become a hassle for users who forget their Apple ID credentials or purchase a second-hand device with the lock still enabled.
In such cases, you can try iCloud DNS bypass. It is a popular way to fix the iCloud activation lock stuck on an iPhone or iPad device. But what exactly is an iCloud DNS bypass, and how does it work? If you are interested in this topic or among those users who can't open their devices, this post is for you.

In this article:
Part 1. What is iCloud DNS Bypass
Before going to the methods of using the feature to activate your iCloud, it would be better to get more information about iCloud DNS Bypass, especially on how it functions. As we all know, its main purpose is to give temporary access to a certain device that iCloud Activation Lock has locked.
Does DNS bypass really remove iCloud lock?
DNS, known as the Domain Name System, acts as an internet directory. It is capable of converting website names into numerical IP addresses. When activating an iOS device, such as an iPhone or iPad, the device contacts Apple servers via DNS. However, when using iCloud DNS Bypass, you redirect this kind of connection through third-party DNS servers. With this feature, you don't have to use any iCloud unlocking services. This type of alternative server can intercept the activation request. It can even prevent reaching Apple's verification system and bypass the lock effectively. Note that this is a temporary solution to the issue, not a permanent one.
When to Use iCloud DNS Bypass?
This type of feature is only used when the user locks the iPhone or an iCloud activation lock is displayed on the screen. With iCloud DNS Bypass, you can effectively bypass the iCloud activation lock to open your screen without any passcode or Apple ID. It is useful if you are using a second-hand iOS device.
Part 2. Pros and Cons of iCloud DNS Bypass
If you want to learn more about this feature, you must take part in this section. We'll give you all of the pros and cons of iCloud DNS Bypass. Therefore, please see the breakdowns below and learn more.
Good Things about iCloud DNS Bypass
No Need for Apple ID Credentials
One of the biggest advantages is that it allows users to unlock the device without a passcode. It's perfect if you've bought a second-hand device with Activation Lock enabled.
Free to Low-Cost Solution
Using a DNS bypass is ideal if you want a free or low-cost solution. It is incomparable with Apple, which requires a costly payment just to open a certain device. Thus, if you want to bypass activation temporarily without incurring any costs, it is better to use a DNS bypass.
Works Without Jailbreaking
The good part here is that you don't need to jailbreak your device to lock it. Well, jailbreaking is too risky, especially if you have enough knowledge about the process. With the help of a DNS bypass, you can change the network settings. It can even provide you with the device in its original iOS version.
Drawbacks of iCloud DNS Bypass
iCloud Lock is Not Removed Completely
The bypass can only trick the device into skipping the activation process. However, the iCloud account remains linked. With that, you can only use some basic functions, such as making calls, using some apps, and browsing the internet through Wi-Fi.
No Access to Apple Services
Some of the important features, such as the App Store, iMessage, FaceTime, and Siri, will not function. It is because the device is still tied to the owner's account.
Against Apple's Terms of Service
Apple does not recommend bypassing activation locks. The device may be blocked in the future. Additionally, if this is detected, the device could be blocked, rendering it unusable on cellular networks.
Part 3. How to use iCloud DNS Bypass
How to bypass iCloud activation on DNS? If you want to learn the process, then you can follow the simple steps below.
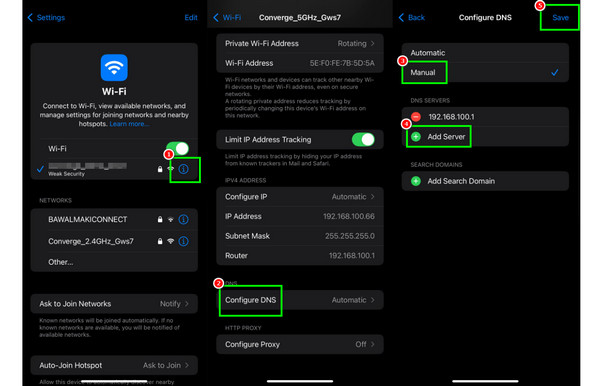
Open your iPhone and proceed to the Settings application. After that, go to the Wi-Fi section and hit the Information option.
After that, scroll down and press the Configure DNS function and choose the Manual option.
Delete or remove the existing DNS server. Then, tick the Add Server button to insert the iCloud bypass DNS server. The server is based on the region:
• Asia: 104.155.220.58
• Australia and Oceania: 35.189.47.23
• Europe: 104.155.28.90
• South America: 35.199.88.219
• USA: 104.154.51.7
Press the Save button in the top-right corner of your screen. Then, you can continue with the device setup, and you will be redirected to the iCloud DNS Bypass.
Part 4. Fix iCloud DNS Doesn't Work
Is DNS bypass worth more attempts?
As we explained, the DNS iCloud lock bypass only works on old iOS versions and iPhone/iPad models, and it only bypasses iCloud lock temporarily and gives very limited access. And the method itself has a low success rate. If it doesn't work for you after you have tried many times, or you want to bypass iCloud lock on an iPhone/iPad that runs high iOS versions permanently, we suggest giving up that method and using a reliable iCloud lock remover.
How to bypass iCloud lock efficiently?
An iCloud lock remover is a solution for you if you want to bypass iCloud effectively. It usually has an intuitive interface and allows you to remove iCloud lock permanently for high iOS versions. imyPass iPassBye is a program like this.
You can completely unlock the device with imyPass iPassBye. What makes it special is that you can use it on various iOS versions, from iOS 5 to 17. Therefore, if the DNS iCloud bypass doesn't meet your needs, imyPass iPassBye is worth trying.
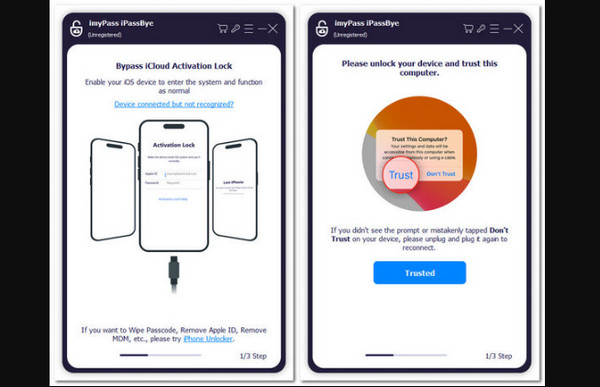
Download imyPass iPassBye software on your Mac or Windows computer. After that, ensure that your iOS and desktop are linked together through a cable.
After connecting your devices, tap the Trust button to proceed to the next process.
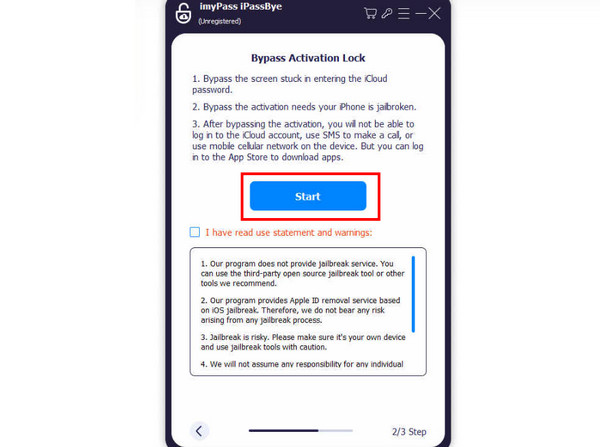
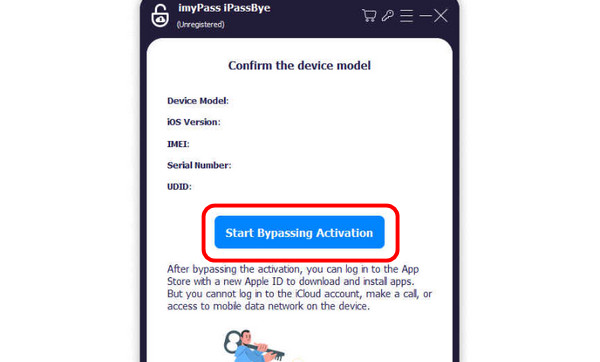
Then, you must read all the information on the screen, especially the warnings. Once done, tap the Start button to confirm bypassing the iCloud Activation Lock.
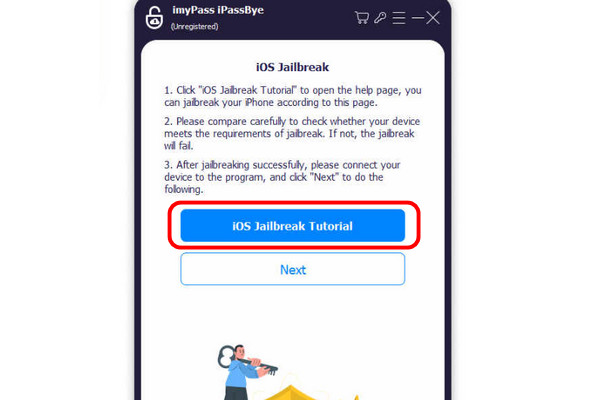
You can now start tapping the iOS Jailbreak Tutorial to learn more about the process. Afterward, tap Next.
For the final process, press the Start Bypassing Activation option. Wait a moment until you lock the activation. Once done, you can now use the device freely.
FAQs.
-
Does iCloud DNS Bypass work on all iOS versions?
No, iCloud DNS Bypass does not work on every iOS version. It mainly functions on older devices running iOS 8 to iOS 12. Newer iOS builds include stronger server authentication, so Apple often patches DNS-based vulnerabilities in recent updates.
-
Is iCloud DNS Bypass a permanent iCloud unlock method?
No, it's a temporary workaround. Once the device is rebooted, the bypass is lost. Therefore, if you successfully bypass an iPhone with DNS bypass, keep in mind that you don't reboot or factory reset your device. Otherwise, it will be permanently locked, and even an iPhone unlocker won't work.
-
Are there security risks when using iCloud DNS Bypass?
Technically, any iCloud activation lock removal has risks, including iCloud DNS Bypass. It may cause the device to be permanently locked. However, if you can't remember the Apple ID and password, iCloud locked removal is the only way to get the locked device back.
Conclusion
Now it is clear about DNS bypass. In a word, it is a worth trying method, but don't waste a lot of time if it doesn't work for you. There are easier and safer ways to bypass iCloud activation lock permanently. You can try imyPass iPassBye and see if it works for you. After removing the iCloud lock, you can get most of your iPhone features.

Penny is a senior editor from imyPass. She has focused on discovering perfect GPS location solutions in all scenarios, and also has experience in fixing computers.
Hot Solutions
-
Unlock iOS
- Review of the Free iCloud Unlock Services
- Bypass iCloud Activation With IMEI
- Remove Mosyle MDM from iPhone & iPad
- Remove support.apple.com/iphone/passcode
- Review of Checkra1n iCloud Bypass
- Bypass iPhone Lock Screen Passcode
- How to Jailbreak iPhone
- Unlock iPhone Without Computer
- Bypass iPhone Locked to Owner
- Factory Reset iPhone Without Apple ID Password
-
iOS Tips
-
Unlock Android
-
Windows Password
