Uncover How to Remove Device Supervision from iPad & Gain Full Control
![]() Penny Warren Published on June 17, 2025Unlock iOS3-min reading
Penny Warren Published on June 17, 2025Unlock iOS3-min reading
If the iPad does not allow you to add apps, change settings, or sign out of your Apple ID, it may be under device supervision. Parents, teachers or companies rely on this if they want to control which features students or workers can access. When you purchase a device, the limits set by the manufacturer may be a concern. In this guide, we will show you how to remove device supervision from your iPad, allowing you to regain full control and use it freely without limitations.

In this article:
Method 1: Official Removal (If You Have Admin Access)
Removing supervision from an iPad through Apple School Manager or Apple Business Manager is the safest and most dependable method when you have administrator access. Using these systems, businesses can monitor and manage their devices remotely as needed. This official method demonstrates how to remove supervision from an iPad securely and without charge, without requiring physical access to the device.
You cannot use this method if you are not part of the managing group, as the option is accessible only to administrators or IT personnel.
Log in to your Apple School Manager or Apple Business Manager account using admin credentials.
From the sidebar menu, select Devices, then use the search bar to find the iPad you want to release.
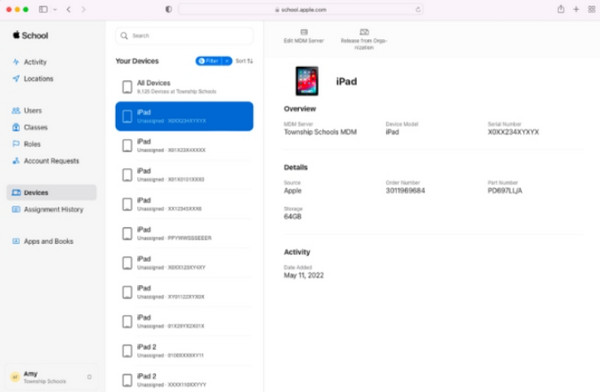
Click on the device from the results, check the box that says I understand that this cannot be undone, then click Release to remove it from supervision.
Method 2: How to Use Factory Reset (For Personal Devices)
If you own an iPad but cannot access its admin settings, performing a factory reset can sometimes remove the iPad supervision, although there are some limitations. It clears all your data and settings so the iPad is returned to its original factory state. Even so, supervised devices may reconnect to the management system during setup, which is important when your organization no longer manages them. Always back up your data safely somewhere before executing a factory reset, as it will delete everything from your iPad.
Open Settings, then go to General and select Reset.
Tap the Erase All Content and Settings from the list that appears, then enter your device passcode or Apple ID password to confirm.

The iPad will begin erasing all data and will restart automatically once the process is complete.
During the setup process, watch for any prompts that request management credentials or indicate that the device is still under supervision. If this happens, the supervision remains linked to an organization and cannot be removed by a reset alone.
This approach can remove iPad supervision if the device is no longer enrolled in a management system, but it is not guaranteed to work on all supervised iPads. That is why factory resetting an iPad can have either positive or negative consequences.
Method 3: Bypass Supervision Without Password (Advanced)
If you cannot access the administrator password or use the built-in way to turn off supervision, there are a few advanced ways you can bypass or remove supervision on your iPad for a while. The use of these methods can be convenient if you access your phone quickly, but they also have risks and limitations.
People usually try the DNS Bypass technique, which is temporary or resort to iPassGo, which cuts off the supervision much more efficiently. We will explain both methods and how you can implement them.
1. DNS Bypass (Temporary Access)
When you set up your iPad, DNS Bypass helps it bypass using DNS servers. Upon modifying the DNS server, you can go past the remote management screen to the main login interface. However, the process provides limited access that will not permanently remove supervision from the system. A VPN should be used primarily as a temporary solution when access is blocked.
Activate your iPad and start the setup process. When prompted, connect the device to a stable Wi-Fi network. This is necessary for the iPad to reach Apples servers, but you will modify the settings before it does.
When you arrive at the Remote Management screen, do not proceed right away. Instead, tap the Wi-Fi settings icon or the small i icon next to your connected network. This will enable you to change the network settings manually.
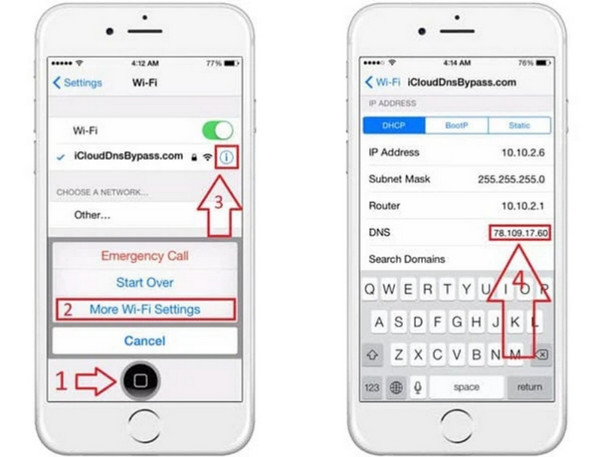
In the Wi-Fi settings menu, scroll down and tap Configure DNS. Choose Manual, then remove any existing DNS entries by tapping the red minus icon. Next, tap Add Server and input the DNS address based on your location:
• North America: 104.154.51.7
• Europe: 104.155.28.90
• Asia: 104.155.220.58
• Other regions: 78.109.17.60
Once entered, tap Save to apply the changes.
Go back to the setup screen and continue with the setup process. If the DNS bypass works successfully, your iPad may skip the supervision check and allow you limited access to the device without triggering Remote Management.
Please note that after using DNS Bypass, restrictions may reappear, and the feature may fail on certain iOS versions. Therefore, if you use this method to remove iCloud Activation Lock, the same result may appear, as it is only effective with older versions. The next choice is more reliable and complete than the previous one.
2. imyPass iPassGo
imyPass iPassGo helps you remove the different restrictions and locks, including supervised mode, on your Apple devices. The differential for that DNS bypass can act as a permanent solution, even without a supervision password. It can be very helpful if you want to take full control of an iPad you just bought used.
When the phone is unlocked, iPassGo finds and removes supervision profiles. Setting up is possible without Apple School Manager or admin accounts, making it ideal for personal use or on secondhand devices. If you are looking for a way to remove supervision from your iPad without requiring login credentials, this is one of the most effective tools available.
Begin by downloading imyPass iPassGo from the official website. Once installed on your Windows or Mac computer, launch the app.
Select the Remove MDM option on the main screen. Use a USB cable to connect your iPad to the computer. When the link is established, click the Start button to begin the removal process.
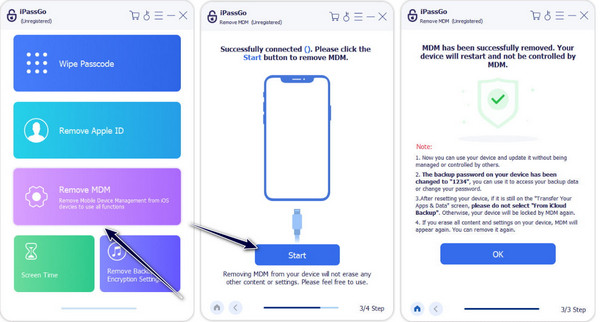
The process runs automatically, and your content or settings will stay untouched. You do not need to take any action during this step; simply let the software complete its task. Once the removal is complete, your iPad will restart on its own. After rebooting, it will no longer be linked to any supervision or control from a school, company, or administrator. However, if the device is ever reset to its factory settings, supervision may be reinstated.
Conclusion
Still wondering how to remove supervision from the iPad due to the mobile device management installed on it? Worry no more, as the mentioned ways here are proven and can surely help you turn it off. However, if you do not have access to the MDM supervision set, try using the imyPass method, as it is worth trying.

Penny is a senior editor from imyPass. She has focused on discovering perfect GPS location solutions in all scenarios, and also has experience in fixing computers.
Hot Solutions
-
Unlock iOS
- Review of the Free iCloud Unlock Services
- Bypass iCloud Activation With IMEI
- Remove Mosyle MDM from iPhone & iPad
- Remove support.apple.com/iphone/passcode
- Review of Checkra1n iCloud Bypass
- Bypass iPhone Lock Screen Passcode
- How to Jailbreak iPhone
- Unlock iPhone Without Computer
- Bypass iPhone Locked to Owner
- Factory Reset iPhone Without Apple ID Password
-
iOS Tips
-
Unlock Android
-
Windows Password
