Quick Tutorial to Unlock an iPhone to Use Accessories Effectively
![]() Samuel Spenser Published on August 12, 2025Unlock iOS3-min reading
Samuel Spenser Published on August 12, 2025Unlock iOS3-min reading
No response when you connect a cable or accessory to your iPhone? You are not the only one. This all typically means your device is locked, and iOS is not letting the connection because of security reasons. Apple has made this interface to prevent the entry of unknown tools into your data without your consent. It can be a nuisance, considering that it helps keep your privacy, but mainly in the case of a broken screen or when your screen is malfunctioning. In this guide, you will learn why this feature exists and how to unlock an iPhone to use accessories, whether your device is in good shape or needs repair. Each method is clear, safe, and easy to follow.

In this article:
Part 1. Why Your iPhone Blocks Accessories When Locked
iOS 11.4.1 and later versions of iOS deny USB accessory access when the device is locked on iPhones. This forms part of the USB Restricted Mode present in Apple to defend against brute-force technology, such as GrayKey, that uses the Lightning port to circumvent passcodes. After one hour of locking, the port of Lightning shuts off data transfer in the device, but you can use it to transfer power.
Consequently, users are forced to unlock the iPhone to access accessories to charge it, especially when connecting to a Mac, PC or a third-party device. This aspect means that sensitive data remains safe because unauthorized access via USB is prevented whenever the device is not attended to or controlled.
Part 2. Standard Solutions for Functional iPhones
1. Simple Unlock & Approve
If your iPhone is in good working condition, unlocking it to allow accessory access is quick and straightforward. Apple’s security feature simply needs confirmation that you trust the connected device. Once approved, charging, syncing, or using other accessories should work without issue.
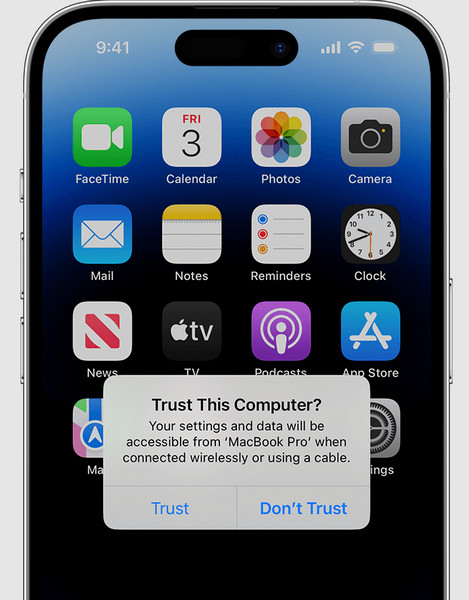
Wake your iPhone by pressing the Side button or tapping the screen.
Unlock the device operating Face ID, Touch ID, or by entering your passcode. Connect the accessory or USB cable to the Lightning port.
When prompted with the Trust This Computer? message, tap Trust. Enter your passcode again to confirm and approve the connection.
2. Disable USB Restrictions
If you want to avoid repeated prompts every time an accessory is connected, you can change a setting that allows accessories to work even when your iPhone is locked. This is helpful for regular connections with trusted devices.
Open the Settings app on your iPhone. Tap Face ID & Passcode or Touch ID & Passcode on some models.
Enter your device passcode to proceed. Scroll down to the Allow Access When Locked section.
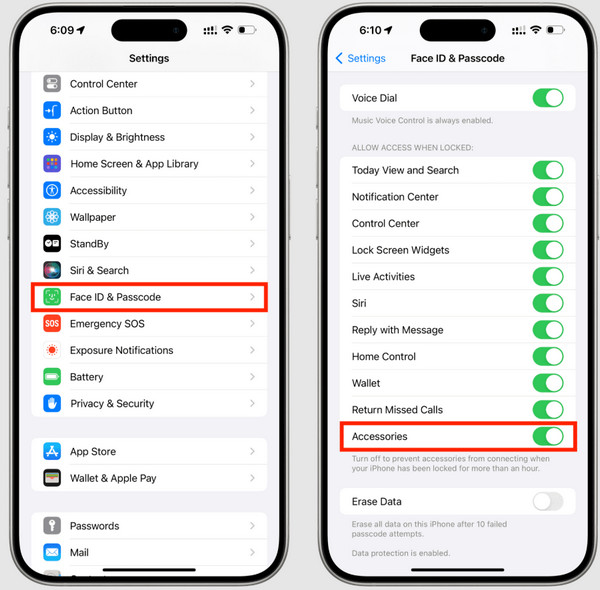
Toggle USB Accessories to ON.
With this setting enabled, you will no longer see the message accessory connected unlock iPhone to use accessories each time. Just be sure to turn it off again if you need tighter security.
3. Try imyPass iPassGo
imyPass iPassGo is a dedicated iOS unlocking tool built for users who are locked out of their devices and unable to connect accessories or perform basic functions. It specializes in removing screen passcodes, even when Face ID or Touch ID fails, restoring full access to your iPhone’s ports and settings.
You want to be able to sync with a computer, charge using your third-party accessories, or get control back when you are jammed with failed attempts: iPassGo is a direct firmware solution. It is fast and secure to be supported using the latest versions of iOS to reset and unlock your device without being tethered to iTunes.
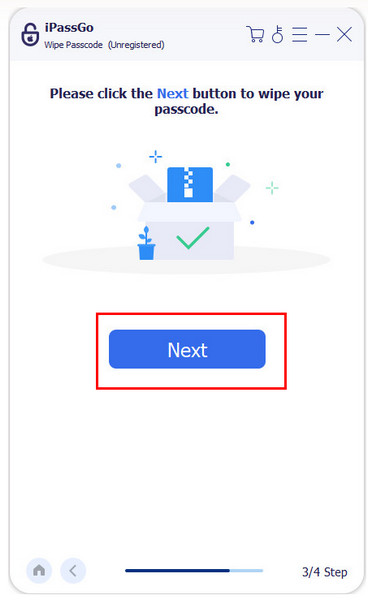
Download and set up the app by clicking the download button that we have here, suitable for your PC operating system.
On the main interface, tick the Wipe Passcode mode, and connect your iOS device, then click Start.
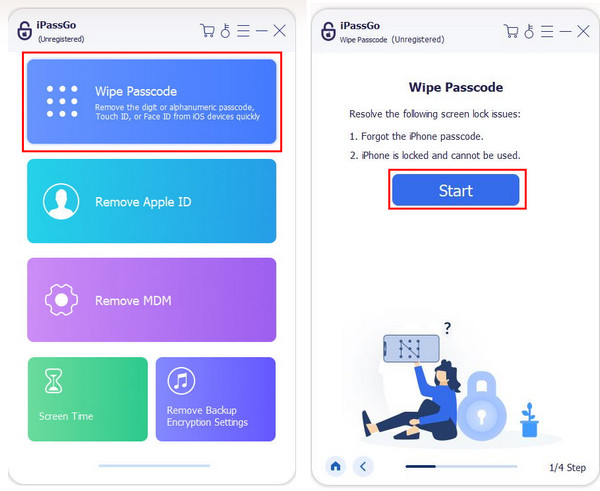
Once you start this process, all your data will be erased since it will update the iOS to the newest firmware package. Verify the information related to your iOS and click Start to proceed.
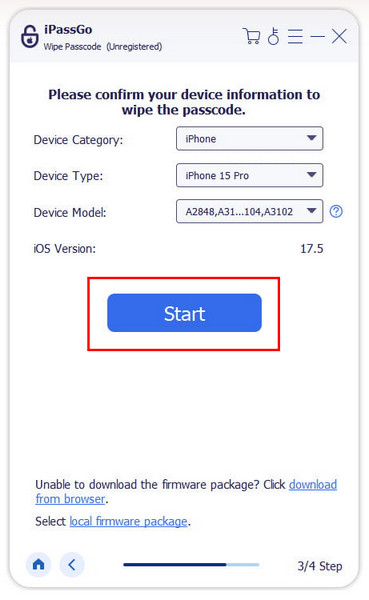
Now that the firmware is downloaded, click Unlock. Enter the 0000 to remove the passcode from your device and click Next to wipe the passcode.
Part 3. Solutions for Broken/Damaged iPhones
1. Using AssistiveTouch (If Touch Works)
1.Using AssistiveTouch (If Touch Works)Suppose your iPhone’s physical buttons are damaged, but the touchscreen still responds. In that case, AssistiveTouch is a built-in feature that can help you unlock your device and approve accessory access without using hardware buttons. It places a virtual control menu on your screen, giving you quick access to key functions like Home, Lock, and Siri.
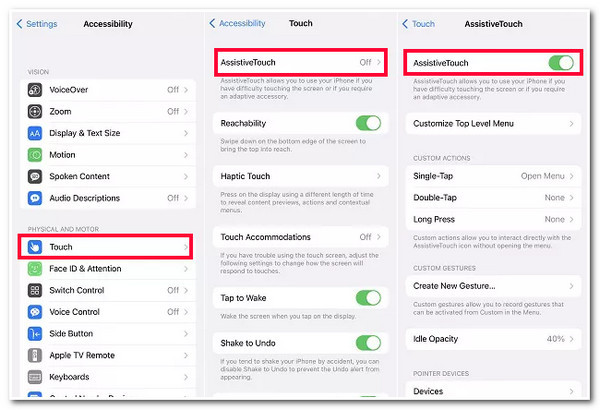
To this end, spend time at Settings > Accessibility > Touch > AssistiveTouch and turn it on. When it becomes active, wake your iPhone with the on-screen menu, type your passcode or use Face ID. It can come in handy when you cannot use your Side or Home button, and they are misbehaving.
2. VoiceOver for Partial Screen Damage
If your iPhone screen is partially broken and unresponsive, using accessories can become a challenge. You might see the message that you cannot use an accessory iPhone without unlocking it, but tapping the screen may not be an option. In this case, VoiceOver can help you control your device through spoken feedback and gesture-based navigation. To activate VoiceOver, simply say: "Hey Siri, turn on VoiceOver."
Once it is on, use one finger to explore the screen and double-tap to confirm selections. Even with limited display access, VoiceOver makes it possible to unlock your iPhone with a broken screen and approve accessory connections.
3. For Completely Broken Screens
If your iPhone screen is entirely black or unresponsive and you cannot use accessory iPhone functions directly, there is still a way to erase and recover your device, as long as it was previously connected to a trusted computer. With iPhone Recovery Mode, you can easily reset the device and remove the passcode using iTunes or Finder.
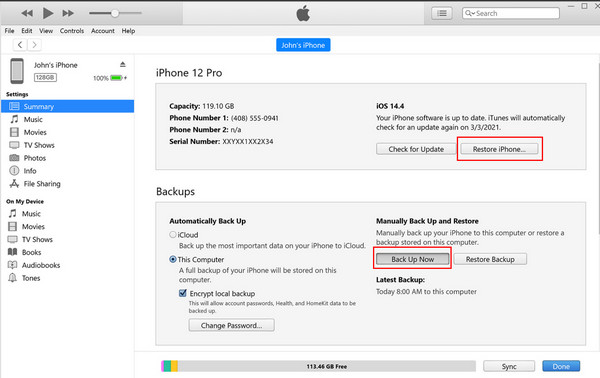
Use a USB cable to connect your iPhone to a trusted computer, one it has connected to before.
Launch iTunes on Windows and earlier versions of macOS Mojave or Finder on macOS Catalina or later.
Wait for your iPhone to appear in the interface, then select Back Up Now to save your data. Once that is done, tick Restore iPhone to erase all information and lock that is on your iOS. Now that it is erased, you can set up the iPhone as new or restore the backup during the setup process.
Conclusion
No matter how badly the iPhone works or if it seems to have a bad screen, there are certain actions you can take to unlock it and reconnect your accessories. Simple unlock procedures all the way up to the more advanced ones, such as the iPassGo; whatever the solution, it is aimed to assist you in getting past the blocks and back to functionality. If you keep seeing the prompt to unlock the iPhone to use accessories charging, it means your device is actively protecting your data, but it does not have to block your workflow. With the right steps, you can safely reconnect, recharge, and continue using your iPhone without interruption.

Samuel is a senior editor from imyPass. He is an expert on password unlocking. He has over five years of experience writing tutorials on phone unlocking.
Hot Solutions
-
Unlock iOS
- Review of the Free iCloud Unlock Services
- Bypass iCloud Activation With IMEI
- Remove Mosyle MDM from iPhone & iPad
- Remove support.apple.com/iphone/passcode
- Review of Checkra1n iCloud Bypass
- Bypass iPhone Lock Screen Passcode
- How to Jailbreak iPhone
- Unlock iPhone Without Computer
- Bypass iPhone Locked to Owner
- Factory Reset iPhone Without Apple ID Password
-
iOS Tips
-
Unlock Android
-
Windows Password
