Google Bootloader Unlock Process: A Step-by-Step Guide
![]() Gideon Byron Published on October 28, 2025Unlock Android3-min reading
Gideon Byron Published on October 28, 2025Unlock Android3-min reading
The bootloader on your Google Pixel is almost the same as BIOS and UEFI, which can be found on a computer. It is a low-level software that is accessible when you start or open the Google Pixel after a shutdown of its system. By default, it is the bridge between the hardware and the Android OS of your Google Pixel.
Some want to unlock the bootloader Google Pixel 7 Pro and other models to have full control of the mentioned device. You will have complete administrative access to your Google Pixel. Are you interested in this topic? This article has a detailed guide to unlock the bootloader of your Google Pixel. Please scroll below to discover the full details.

In this article:
Part 1. Things to Do Before You Unlock Google Pixel Bootloader
The Google Pixel 3 bootloader unlock for all models is indeed risky to perform. Before performing it, it is recommended to know the things that might happen during the unlocking procedure. The list below includes some of them.
1. Back Up All Your Data
The unlocking procedure of your Google Pixel bootloader has the same outcome as the master codes to unlock a phone. It erases the entire content and settings on your Google Pixel. What is the best prevention for this outcome? You need to back up the Google Pixel data using cloud-based storage. Luckily, Google Pixel has Google as the main backup and restore account it supports.
2. Charge Google Pixel
The Google Pixel 6 bootloader unlock and all models will take up much of your time. It is due to the demanding procedure it contains. You need to ensure that the mobile phone battery has enough charge. If the Google Pixel phone shuts down during the process, it will be interrupted. You need to restart the process. It is recommended to charge the phone at least 70 to 80 percent.
3. Remove Google Account
It is recommended to remove the Google account from the Google Pixel. The reason is that unlocking the bootloader might affect the account. It happens rarely, but it is better safe than sorry.
4. Enable Developer Options
Besides the tool that will be used to unlock the Google Pixel bootloader, you need to set up other features on the mentioned device. You need to enable the Developer Options features, including the OEM Unlocking tool. This procedure is required because you cannot proceed to the bootloader unlocking procedure without enabling the mentioned features. Please perform the steps below to enable the Developer Options feature.
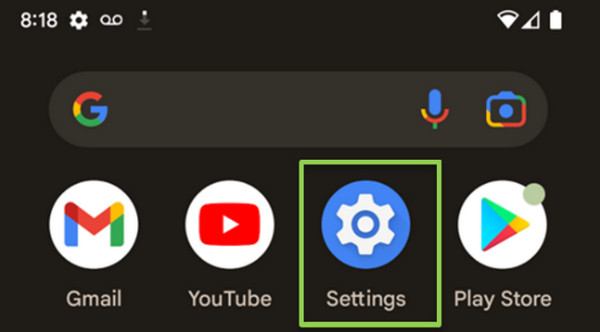
Open the Settings application on the Google Pixel. After that, tap the About Phone button at the bottom. Go to the Build Number section and tap it seven times. The You Are Now 1 Step Away From Being a Developer sign will appear.
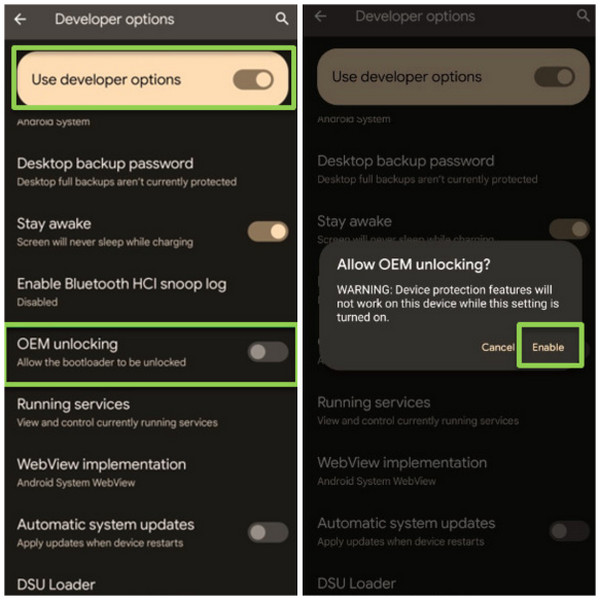
Go back to the main interface of the Settings app. Then, tap the Developer Options button. Toggle the Use Developer Options and the OEM Unlocking sliders at the bottom of the screen. A small window will appear. Tap the Enable button to confirm.
Part 2. [6 Steps] Unlock Google Pixel Bootloader
Now that your Google Pixel is ready, it is time to unlock its bootloader. How to perform the Google bootloader unlock? Please expect demanding steps in this procedure. The reason is that there are multiple tools to install and use. Please follow the steps below as your detailed guide.
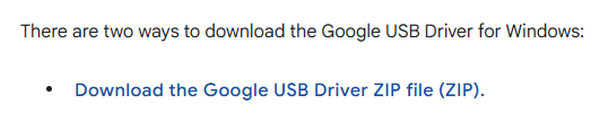
We assume that you have already enabled the Developer Options feature on your Google Pixel. Then, go to the Google Android Developer website and grab the related drivers for your phone. Click the Download The Google USB Driver ZIP File (ZIP) button.
Please extract the usb_driver_r13_windows.zip file. After that, open the Device Manager tool on your Windows device. After that, click the Other Devices button and select the Google Pixel name. Please double-click it to see its properties.
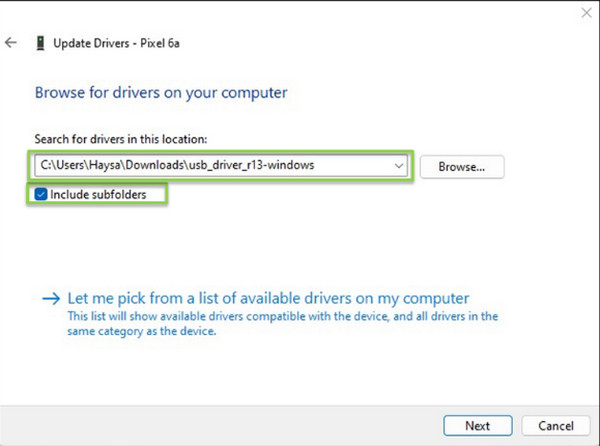
Select the Update Driver button. After that, click the Browse My Computer for Drivers button. Select the location where the USB driver directory is included. Also, ensure that the Include Subfolders box is checked. Click the Next button afterward to proceed.
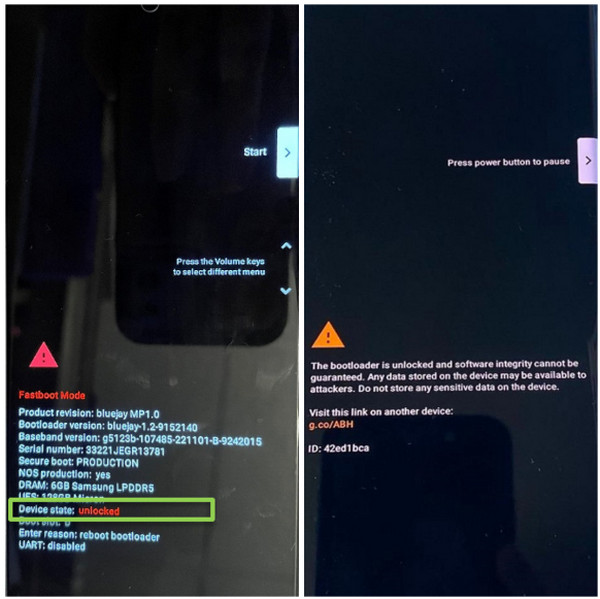
The Update Drivers - Android Bootloader Interface screen will appear. Please follow the on-screen instructions afterward. Restart your Google Pixel. Then, hold down the Volume button to enter Fastboot Mode. Open Command Prompt and type fastboot flashing unlock.

You will see the Do Not Unlock The Bootloader screen. Use the Volume button to see the Unlock The Bootloader screen. You will see the Start screen and select the Start button from the main interface. You will see the Unlocked from the Device Status section.
Finally, the Google Pixel screen will show you the The Bootloader Is Unlocked, And Software Integrity Cannot Be Guaranteed screen. In this state, you do not need to press any buttons because it will be automatically restarted.
Tips: Unlock Google Pixel Screen Without Unlocking Bootloader
As mentioned, unlocking the bootloader on the Google Pixel is risky and demanding. imyPass AnyPassGo is here to help you unlock the Google Pixel if the password is forgotten without unlocking the bootloader! Besides the Google Pixel, this tool supports more famous brands for the unlocking procedure. Huawei, Samsung, LG, HTC, Oppo, Vivo, OnePlus, and more. It is considered a 2-in-1 tool because it can also bypass the Google FRP lock on the mentioned Android phone models.
You will surely love using this tool due to its intuitive interface. Please follow the steps below that are related to using the software.
Please get imyPass AnyPassGo on your computer. To do this, you need to visit its official website. Then, set up the downloaded file based on the requirements. Finally, launch the tool to start the unlocking procedure for your Google Pixel.
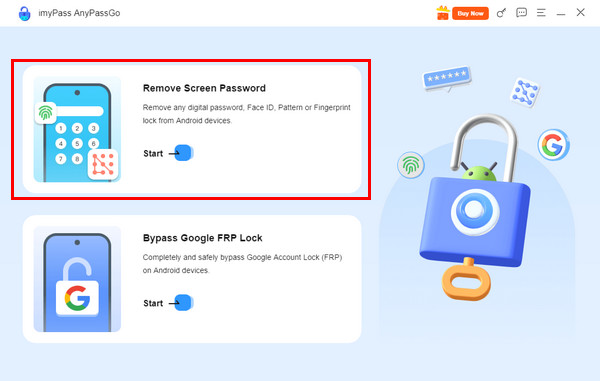
The tool will show you the full description of the two features it contains. Please click the Remove Screen Password button at the top left corner. Wait for the interface to be replaced.
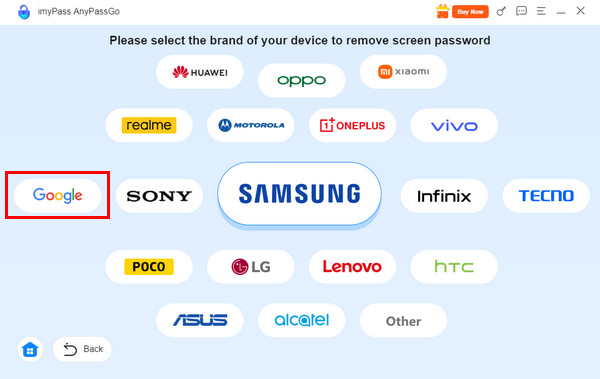
The software will show you its supported Android phone brands. Since you have a Google Pixel, please click the Google button in the center left. Then, you will see the related features for unlocking your Google Pixel.
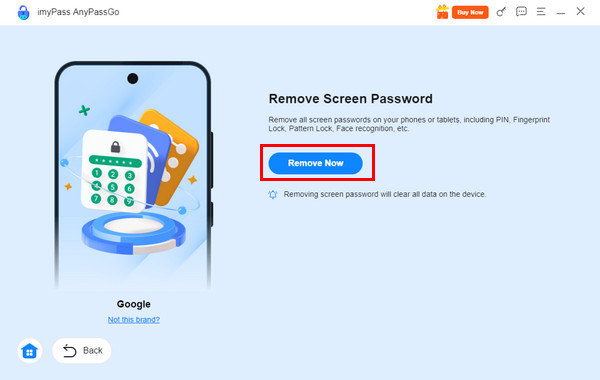
Please plug your Google Pixel into the computer using a USB cable. After that, click the Remove Now button on the right. Later, the tool will start unlocking the Google Pixel, and you need to wait for the process to be completed.
Conclusion
The Google bootloader unlock is the main topic of this article. A detailed guide about it is presented. Also, imyPass AnyPassGo is here to help you unlock the Google Pixel without unlocking the bootloader. Way more convenient, right? You may download the tool to experience it more.

Gideon is a senior editor from imyPass. He is an expert in unlocking phones and computers, and he has written password tutorials in imyPass for 3 years.
Hot Solutions
-
Unlock Android
-
Unlock iOS
-
Password Tips
-
iOS Tips
