How to Factory Reset a Disabled iPhone to Get It Back in Action
![]() Penny Warren Published on June 11, 2025Unlock iOS3-min reading
Penny Warren Published on June 11, 2025Unlock iOS3-min reading
If you type the wrong passcode too many times, your iPhone will get disabled. You only have ten chances to get it right. After that, your screen will lock, and you cannot use your iPhone. But do not panic; there is a way out. We are here to help you factory reset your disabled iPhone. This article will present various ways to fix it, so keep reading to learn all of them!

In this article:
- Part 1: Directly Factory Reset Disabled iPhone on the Security Lock Screen
- Part 2: The Most Efficient Way to Factory Reset a Disabled iPhone
- Part 3: How to Factory Reset a Disabled iPhone with iTunes
- Part 4: How to Factory Reset an iPhone When Disabled via Find My
- Part 5: How to Factory Reset a Disabled iPhone in iCloud.com
- Part 6: Factory Reset Disabled iPhone Using Siri
Part 1: Directly Factory Reset Disabled iPhone on the Security Lock Screen
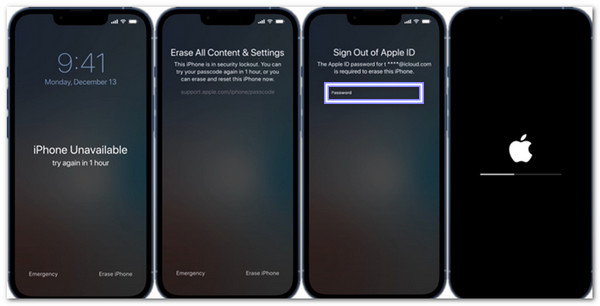
When too many wrong passcodes lock your iPhone, it will show a Security Lockout screen. This feature only works if your iPhone runs iOS 15 or later. With this feature, you do not need a desktop. You need your Apple ID and password. It is the fastest way to reset your iPhone without needing help from iTunes or iCloud. Learn how to factory reset disabled iPhones on the Security Lock Screen below!
Steps for iOS 15.2 to iOS 16
When the Security Lockout screen shows up, tap Erase iPhone at the bottom right.
Tap Erase iPhone again to make sure you want to erase it.
Enter your Apple ID password so the iPhone knows it is you.
Tap Erase iPhone one last time to delete everything and reset your iPhone.
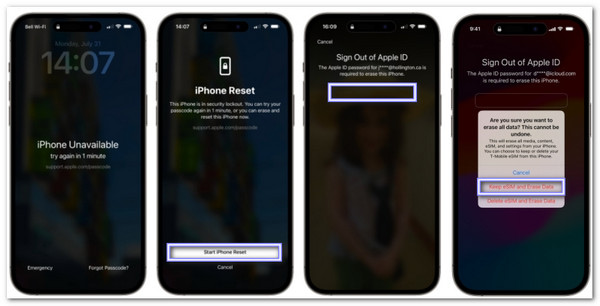
Steps for iOS 17 or later
Enter the wrong passcode until the screen says iPhone Unavailable.
Tap Forgot Passcode, then pick Start iPhone Reset.
Now, put in your Apple ID and password to sign out of the account.
Select Keep eSIM and Erase Data if you still want your phone number, or select Delete eSIM and Erase Data if not.
Part 2: The Most Efficient Way to Factory Reset a Disabled iPhone
Getting locked out of your iPhone can be scary. You may have forgotten your passcode, or the screen just stopped working. Now your phone is stuck. Good thing; there is a fast and safe way to factory reset disabled iPhones, and that is using imyPass iPassGo.
imyPass iPassGo is designed to help users reset any iPhone without a password. You only need one click to wipe the phone clean. It supports the newest iOS devices, like iPhone 17, iPads, and iPods running iOS 26 or iPadOS 26. It works even if you have no tech skills. Just connect your iPhone and follow the screen.
Without further discussion, check out how to factory reset a disabled iPhone using imyPass iPassGo:
What you need to do first is download and install imyPass iPassGo from the main website.
Launch the program. Pick Wipe Passcode, click Start, and plug your iPhone into the desktop using a Lightning cable.
The program will show your iPhone information, like the model, system version, and more. If everything is correct, click Start again to download the firmware package for your iPhone.
After the download, click the Unlock button. A warning message will appear. Please read it and confirm to proceed. You will now be asked to enter 0000 to start wiping your iPhone.
imyPass iPassGo will erase your iPhone and remove the passcode. It takes a few minutes. Once done, your iPhone will restart and return to factory settings, just like new.

Part 3: How to Factory Reset a Disabled iPhone with iTunes
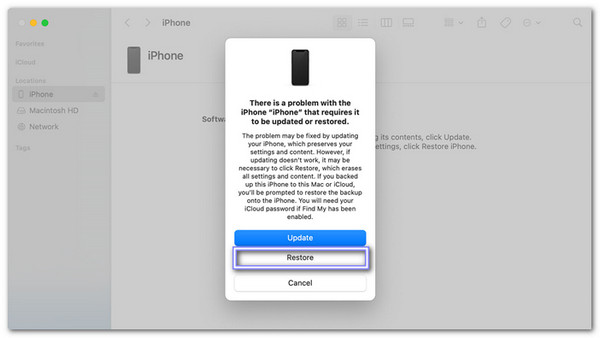
If your iPhone is locked and you have a computer nearby, you can use iTunes (or Finder on Mac) to reset it. It works by putting your device into Recovery Mode. After that, iTunes will let you erase everything and install a clean system. You can also use iTunes to recover data after a factory reset on an iPhone.
Wanna learn how to factory reset an iPhone that is disabled with iTunes? Rely on the tutorial below!
First, turn off your iPhone. Then, plug it into your computer with a USB cable.
Press the right buttons to put your iPhone in Recovery Mode (the buttons depend on your model).
Open iTunes or Finder. A box will pop up. It will ask if you want to Restore or Update.
Click Restore; your computer will erase the phone and install the latest iOS.
Part 4: How to Factory Reset an iPhone When Disabled via Find My
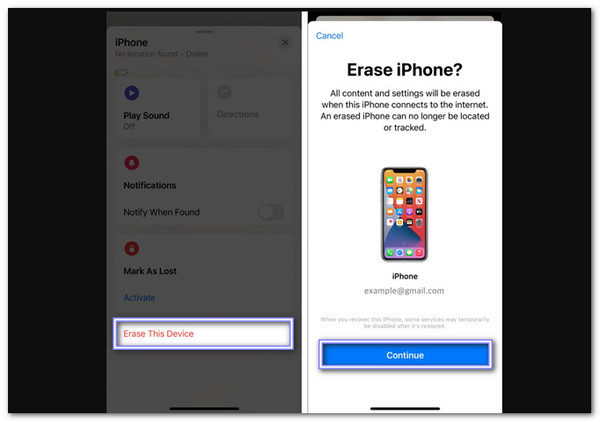
The Find My application helps you manage your Apple devices remotely. If your iPhone is locked, you can use this application from another Apple device to erase it. It only works if Find My iPhone was turned on before it got locked. It is a great way to reset your phone if you cannot access it or use a computer.
Want to try how to factory reset an iPhone when disabled via Find My? Follow these steps!
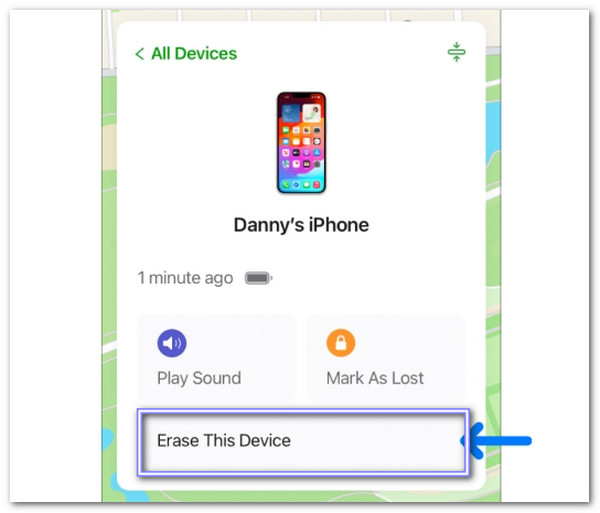
Open the Find My application on another Apple device, then tap Devices at the bottom.
Look for your locked iPhone in the list and tap its name.
Tap Erase This Device, hit Continue, and then tap Erase again.
Type your Apple ID password and confirm by tapping Erase once more.
Part 5: How to Factory Reset a Disabled iPhone in iCloud.com
You can reset your locked iPhone using iCloud.com even without another Apple device. This method works as long as Find My was on before your phone got locked. You need to sign in using a browser. Then, you can erase the iPhone from there. It is easy and works even if your phone is far away.
Learn how to factory reset a disabled iphone on iCloud.com below:
Head to www.icloud.com and log in using your Apple ID and password.
Click on Find iPhone, then go to the top and click All Devices.
From the list, click on the name of your locked iPhone.
Click Erase This Device, confirm your choice, and click Erase again.
Part 6: Factory Reset Disabled iPhone Using Siri
Siri might help you bypass the lock screen, but it only works on older iOS versions. This trick uses a few loopholes to unlock your phone without a passcode. It is not always guaranteed to work, and Apple has fixed it in newer updates. Still, it is worth a try if other methods do not work.
Refer to the steps below to discover how to factory reset a disabled iPhone using Siri:
Hold the Home button to wake up Siri. Ask, "What time is it?" When the clock shows up, tap on it. It takes you to the World Clock screen.
Tap the + in the top-right corner. In the search bar, type anything. Tap and hold the text. Tap Select All, then tap Share, and choose Message.
In the Message box, type something random. Tap the plus + again, then choose Create New Contact. On the next screen, tap Add Photo. It opens the Photos application.
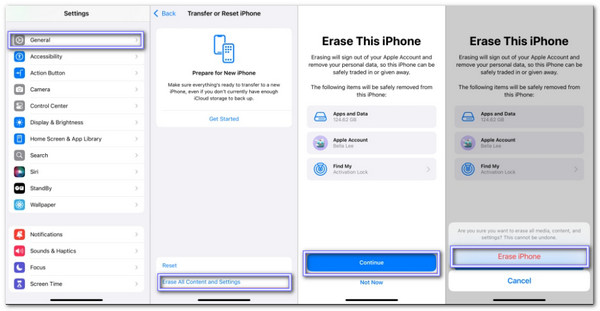
Wait for a few seconds in the Photos application. Then, press the Home button. If it works, your device will be unlocked. Now go to Settings > General > Transfer or Reset iPhone.
Tap Erase All Content and Settings. When it asks you, tap Continue, then tap Erase iPhone again. Type your passcode or Apple ID password when asked. The iPhone will now erase everything. When you see the "Hello" screen, it means the reset worked.
Conclusion
Fixing a disabled iPhone is not as complicated as it seems. You just need to know what to do. So, how do you factory reset an iPhone that is disabled? Now you know the answer. There are many ways to do it. Some need iTunes. Others use settings. But the easiest way is with imyPass iPassGo. It needs no password. Just one click. It works on the newest iPhones, even iPhone 17, and runs well on iOS 26.
Pick what works for you and get your iPhone back!

Penny is a senior editor from imyPass. She has focused on discovering perfect GPS location solutions in all scenarios, and also has experience in fixing computers.
Hot Solutions
-
Unlock iOS
- Review of the Free iCloud Unlock Services
- Bypass iCloud Activation With IMEI
- Remove Mosyle MDM from iPhone & iPad
- Remove support.apple.com/iphone/passcode
- Review of Checkra1n iCloud Bypass
- Bypass iPhone Lock Screen Passcode
- How to Jailbreak iPhone
- Unlock iPhone Without Computer
- Bypass iPhone Locked to Owner
- Factory Reset iPhone Without Apple ID Password
-
iOS Tips
-
Unlock Android
-
Windows Password
