Fix iPod Is Disabled Using the 4 Solutions Available Here for Free
![]() Penny Warren Published on June 17, 2025Unlock iOS3-min reading
Penny Warren Published on June 17, 2025Unlock iOS3-min reading
You reach for your iPod, excited to listen to music or catch up on a podcast, but instead, you are met with a message that says your iPod is disabled. You get locked out if you make several incorrect passcode entries, either because you made a mistake or forgot, and now your phone is locked. While this is an issue many people face, it can be easily fixed with a few straightforward steps. We will help you figure out why your iPod was disabled and show you the best ways to unlock it and resume using it.

In this article:
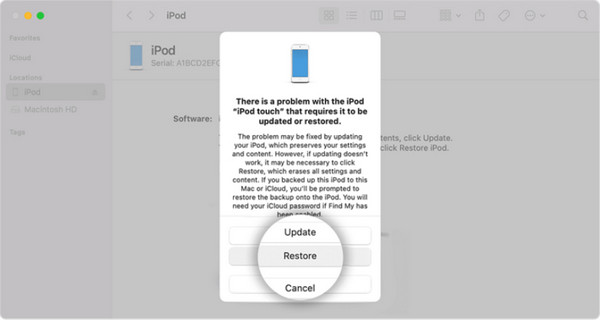
Solution 1: Unlock via iTunes/Finder (Best for Most Users)
It is widely agreed that iTunes or Finder is the best way for most people, as it is official, has strong security, and runs properly across the entire range of Apple devices. If you have a Mac or PC, you can use this solution without having to buy new equipment. Because Apple supports it, you can be sure it works well and is designed for your safety.
For anyone searching for how to unlock a disabled iPod, this is often the first and most recommended option. If your iPod has been backed up or synced before, you will be able to put your content back on after the restore. You can complete it fast, without troubleshooting and have your device operational once more.
Power off your iPod and connect it to your computer using a USB cable.
Enter recovery mode by using the correct button combo for your device. If you own an iPod touch later than the 7th generation, press and hold both the Top or Side button and the Volume Down button until a new screen shows up.
For iPod touch earlier than the 6th generation, press and hold the Top or Side and Home buttons together until you see the recovery screen.
Launch iTunes if you are utilizing a Windows PC or macOS Mojave or earlier. On macOS Catalina and newer, open Finder instead.
Once your iPod appears in the window, click the device icon and choose Restore. Your computer will download the needed software and begin the reset process.
Solution 2: Use iCloud (If Find My iPod Was Enabled)
If you had Find My iPod set up before your iPod was locked, you can erase it remotely using iCloud. It is helpful when you are unable to launch iTunes or Finder, or wish to reset the device without using a cable. By going to iCloud.com and logging in, you can conveniently find your device and wipe it using only your web browser.
Go to iCloud.com using any browser and log in with your ID and password.
Once signed in, click on the Find My feature and wait for the map to load. Then, open the All Devices dropdown and choose your disabled iPod from the list.
In the device details window, select Erase This Device to start removing all content and settings from your iPod.
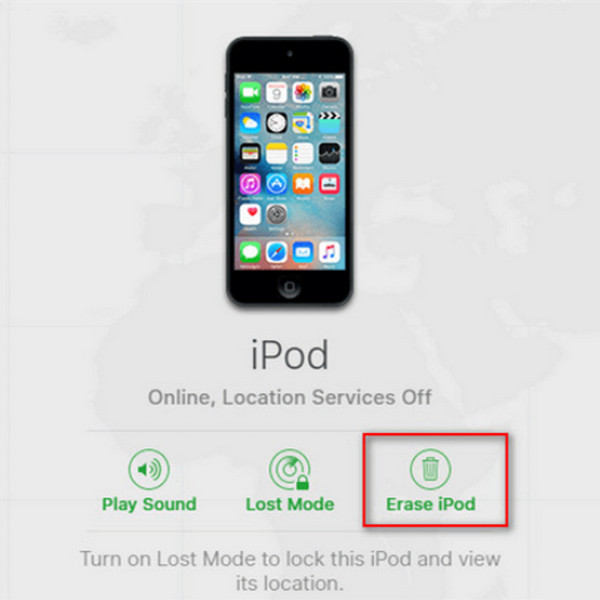
When initiated, type in your Apple ID password to verify your identity, then click Erase iPod again to confirm the action.
For those wondering how to unlock an iPod when it is disabled, this is a reliable option as long as your iPod is connected to Wi-Fi and signed in to your Apple ID. It completely clears your device, removes the passcode, and enables you to set it up again like new or restore it from a backup. If you cannot access your laptop due to a forgotten password, factory resetting allows you to do it remotely without causing any damage.
Solution 3: Recovery Mode (If iTunes Doesn’t Recognize iPod)
Sometimes, iTunes or Finder may not detect your iPod, even when it is connected, leaving you stuck wondering how to open a disabled iPod. To do this, you should force your device into recovery mode, so your computer can at last detect it. Recovery mode allows you to restore or reinstall your iOS without needing to type in your passcode. It becomes really useful when the iPod’s software crashes or when you cannot get a normal reaction from it.
Turn off your iPod by pressing and holding the Top or Side switch until the power-off slider appears to turn it off.
Link your iPod to the computer with a USB cable, then immediately press and hold the correct buttons to enter recovery mode, as we did in Part 1.
Open iTunes or Finder, and your computer will detect the iPod in recovery mode, even if it did not before.
When the prompt appears, saying there is a device in recovery mode, click Restore. These apps will download the latest software, reinstall it, remove the passcode, and fix any system errors. Indicating that a device is in recovery mode, click Restore.
With iPhone recovery mode, you skip the regular connection setup process. After putting the iPod in recovery mode, iTunes or Finder will notice that it needs to be restored. At this point, you can remove the passcode, put on a new operating system and set it up once more. If your iPod fails to respond and seems to be all set, just use this method to enter recovery mode and restart it.
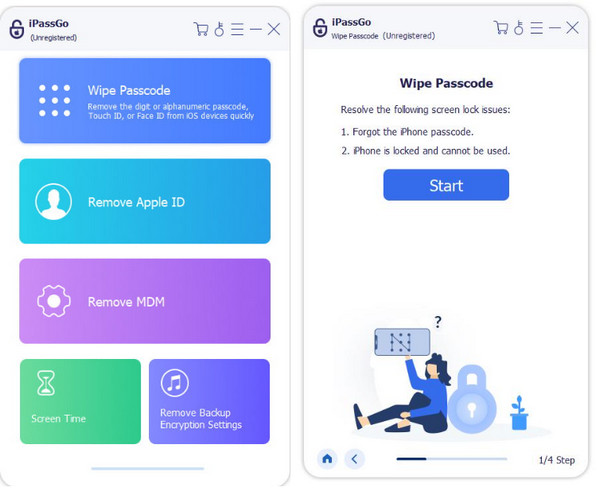
Solution 4: Third-Party Tools (If You Need Data Recovery)
When your iPod is disabled and you want to save your files before wiping it, imyPass can help. It permits you to unlock your iOS device without first risking your personal information. Since iPassGo allows you to skip the passcode screen, it lets you access all your photos, messages and other personal data that could vanish during a simple restore.
imyPass iPassGo first checks if your iPod is in recovery mode and then carefully retrieves and deletes its lock information. Simply attach your device, let the program scan for recoverable data, and follow the on-screen instructions to save what you need. If you need to enter a disabled iPod and want to protect your memories or documents, iPassGo helps with easy, clear steps to do so.
Conclusion
Choosing iTunes/Finder is easy. While iCloud comes in handy when you are not near your computer, you can manage the process on your device as long as you have internet and the device you want to unlock is connected. Recovery mode can fix errors, especially when it is applied when iTunes or Finder are not detecting it, and iPassGo lets you view your information without erasing it.
By following these steps, you will know exactly how to unlock a disabled iPod and be back to enjoying music and apps in no time. Maintain a backup of your data on iCloud or your computer, and select a passcode that you will not forget, as this will help you leave your phone unlocked.

Penny is a senior editor from imyPass. She has focused on discovering perfect GPS location solutions in all scenarios, and also has experience in fixing computers.
Hot Solutions
-
Unlock iOS
- Review of the Free iCloud Unlock Services
- Bypass iCloud Activation With IMEI
- Remove Mosyle MDM from iPhone & iPad
- Remove support.apple.com/iphone/passcode
- Review of Checkra1n iCloud Bypass
- Bypass iPhone Lock Screen Passcode
- How to Jailbreak iPhone
- Unlock iPhone Without Computer
- Bypass iPhone Locked to Owner
- Factory Reset iPhone Without Apple ID Password
-
iOS Tips
-
Unlock Android
-
Windows Password
