Turn Off Stolen Device Protection With or Without Face ID/Touch ID
![]() Samuel Spenser Published on July 11, 2025Unlock iOS3-min reading
Samuel Spenser Published on July 11, 2025Unlock iOS3-min reading
Stolen Device Protection is a security feature in iOS 17.3 and later. It helps keep your iPhone safe if it gets lost or stolen. This feature ensures that only you can turn off certain protections using Face ID or your passcode. However, sometimes people prefer to turn it off for easier use. It can make using the phone more convenient, but also less secure.
Here in this write-up, we will teach you how to turn off Stolen Device Protection on an iPhone. Moreover, we will provide in-depth details on Stolen Device Protection and where to find it in settings.
Let us get started and ensure you understand this feature thoroughly!

In this article:
Part 1: What Is Stolen Device Protection
Let us start with Stolen Device Protection.
When someone steals your iPhone, they might try to change your settings, access your files, or erase your data. That is where Stolen Device Protection helps. It adds an extra layer of protection to safeguard your iPhone from misuse. Even if the thief knows your passcode, they cannot do much without a Face ID or Touch ID. It locks down important actions and helps you keep control over your iPhone.
Purpose
The main goal of Stolen Device Protection is to stop someone from taking over your iPhone after they steal it. A thief might try to change your Apple ID, turn off Find My iPhone, or erase the phone. This feature stops that. It asks for Face ID or Touch ID before making those changes. That way, even if the thief has your passcode, they cannot control your phone or steal your data.
Key Features
Here is what Apple Stolen Device Protection can do:
• It blocks changes to your Apple ID unless Face ID or Touch ID is used.
• You need Face ID or Touch ID to turn off Find My iPhone.
• If you are in a place that is not familiar, it delays access to sensitive settings for up to one hour.
• You can still use your iPhone like normal, but a thief cannot make big changes without your face or fingerprint.
When It Activates
This feature operates automatically in the background once it is enabled. It becomes active anytime your iPhone is taken to a new location you do not often visit. If someone tries to change your iCloud password or settings or remove your account in that new place, the feature kicks in. It may also request Face ID or Touch ID, even in familiar places, when a sensitive setting is being changed.
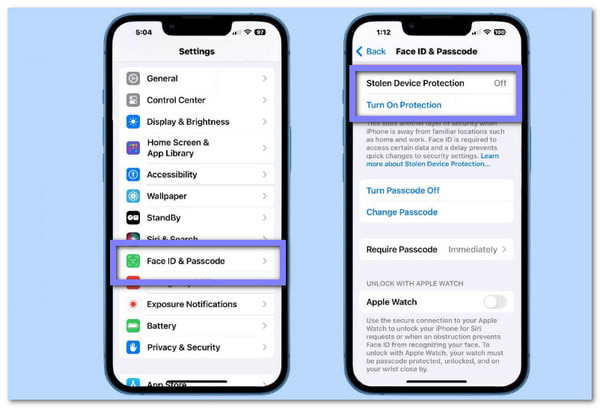
Part 2: Where to Find Stolen Device Protection on iPhone
"Where can I find my Stolen Device Protection exactly on iPhone?"
You do not need to look far to find this setting. Apple placed it inside the Face ID & Passcode menu for easy access. But it is a little hidden, so you need to know where to go. First, unlock your iPhone. Open the Settings app. Then, press Face ID & Passcode. You might have to enter your passcode. After that, scroll down a bit. You will see Stolen Device Protection. Tap it to view or change its settings.
Part 3: How to Turn Off Stolen Device Protection
Suppose you want to disable Stolen Device Protection on your iPhone but are unsure how; you are in the right place. There are two ways to do it. One option is to use Face ID or Touch ID, and the other is if you do not need to use Face ID at all. We will show you both methods, step by step, in a clear and easy-to-follow manner.
1. With Face ID/Touch ID
Disabling Stolen Device Protection on your iPhone is quick and easy if Face ID or Touch ID is still functioning. You do not need to wait or go anywhere. If your iPhone is in a location you frequently use, such as home or work, the steps will only take a minute.
Refer to the steps below to find out how to turn off Stolen Device Protection with Face ID/Touch ID:
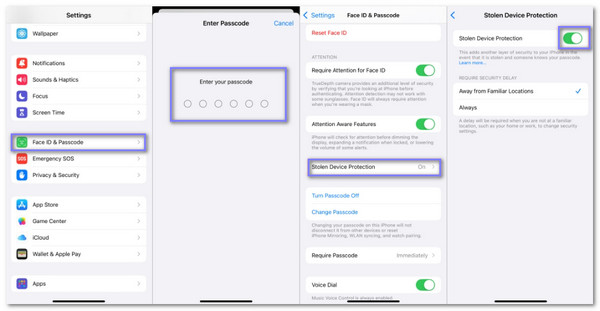
On your iPhone, go to Settings and tap Face ID & Passcode.
Type in your passcode when your iPhone asks for it.
Scroll down until you see Stolen Device Protection, then tap it.
You will see a switch at the top. Turn the switch Off.
Use your Face ID or Touch ID to confirm.
2. Without Face ID
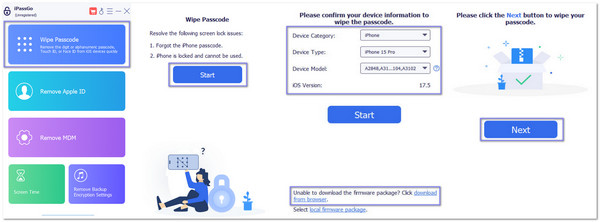
Sometimes, you cannot turn off Stolen Device Protection with Face ID or Touch ID. It may occur if those features are broken or not functioning properly. If that is the case, you do not have to panic. You can still turn it off without Face ID. One tool that can help is imyPass iPassGo.
imyPass iPassGo is an all-in-one iPhone unlock tool. It works on iPhone, iPad, and iPod touch. It can remove screen locks and MDM locks and even disable Stolen Device Protection. You do not need Face ID or Touch ID. You do not need the passcode either. The tool guides you step by step and works with just a computer and a USB cable.
Rely on the steps below to learn how to turn off Stolen Device Protection without Face ID:
Go to the imyPass iPassGo's main website and click the Free Download button. Please save the file, open it, and install the program on your computer. After installing, run the program.
From the main menu, click the Wipe Password option. Now, connect your iPhone or iPad to your computer using a USB cable. Once connected, click the Start button on the screen.
You will see a message pop up on your iPhone or iPad. It will ask you to trust the computer. Tap the Trust button. Then, on your computer, verify that the device information appears correct. If everything looks good, click Next. The tool will now download a special file, called firmware, to help fix your device. This step takes some time, so wait and do not unplug your device.
Once the firmware finishes downloading, you will see the Unlock button. Click it. A small box will appear, asking you to enter 0000. It is to confirm that you want to move on. After typing the number, click Unlock again.
The tool will now start removing the screen lock. It will also turn off Stolen Device Protection. Please keep your device connected until the process is complete. When it finishes, your iPhone will be unlocked.
Part 4: How to Remove Stolen Device Protection Completely
If you want to learn how to remove Stolen Device Protection completely from your iPhone, it is necessary to follow the right steps. This feature was made by Apple to stop thieves from changing security settings, even if they have your passcode. However, if you are the actual owner and the Face ID or Touch ID is functioning properly, you can turn it off correctly. The steps below will help you do it safely, clearly, and without stress.
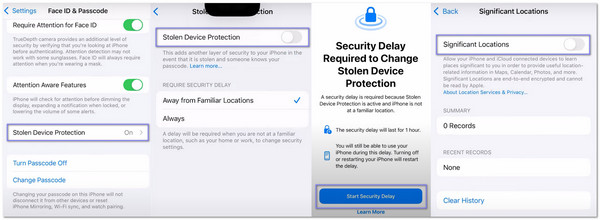
Unlock your iPhone. Go to the Settings from your home screen. Scroll down until you see Face ID & Passcode. Tap on it. Now, enter your iPhone passcode to continue.
Once you are inside, scroll to the bottom. You will see Stolen Device Protection listed there. Tap it. Please tap on the toggle to turn it off. Your iPhone may ask for Face ID or Touch ID.
If your iPhone is not in a familiar location, Apple will start a 1-hour delay. It is normal. It protects you in case your phone is stolen.
Tap Start Security Delay. You can still use your iPhone during this time, but you must wait before turning off the protection. Do not restart your iPhone, or the delay will begin again.
If you do not want to wait an hour, go back to Settings. Tap Privacy & Security, then Location Services. Scroll down and tap System Services. Then, choose Significant Locations. Turn it ONif it is OFF.
After waiting or confirming your safe place, return to Face ID & Passcode. Enter your passcode again. Scroll down, tap Stolen Device Protection, and turn it OFF.
Conclusion
Mastering how to disable Stolen Device Protection on your iPhone helps you take control of your phone's security when you need to turn it off.
If you want to turn off Stolen Device Protection but do not have Face ID or Touch ID working, a tool like imyPass iPassGo can help you unlock your iPhone safely and easily. It makes the process simple, even if you forget your passcode or are unable to use your face or fingerprint.
We hope this guide has made it easy for you to manage your iPhone's protection and keep your phone the way you want it.

Samuel is a senior editor from imyPass. He is an expert on password unlocking. He has over five years of experience writing tutorials on phone unlocking.
Hot Solutions
-
Unlock iOS
- Review of the Free iCloud Unlock Services
- Bypass iCloud Activation With IMEI
- Remove Mosyle MDM from iPhone & iPad
- Remove support.apple.com/iphone/passcode
- Review of Checkra1n iCloud Bypass
- Bypass iPhone Lock Screen Passcode
- How to Jailbreak iPhone
- Unlock iPhone Without Computer
- Bypass iPhone Locked to Owner
- Factory Reset iPhone Without Apple ID Password
-
iOS Tips
-
Unlock Android
-
Windows Password
