How to Change Microsoft Account Name or Windows User Name
![]() Penny Warren Published on September 05, 2025Windows Tips3-min reading
Penny Warren Published on September 05, 2025Windows Tips3-min reading
At the startup of a PC, you need to create a local account or use a Microsoft account. It can protect your data and documents on your hard drive. You may want to change the user name for the login screen on Windows 11/10 or earlier. This guide will explain how-to for both local accounts and Microsoft account names. So that you can update your account name and keep it secure.

In this article:
Part 1: How to Change Microsoft Account Name
Some users want to change the Windows user name, but what they are actually referring to is the Microsoft name appearing on the Word and Excel documents. You can enter the Microsoft website directly and change the username, or enter the change page on Windows Settings.
How to Change Microsoft Account Name Online
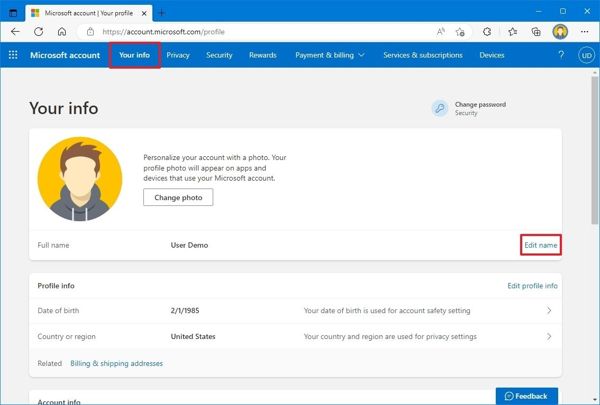
Visit https://account.microsoft.com/ in a browser. Enter your account and password.
Then go to Your info at the top of the screen to enter the Your info window. Click the Edit name button under your current name to continue.
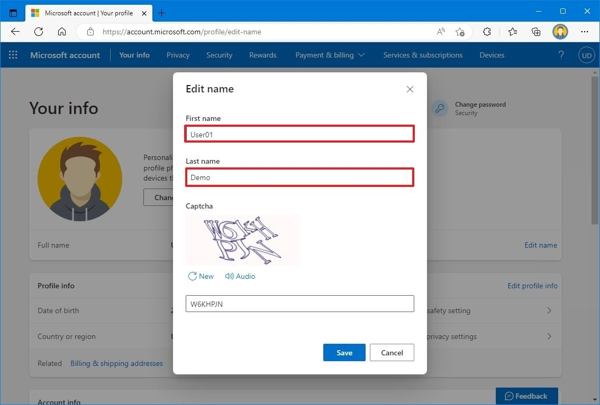
Input a new first name and last name. Enter the captcha according to the image. At last, click on the Save button to confirm it.
Now, power on your PC and check if changing the user name of Windows 10 is successful.
How to Change Microsoft Account Name on PC
To change your user name on Windows 11/10, search for Settings in your Start menu and open the Settings app from the result.
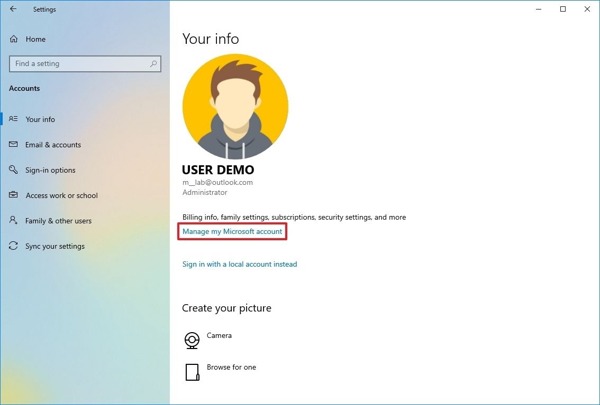
Choose Accounts, and go to the Your info tab from the left side.
Click the Manage my Microsoft account link. Then, the Your info web page will open in your default browser.
Next, follow the on-screen instructions to change the Microsoft account name.
Part 2: How to Change User Name on Windows Control Panel
You can change the user name on Windows 11/10 and earlier for a local account with a few methods. The fundamental way is the Control Panel. This way, you can only modify your account. An administrator account can change standard users.
Go to the Start menu, search for Control Panel, and open it. Or press the Win + R to open the Run dialog, enter the control panel, and hit OK to open the Control Panel directly.
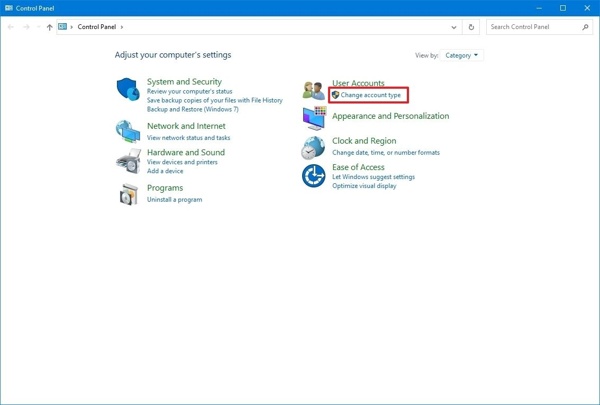
Click the Change account type link under the User Accounts heading. Then, select your local account.
Press the Change the account name button.
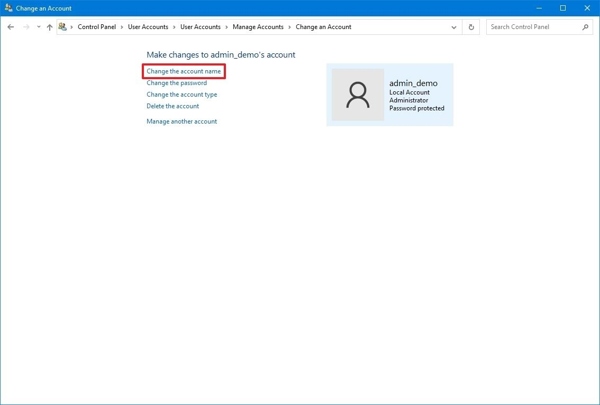
Next, enter a new account name and click the Change Name button to confirm it.
Restart your PC, and you will see the new name on the login screen.
Part 3: Other Ways to Change User Name on Windows
How to Change User Name on Windows 11 User Accounts
The account management tool on Windows allows users to change Windows user names on PCs. Of course, it is only available to local accounts. Moreover, an admin user can change standard accounts. A standard account can only modify its own username.
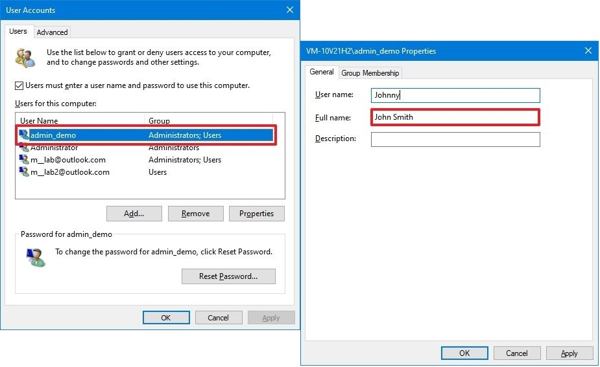
Press Win + R to open the Run dialog, type netplwiz, and click OK to open the legacy account management tool.
Go to the Users tab and highlight the desired account. Click the Properties button to open the following dialog.
Update the User name field to change your account nickname. Then, type the new name in the Full name field.
If you wish to see a nickname instead of your real name, keep the Full name field blank.
Click the Apply button, hit OK, and press OK again.
How to Change Windows 10 User Name by Command Prompt
The command line is another way to change the Windows 11/10/8/7 user name and earlier. Moreover, this way is available if you are locked out of your PC. Here are the steps you can try:
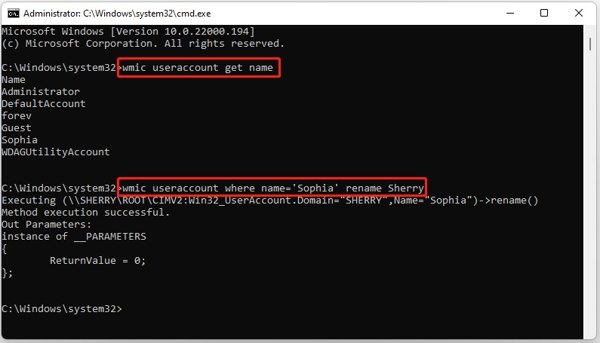
Open the Start menu, search for Command Prompt, right-click on the top result, and choose Run as administrator.
If you are locked off your PC, keep pressing the Shift button while clicking the Power button and choosing Restart. Then, choose Troubleshoot, Advanced options, and Command Prompt.
Type the command wmic useraccount get name, and hit the Enter button to list all local accounts on your PC.
Next, type wmic user account where name="OldAccountName" rename "NewAccountName", and hit Enter. Make sure to replace OldAccountName with the current username and NewAccountName with a new name.
Part 4: How to Change Windows User Name with New Account
The easiest way to change a user name on Windows 11 and earlier is to create a new account. imyPass Windows Password Reset is the best option to complete the job even if you forgot your Windows password.
4,000,000+ Downloads
Add a new account to Windows without logging in.
Create an admin or standard user account on a PC.
Reset forgotten Microsoft passwords easily.
Support Windows 11/10/8/7/XP/Vista.
How to Change Windows User Name Without Login
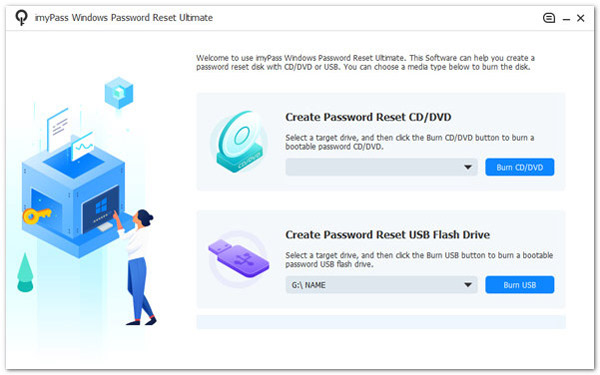
Create a bootable disk
Launch the best Windows user name changing software after installing it on another PC. Insert a blank disk, choose the ROM drive from the drop-down list, and click Burn CD/DVD. To create a Windows password reset disk, connect a flash drive, select it from the drop-down list, and click Burn USB.
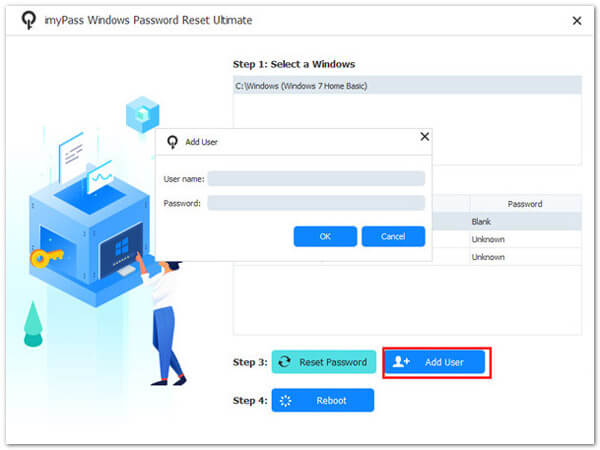
Add a new account
Next, insert the bootable disk or USB into your PC and turn it on. It should boot into the bootable medium. Select your operating system, and click the Add User button. Type a user name and password, and hit OK. Click the Reboot button and log in to the new username.
Conclusion
This guide has demonstrated five ways to change a user name on Windows 10/11 in various situations. Following our guide, you can easily modify the username for a Microsoft account and local accounts. imyPass Windows Password Reset is available when locked out.

Penny is a senior editor from imyPass. She has focused on discovering perfect GPS location solutions in all scenarios, and also has experience in fixing computers.
Hot Solutions
-
Windows Tips
-
Windows Password
-
Fix Windows
-
Password Tips
